There is something especially cheerful about crocheting Christmas decorations by hand. This festive tree duo combines simple shaping, bright buttons and two distinctive decoration styles, making it a rewarding project for confident beginners and experienced crocheters alike. Display the finished trees on a mantelpiece, sideboard or seasonal table, or give them as thoughtful handmade gifts.
What makes this crochet pattern special
The trees are built from flat single-crochet panels, so there is no complicated three-dimensional shaping to master. Gradual increases create the triangular sides, while visible single-crochet seams give each tree structure and definition.
This project is particularly useful for practising:
- Increasing evenly at the beginning and end of rows
- Maintaining straight edges and consistent tension
- Joining flat crochet panels
- Stuffing a shaped decoration
- Crocheting small motifs in rounds
- Positioning surface embellishments evenly
- Combining crochet with simple hand sewing
Although each tree requires several components, those pieces are small and portable. The repeated rows quickly settle into a relaxing rhythm. The three specified yarn colours are enough for a coordinated duo, with remaining yarn potentially available for other small festive decorations.
“The panel construction was much easier than I expected. I counted every increase row, stuffed the points gradually and ended up with two sturdy trees that look lovely from every angle.”
Before you begin
You will crochet two stuffed trees. Each tree requires three matching side panels and one triangular bottom panel. After attaching the lower edges to the base, you will single crochet the side panels together and add stuffing before closing the final seam.
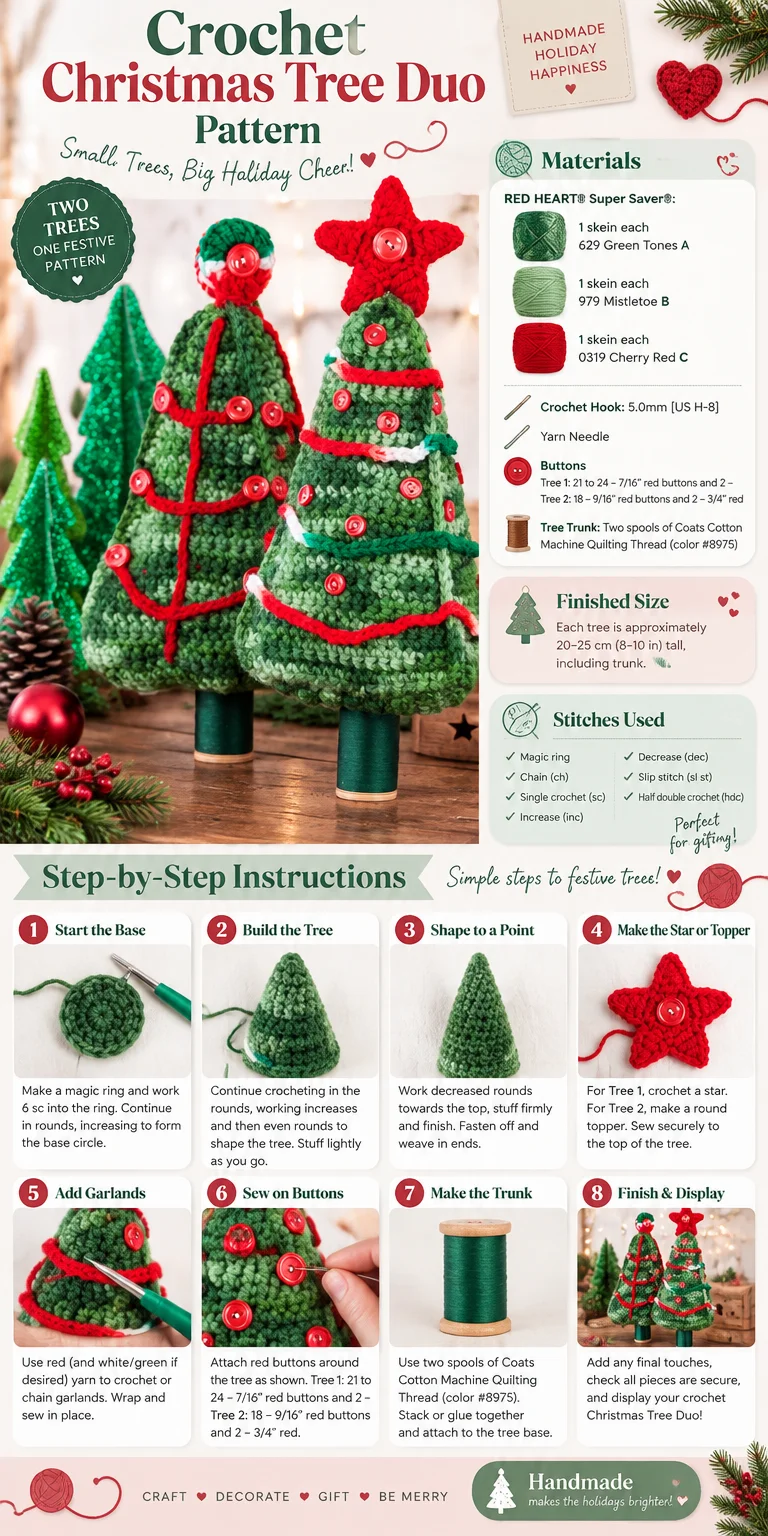
Tree 1 has a three-dimensional star topper, chain garlands and small button ornaments. Tree 2 features a circular topper and chain-stitch branches arranged around central stems. Both trees stand on thread-spool trunks supported by wooden dowels or chopsticks.
The main fabric uses single crochet worked in rows. The embellishments introduce slip stitches, half double crochet and double crochet. This makes the pattern suitable for an advanced beginner who can count stitches, work increases and sew crochet pieces together.
Completion time depends heavily on sewing and embellishment placement. The crochet itself is straightforward, but allow additional time for assembling the six side panels, attaching buttons and letting the glue dry fully.
US crochet terminology is used throughout.
Abbreviations
- ch: chain
- dc: double crochet
- hdc: half double crochet
- sc: single crochet
- sl st: slip stitch
- st(s): stitch(es)
The turning chain does not appear to count as a stitch in the rows. Count the worked single crochet stitches rather than including the chain.
Crochet tools and materials
- 1 skein RED HEART® Super Saver® in 629 Green Tones (A)
- 1 skein RED HEART® Super Saver® in 979 Mistletoe (B)
- 1 skein RED HEART® Super Saver® in 0319 Cherry Red (C)
- 5.0 mm crochet hook (US H-8)
- Yarn needle
- Polyester stuffing
- 21–24 red buttons measuring 7/16 inch for Tree 1
- 2 red buttons measuring 3/4 inch for Tree 1
- 18 red buttons measuring 9/16 inch for Tree 2
- 2 red buttons measuring 3/4 inch for Tree 2
- 2 spools of Coats Cotton Machine Quilting Thread in colour 8975
- 2 wooden dowels measuring 1/8 × 7 1/2 inches, or 1 set of wooden chopsticks
- Sewing needle
- Red sewing thread
- Tacky glue
RED HEART® Super Saver® is an acrylic, medium-weight yarn. If substituting, choose a yarn with similar weight and firmness. A thinner yarn will produce smaller, less substantial trees, while a heavier yarn will enlarge the pieces and may require more stuffing.
Check that each dowel fits securely inside its spool before assembly. If using chopsticks, their diameter may differ, so test the fit and carefully trim them if necessary. Buttons are decorative but can be a choking hazard; these trees should not be treated as toys or placed where young children or pets can pull off small parts.
Step-by-step instructions
Important construction notes
- Make two complete trees.
- Each tree needs three side panels and one bottom panel.
- Make two stars for Tree 1.
- Make two circles for Tree 2.
- Make three centre stems for Tree 2.
- Make three branches in each of the three specified lengths for Tree 2.
- Leave sewing lengths where directed.
- Follow the stated wrong-side and right-side orientation during assembly.
Tree side panels
Make three side panels for each tree, for a total of six.
With yarn A, ch 2.
- Row 1: Work 3 sc in the second ch from the hook. Turn. 3 sc
- Row 2: Ch 1, sc in each st across. Turn.
- Row 3: Ch 1, work 2 sc in the first st, sc in the next sc, then 2 sc in the final st. Turn. 5 sc
- Rows 4–6: Ch 1, sc in each st across. Turn.
- Row 7: Ch 1, work 2 sc in the first st, sc in each st across to the final st, then work 2 sc in the final st. Turn. 7 sc
- Rows 8–27: Repeat Rows 4–7 five times.
- Rows 28–32: Repeat Row 4.
- Fasten off.
The increases should form two balanced sloping edges. If one side looks steeper, recount the row and check that you worked two single crochets into both the first and final stitches of every increase row.
Tree bottom
Make one bottom for each tree.
With yarn A, ch 2.
- Row 1: Work 3 sc in the second ch from the hook. Turn. 3 sc
- Row 2: Ch 1, sc in each st across. Turn.
- Row 3: Ch 1, work 2 sc in the first st, sc in each st across to the final st, then work 2 sc in the final st. Turn. 5 sc
- Row 4: Ch 1, sc in each st across. Turn.
- Rows 5–16: Repeat Rows 3 and 4 six times. 17 sc after Row 16
- Fasten off, leaving a long sewing length.
Assemble and stuff each tree
- Arrange three tree sides around one bottom panel.
- With wrong sides facing, sew the bottom edge of each side panel to one edge of the tree bottom.
- Bring two side panels together with their right sides facing out.
- Single crochet the corresponding edges together.
- Join the next pair of side edges in the same way.
- Begin joining the last two edges, leaving enough space to add stuffing.
- Add stuffing gradually. Push small amounts into the tip and distribute the filling evenly through the body.
- Continue the final single-crochet seam, adding more stuffing as needed before closing it completely.
- Weave in all ends securely.
Avoid packing the tree so tightly that the base bulges. It should feel firm enough to hold its shape while retaining a flat, stable bottom.
Tree 1 star
Make two stars with yarn C.
- Ch 4.
- Join with a sl st in the first ch to form a ring.
- Round 1: Ch 1, work 10 sc into the ring. Join with a sl st in the first sc. 10 sc
- Round 2: Ch 1 and sc in the first sc.
- Ch 5, sc in the second ch from the hook, hdc in the next ch and dc in each of the next 2 ch. Skip the next sc from Round 1, then sc in the following sc.
- Repeat from * around until there are five points, ending the final repeat after skipping the next sc.
- Join with a sl st in the first sc. 5 points
- Fasten off, leaving a sewing length.
- Repeat to make the second star.
Assemble the Tree 1 star
- Place the two stars together with right sides facing.
- Sew around them, matching corresponding stitches and points.
- Position the assembled star at the top of Tree 1 and sew it securely in place.
- Using the sewing needle and red thread, attach one 3/4-inch button to the centre of each side of the star.
- Weave in the remaining yarn ends.
Take care not to pull the sewing thread too tightly, as this can cup the star or distort its points.
Tree 1 garland and buttons
- With yarn B, make four chains of different lengths. Each should be long enough to wrap around its intended part of the tree.
- Fasten off each chain, leaving a sewing length.
- Beginning at either the top or bottom, arrange the garlands around the tree approximately 1 1/2 inches apart.
- Sew the garlands in position. Add a few discreet securing stitches along each chain so it cannot slip.
- Sew the 7/16-inch red buttons between the garlands on every side of the tree.
- Use 21–24 small buttons in total, spacing them as evenly as possible.
Pinning or temporarily tacking all four chains before permanent sewing makes it easier to maintain an even spiral.
Tree 2 circle topper
Make two circles with yarn B.
- Ch 2.
- Round 1: Work 6 sc in the second ch from the hook. Join with a sl st in the first sc. 6 sc
- Round 2: Ch 3; this counts as the first dc. Work 1 dc in the first sc, then 2 dc in each remaining sc around.
- Join with a sl st in the top of the beginning ch-3. 12 dc
- Fasten off, leaving a sewing length.
- Repeat to make the second circle.
Assemble the Tree 2 circle
- Place the circles together with right sides facing.
- Sew around the edges, matching the stitches.
- Sew the assembled circle to the top of Tree 2.
- Using the sewing needle and red thread, attach one 3/4-inch button to the centre of each side.
- Weave in all ends.
Tree 2 centre stems
Make three with yarn C.
- Ch 33.
- Fasten off, leaving a sewing length.
- Repeat twice more.
Tree 2 branches
Make three branches in each length, giving nine branches in total.
- Branch 1: With yarn C, ch 15. Fasten off, leaving a sewing length. Make three.
- Branch 2: With yarn C, ch 19. Fasten off, leaving a sewing length. Make three.
- Branch 3: With yarn C, ch 23. Fasten off, leaving a sewing length. Make three.
Position the Tree 2 stems, branches and buttons
- Centre one 33-chain stem vertically on each side of Tree 2.
- Sew each stem in place.
- Arrange one branch of each length across every stem, creating a triangular tree shape on each panel.
- Sew the branches securely to the surface.
- Attach one 9/16-inch red button at each branch end.
- Use all 18 buttons, with two buttons on each of the nine branches.
Lay out all stems and branches before sewing. This lets you compare the three sides and correct uneven spacing while adjustments are still easy.
Add the trunks
Complete this process for both trees.
- Insert one wooden dowel into the centre opening of a thread spool.
- Check that it sits straight.
- Apply tacky glue to the top of the spool.
- Insert the exposed end of the dowel into the centre bottom of the tree.
- Bring the tree down onto the glued spool so that the spool supports it.
- Adjust the alignment before the glue begins to set.
- Leave the tree upright and undisturbed until the glue is fully dry.
Use only enough glue to form a secure bond. Excess adhesive can spread onto the yarn and leave a stiff, visible patch.
Finished project inspiration
Place the duo together on a mantelpiece, windowsill or entry table. The different decorations make them visually interesting as a pair, while the matching colours keep the display cohesive.
Other suitable uses include:
- Creating a centrepiece for a Christmas dining table
- Adding height to a festive shelf or miniature village display
- Decorating an office desk or reception area
- Giving one tree to each of two friends or relatives
- Presenting the pair as a handmade housewarming gift
- Displaying them at a craft fair as coordinated seasonal décor
- Using several pairs to create a crocheted woodland scene
Because the trees contain buttons, glue, wooden supports and rigid spools, they are decorative objects rather than washable soft toys.
Cleaning and storage
Acrylic yarn itself is generally easy to maintain, but the mixed materials used here require more careful treatment.
- Dust the trees regularly with a clean, soft brush or a lint roller used with very light pressure.
- For small marks, spot-clean the yarn with a damp white cloth and a little mild detergent.
- Do not soak or machine wash the assembled trees. Water may affect the glue, thread spools, wooden dowels and button placement.
- Test for colour transfer before cleaning, particularly around red yarn, buttons and sewing thread.
- Blot moisture rather than rubbing the stitches.
- Allow a cleaned area to air-dry completely away from direct heat.
- Do not iron the acrylic yarn, as high heat can flatten or melt the fibres.
- Store the trees upright in a dry box with enough room around them to protect the toppers.
- Avoid compressing the decorations under heavier items.
- Wrap them in acid-free tissue paper for long-term storage, and keep them away from damp lofts or humid cupboards.
If you clean any crochet components before assembly, follow the yarn label’s latest care instructions.
Tips for success
- Count every increase row. Missing one increase at either edge will make a side panel asymmetrical.
- Mark the right side. Attach a removable stitch marker to the right side of every panel before assembly.
- Keep your tension consistent. Looser panels may stretch during stuffing and no longer match the others.
- Compare panels frequently. Stack the three sides after every few rows to identify differences early.
- Do not skip the first stitch. The ch-1 turning chain does not replace the first single crochet.
- Leave generous sewing tails. Short tails are difficult to secure when attaching small motifs.
- Stuff the top first. Use the blunt end of the hook or a clean dowel to guide small pieces of stuffing into the tip.
- Stuff conservatively near the base. Overfilling can make it difficult to attach the trunk straight.
- Use sewing thread for buttons. It passes through small buttonholes more neatly than yarn.
- Secure buttons individually. If one thread breaks, the remaining decorations will stay attached.
- Check the balance before gluing. Dry-fit the dowel, spool and tree, then view the piece from several angles.
- Protect your work surface. Tacky glue can seep through openings around the spool or base.
Personalise your crochet
A traditional green, mistletoe and red palette creates a classic Christmas look, but the decorative structure lends itself to other colour schemes.
- Use cream, gold and champagne tones for understated festive décor.
- Combine pale green, pink and white for a softer contemporary palette.
- Make the two trees in contrasting shades while retaining matching red embellishments.
- Replace the small red buttons with shatterproof beads or securely sewn felt circles.
- Embroider tiny French knots instead of adding buttons when decorating for households with pets, though the dowel and spool still make the project unsuitable as a toy.
- Add surface embroidery to the star or circle topper.
- Use variegated yarn for the main tree panels and solid colours for the embellishments.
- Add a light dusting of surface slip stitches to suggest snow.
Changing yarn weight or hook size alters the dimensions, firmness and yarn requirement of every component. A larger version also needs a longer, stronger trunk and a broader base to remain stable. For the most predictable result, keep the stated yarn weight and hook size, and customise through colour and surface decoration instead.
Your questions answered
Is this pattern suitable for beginners?
It is best for advanced beginners. The crochet stitches are straightforward, but accurate counting, panel assembly, stuffing and detailed embellishment placement require patience.
How many tree side panels do I need?
Make three side panels for each tree. Since the pattern creates a duo, you need six side panels altogether.
What yarn works best?
A medium-weight acrylic yarn similar to RED HEART® Super Saver® provides the firmness needed for stuffed decorations. Softer yarn may produce panels that stretch or lose definition.
Can I change the hook size?
Yes, but doing so changes the stitch density and finished size. A larger hook creates a looser fabric that may expose the stuffing, while a smaller hook produces a denser and potentially stiffer fabric.
Why do my side panels not match?
The most common causes are missed edge stitches, accidental increases and inconsistent tension. Count at the end of each increase row and stack completed panels to compare their edges.
How do I stop stuffing showing through?
Maintain firm, even tension and avoid overstuffing. If the gaps remain large, restart with a slightly smaller hook rather than pulling the working yarn excessively tight.
Why does my tree lean on its trunk?
The dowel may not be centred, the base may be overstuffed or the spool may be sitting unevenly. Test the complete assembly without glue, adjust it, and only then secure the pieces permanently.
Can I make the trees larger?
You could use heavier yarn and a suitable hook, but the result will require more yarn and stuffing. You would also need to adapt the dowel and spool support so the larger tree remains stable.
Can I omit the buttons?
Yes. Embroidery or small crocheted dots can provide decoration without buttonholes or extra sewing. Keep the overall placement balanced on all three sides.
Can I wash the finished trees?
Do not immerse or machine wash them. The assembled decorations contain glue, wood and cardboard-based thread spools. Spot-clean carefully and let them air-dry.
Can I sell finished trees made from this pattern?
The supplied information does not state commercial-use permission. Check the original designer’s usage and licensing terms before offering finished pieces for sale.
Conclusion
This crochet Christmas tree duo is a satisfying way to practise panel construction while making substantial seasonal décor. Take time over the seams, embellishment spacing and trunk alignment, as careful finishing has the greatest effect on the final appearance.
For more festive inspiration, a compact crochet Christmas tree ornament can complement the larger standing trees. Crocheters who enjoy playful amigurumi may also like the holiday dinosaur crochet pattern bundle, while a crochet Christmas tree hat pattern offers a wearable seasonal project. A broader collection of Christmas craft patterns can help you plan coordinated decorations, and the Christmas Tree Pillow Duo pattern provides another way to carry the tree theme through your festive home.