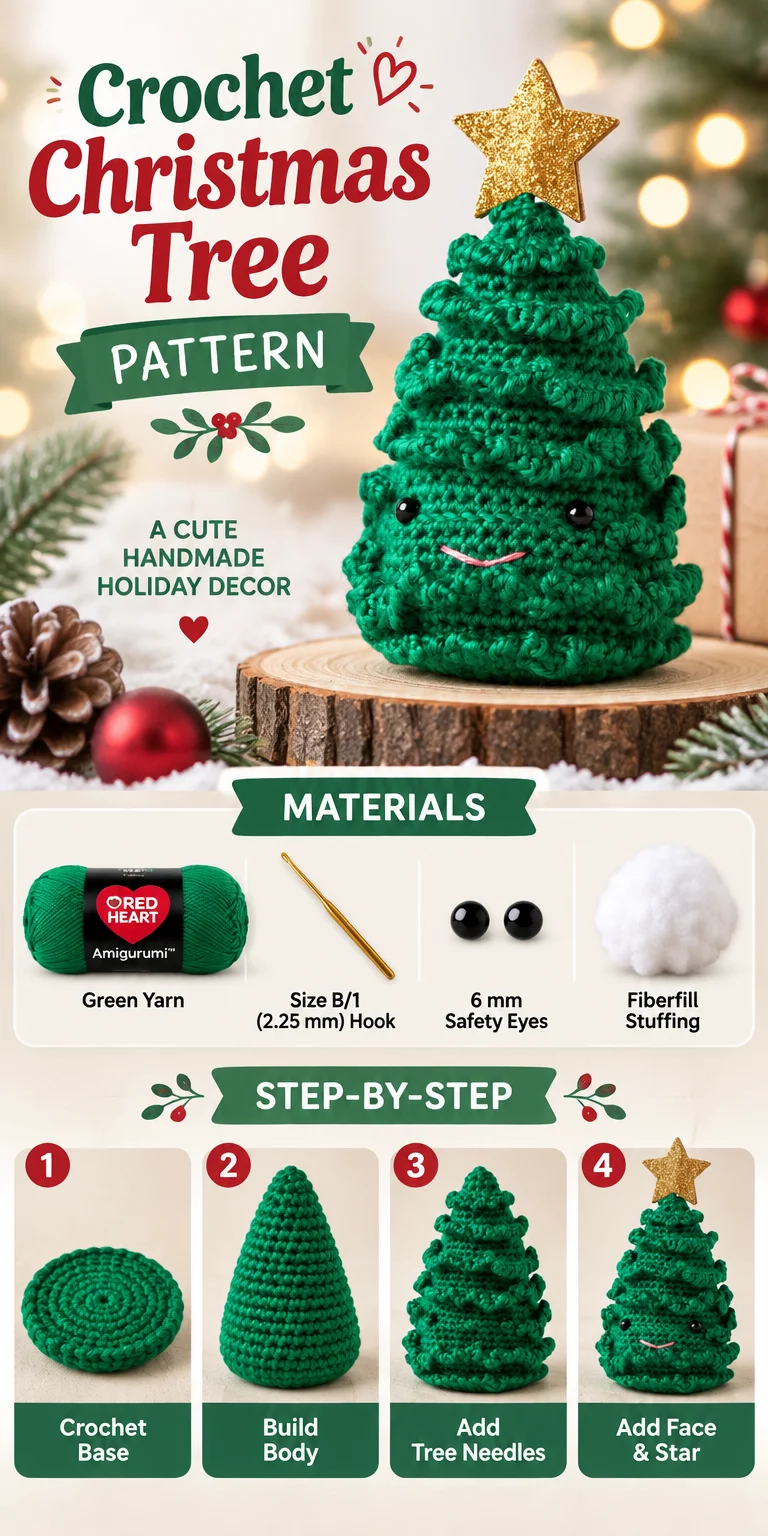
This cheerful amigurumi-style tree combines simple shaping, textured branches and a sweet embroidered face. It is an enjoyable seasonal project for confident beginners who can crochet in continuous rounds, and it makes a charming decoration or handmade Christmas gift.
What makes this crochet pattern special
The tree is worked in one piece from its flat base to its pointed top, so there is very little assembly. Back-loop rounds leave exposed front loops for the decorative needles, giving the tree convincing layers without complicated stitches.
It is also a useful skill-building project. You will practise working in a spiral, increasing, decreasing, changing loops and adding weighted stuffing. The small hook creates a firm fabric that helps prevent the filling from showing.
“The separate needle rounds looked intricate, but they were surprisingly easy. Marking every special round helped me keep the branches evenly spaced.”
How this crochet pattern comes together
First, you crochet a circular base and continue upwards in single crochet. Regular decreases gradually form the conical tree. Selected rounds are worked through the back loops, leaving front loops available for six tiers of chain-loop needles.
Safety eyes, weighted filling and fibre filling are added before the opening becomes too narrow. Once the top is closed, you crochet the needle tiers, embroider a smile and insert the glitter-star topper.
This pattern is best described as suitable for a confident beginner or intermediate crocheter. Allow several relaxed crochet sessions, particularly if you are new to amigurumi shaping.
Abbreviations
- ch: chain
- PM: place marker
- rem: remaining
- rep: repeat
- rnd(s): round(s)
- sc: single crochet
- sc2tog: single crochet two stitches together
- sl st: slip stitch
- sp: space
- st(s): stitch(es)
Work the tree in continuous rounds unless instructed otherwise. Do not join at the end of each round.
Gather these supplies
- 1 ball Red Heart® Amigurumi™ in Santa (9962), 3.5 oz/100 g, 239 yds/219 m; use only the green yarn from the ball
- One US B/1 (2.25 mm) crochet hook, or the size needed to obtain gauge
- One stitch marker
- Fibre filling
- Two 6 mm safety eyes
- A small amount of pink embroidery floss
- One knee-high stocking
- Weighted filling, such as aquarium gravel, plastic pellets or rice
- Two 1½ in (4 cm) self-stick glitter foam stars
- One toothpick
A yarn needle and scissors are also useful for finishing. If substituting yarn, choose a similar-weight yarn that produces dense stitches. A thicker yarn or larger hook will increase the finished size and filling requirement.
Safety eyes, weighted filling and a toothpick are unsuitable for toys intended for babies or young children. For a child-safe version, embroider the eyes and omit the weighted filling and rigid topper.
Step-by-step instructions
Crochet the base
- Chain 2.
- Round 1: Work 6 sc in the second ch from the hook. Do not join. Place a marker to identify the beginning of the round. 6 sc.
- Round 2: Work 2 sc in each of the next 6 sc. 12 sc.
- Round 3: Repeat (1 sc in the next sc, 2 sc in the next sc) 6 times. 18 sc.
- Round 4: Repeat (1 sc in each of the next 2 sc, 2 sc in the next sc) 6 times. 24 sc.
- Round 5: Repeat (1 sc in each of the next 3 sc, 2 sc in the next sc) 6 times. 30 sc.
- Round 6: Repeat (1 sc in each of the next 4 sc, 2 sc in the next sc) 6 times. 36 sc.
- Round 7: Repeat (1 sc in each of the next 5 sc, 2 sc in the next sc) 6 times. 42 sc.
- Round 8: Repeat (1 sc in each of the next 8 sc, 2 sc in the next “sct”) 6 times. 48 sc. The source preserves the word “sct”; treat it as the stated stitch position rather than inventing a correction.
- Round 9 — bottom ridge: Working through the back loops only, work 1 sc in every sc around. The source does not restate the stitch count.
Shape the sides
- Rounds 10–12: Working through both loops, work 1 sc in every sc around.
- Round 13: Working through the back loops only, work 1 sc in every sc around.
- Round 14: Repeat Round 10.
- Round 15: Repeat (sc2tog, 1 sc in each of the next 14 sts) 3 times. 45 sts.
- Round 16: Repeat Round 10.
- Round 17: Repeat Round 13, working through the back loops only.
- Round 18: Repeat (sc2tog, 1 sc in each of the next 13 sts) 3 times. 42 sts.
- Round 19: Repeat Round 10.
- Round 20: Repeat (sc2tog, 1 sc in each of the next 12 sts) 3 times. 39 sts.
- Round 21: Repeat Round 13, working through the back loops only.
- Round 22: Repeat Round 10.
Add the eyes and filling
- Attach the safety eyes between Rounds 21 and 22, approximately 9 stitches apart.
- Put the weighted filling into the toe of the knee-high stocking. Tie or secure it firmly, then place it flat inside the base.
- Add fibre filling around and above the weighted pouch. Stuff firmly, but do not stretch the stitches apart.
- Continue adding small amounts of fibre filling as the tree narrows.
Complete the tree shape
- Round 23: Repeat (sc2tog, 1 sc in each of the next 11 sts) 3 times. 36 sts.
- Round 24: Repeat Round 10.
- Round 25: Repeat Round 13, working through the back loops only.
- Round 26: Repeat (sc2tog, 1 sc in each of the next 4 sts) 6 times. 30 sts.
- Round 27: Repeat Round 10.
- Round 28: Repeat (sc2tog, 1 sc in each of the next 3 sts) 6 times. 24 sts.
- Round 29: Repeat Round 13, working through the back loops only.
- Round 30: Repeat (sc2tog, 1 sc in each of the next 2 sts) 6 times. 18 sts.
- Round 31: Repeat Round 10.
- Round 32: Repeat (sc2tog, 1 sc in the next st) 6 times. 12 sts.
- Round 33: Repeat Round 13, working through the back loops only.
- Round 34: Repeat (sc2tog, 1 sc in the next st) 4 times. 8 sts.
- Finish stuffing the piece, shaping a smooth cone without overfilling the tip.
- Round 35: Work 1 sc in every st around.
- Fasten off, leaving a long tail. Thread the tail through the remaining stitches, pull the opening tightly closed and fasten securely.
Crochet the tree needles
The needles are worked into the unused front loops of Rounds 13, 17, 21, 25, 29 and 33. Hold the tree with its tip facing down while working.
- First needle tier: Join green yarn with a sl st in any front loop of Round 13. Repeat ch 3, sl st in the front loop of the next st around. Place the final sl st in the same space as the first sl st. Fasten off.
- Second needle tier: Join yarn in any front loop of Round 17. Repeat Step 41 and fasten off.
- Third needle tier: Do not work needles across the face on Round 21. Join yarn in the front loop of the second stitch from the outer edge of one eye.
- Work around the side and back towards the other eye, repeating ch 3, sl st in the front loop of the next st. Stop one front loop before the second eye and fasten off.
- Fourth needle tier: Join yarn in any front loop of Round 25. Repeat Step 41.
- Fifth needle tier: Join yarn in any front loop of Round 29. Repeat Step 41.
- Sixth needle tier: Join yarn in any front loop of Round 33. Repeat Step 41.
- Weave in all ends securely, taking care not to flatten the textured needles.
Add the smile and star
- Separate four strands from the six-strand pink embroidery floss.
- Embroider a small, upturned arc spanning five stitches to make the mouth. Secure the floss inside the tree where possible.
- Lay one glitter foam star with its adhesive side facing up.
- Position one end of the toothpick in the centre of the star.
- Place the second star adhesive-side down over the first. Align the edges and press firmly so the toothpick is held between them.
- Insert the exposed end of the toothpick into the top of the tree.
Finished project inspiration
Display the finished tree on a mantelpiece, bookshelf, desk or Christmas table. Its weighted base makes it particularly useful in arrangements where a lighter stuffed ornament might topple.
It also works well as:
- A handmade host or teacher gift
- Part of a miniature winter village
- A festive place-setting decoration
- A seasonal craft-fair item, subject to the designer’s usage terms
- The centrepiece of a collection made in different shades of green
Keep the decoration out of reach of small children and pets because it contains small parts, weighted material and a pointed toothpick.
Cleaning and storage
Follow the yarn label’s care instructions, as fibre content and colourfastness affect safe cleaning. Because this project contains weighted filling, adhesive foam and a toothpick, do not put the completed tree in a washing machine or tumble dryer.
For routine care, dust it gently with a soft brush or use a lint roller with very light pressure. If necessary, spot-clean the crochet with cool water and mild detergent. Avoid soaking the weighted pouch, eyes or star. Blot moisture with a towel, reshape the tree and allow it to air-dry fully.
Store the tree upright in a cool, dry box. Avoid crushing the needle tiers, and keep tissue around the topper so the star does not bend or stick to nearby decorations. If rice was used as weight, moisture-proof storage is especially important.
Tips for success
- Move the marker every round. Continuous rounds have no visible join, making it easy to lose the starting point.
- Count after each shaping round. An omitted increase or decrease can make the tree lean.
- Keep back-loop rounds loose enough to identify. You will need their exposed front loops when adding the needles.
- Mark special rounds temporarily. Spare yarn markers on Rounds 13, 17, 21, 25, 29 and 33 make them easier to find later.
- Use a dense fabric. If filling shows between stitches, switch to a smaller hook rather than pulling each stitch excessively tight.
- Make a sealed weight pouch. Double-check the stocking for holes before adding gravel, pellets or rice.
- Add fibre filling gradually. Small pieces give a smoother surface than one large wad.
- Keep the face clear. On Round 21, work the needles only around the sides and back as instructed.
- Check eye placement before attaching the washers. Safety-eye backs are difficult to remove once fitted.
- Shape as you stuff. Keep the base flat and distribute filling evenly around the weighted pouch.
Personalise your crochet
Use deep forest green for a traditional tree, pale sage for Scandinavian-style décor or white for a snowy version. You can also embroider tiny French knots as baubles, provided they remain light enough not to distort the fabric.
For an adult-only decoration, small beads or sequins may be sewn securely between the needle tiers. Avoid adding detachable embellishments if the tree could reach children or pets.
A different yarn thickness can produce a larger or smaller tree, but it also changes the fabric density, yardage and amount of filling required. Choose a hook that makes tight, stuffing-proof stitches. Altering the number of rounds or shaping repeats requires recalculating the decreases and branch placement, so a straightforward yarn-and-hook change is safer than modifying the stitch structure.
You could also replace the glitter stars with felt stars stitched together around the toothpick. If you omit the toothpick for safety, sew a soft stuffed star directly to the tip instead.
Your questions answered
Is this pattern suitable for beginners?
It suits confident beginners who already know chain, single crochet, slip stitch and basic decreases. Working in continuous rounds and identifying front and back loops are the main challenges.
How much yarn is required?
The pattern calls for one ball of Red Heart® Amigurumi™ in Santa (9962), using only its green yarn. Exact consumption is not stated.
Why are some rounds worked through the back loops?
Back-loop crochet leaves the front loops exposed. Those loops later anchor the chain-3 needles that create the layered branch texture.
Can I use a different hook size?
Yes, if necessary to create a dense fabric. A larger hook generally makes a bigger, softer tree and may expose the filling. A smaller hook makes a firmer, potentially smaller result.
What can I use for weighted filling?
Aquarium gravel, plastic pellets or rice are suggested. Seal the chosen material inside the toe of a knee-high stocking before inserting it. Plastic pellets tolerate humidity better than rice, although the finished decoration should still be kept dry.
How can I make the tree safe for a young child?
This version is designed as décor rather than a baby toy. For a safer adaptation, embroider the eyes, omit the weighted material and toothpick, and attach a soft sewn topper. Always consider the yarn, embellishments and intended age.
Why is the base curling?
A little movement during the increase rounds can be normal. Check that you have not missed increases, maintain relaxed tension and press the finished base flat while distributing the weighted pouch evenly.
Can I sell trees made from this pattern?
The supplied instructions do not state licensing permissions. Check the original designer or publisher’s usage terms before selling finished pieces, and do not reproduce or distribute the written pattern without permission.
Conclusion
This design is a rewarding way to practise amigurumi shaping while making useful festive décor. For further inspiration, browse these free crochet Christmas tree patterns or compare the techniques in these Christmas tree patterns and tutorials.
If you prefer a two-dimensional ornament, this flat Christmas tree appliqué pattern offers a different construction method. You can also explore another free crochet Christmas tree design or try an easy crochet Christmas tree pattern when building a coordinated handmade display.