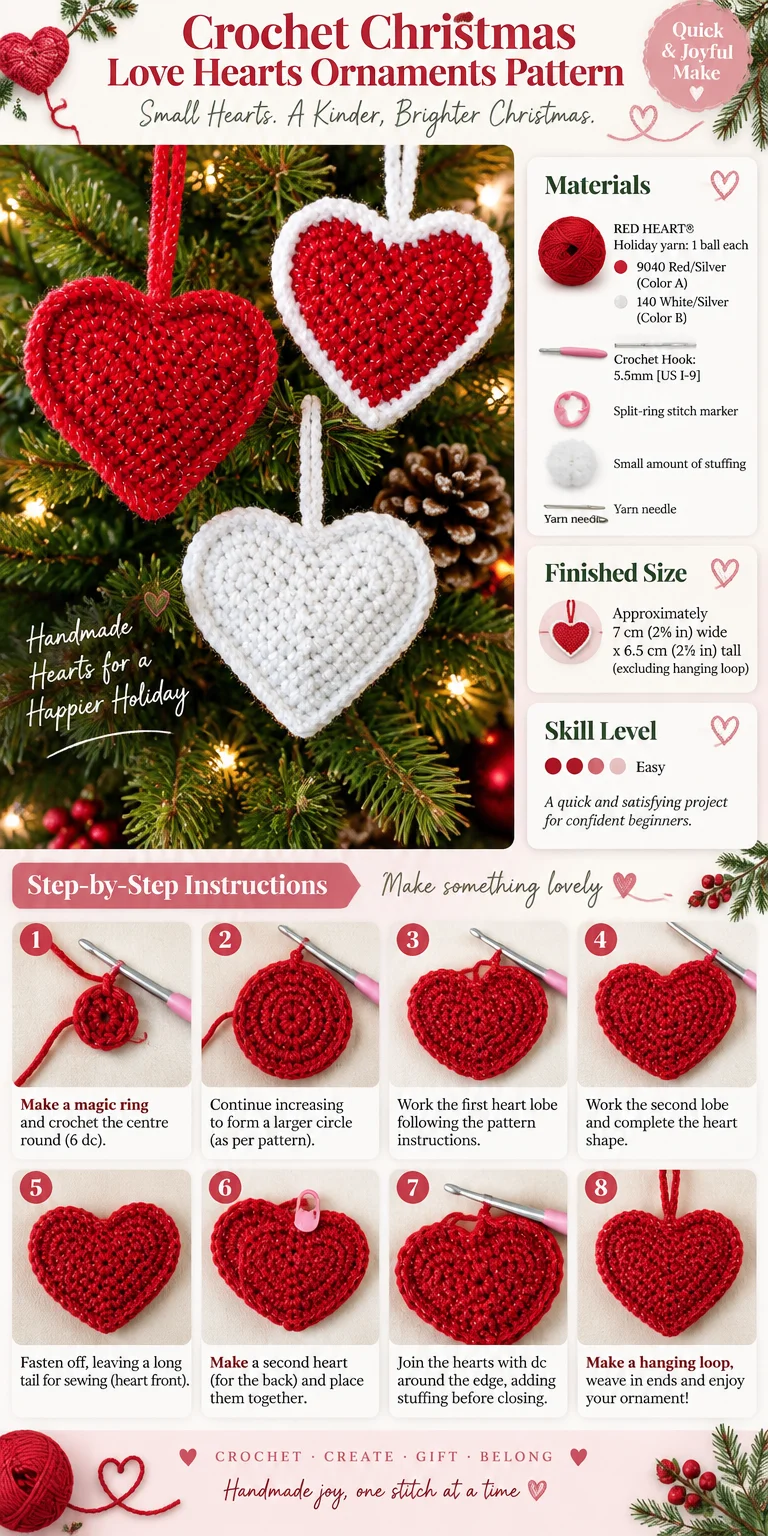
There is something especially satisfying about crocheting a decoration that looks polished but uses only simple stitches. These lightly stuffed heart ornaments are worked in red-and-silver and white-and-silver yarn, giving them a festive sparkle. They suit confident beginners who can crochet into both sides of a foundation chain, and they make an enjoyable portable project for Christmas decorating or gifting.
Why you’ll love this pattern
Each ornament consists of two flat heart panels joined around the edge. The construction offers useful practice in shaping with increases, creating the centre dip with skipped stitches and forming a defined point with a chain space.
The hearts are small enough to finish relatively quickly, although the exact time depends on your experience. You can work the panels wherever you have space for a hook and one ball of yarn, then complete the stuffing and assembly at home.
The three suggested colour arrangements create a coordinated set:
- One red-and-silver heart
- One white-and-silver heart
- One reversible heart with a panel in each colour
Their built-in hanging loops make them suitable for trees, garlands, wreaths and gift wrapping. Although one ball of each specified colour is listed, the individual ornaments use relatively little yarn.
“The shaping became easy once I marked the beginning and counted after every round. I particularly liked that the hanging loop was added while joining, so there was no separate cord to sew on.”
Crochet process explained
You will make three stuffed heart ornaments. Each one begins with a chain of 15. Rather than working in rows, you crochet around both sides of that foundation chain to establish the heart shape.
Four rounds create each front and back panel. Increases form the rounded lobes, skipped stitches sharpen the indentation at the top and a chain-2 space establishes the bottom point. The corresponding panels are then held with their wrong sides together and joined with single crochet.
During the joining round, you will also make a chain-20 hanging loop and add a small amount of stuffing. A final round of slip stitches gives the edge a tidy, slightly firmer finish.
This is best described as an easy or confident-beginner pattern. The stitches themselves are basic, but accurate counting and recognising the unused loops of the starting chain require attention. Each heart can reasonably be treated as a short project, but no fixed completion time applies because working speed varies.
What you’ll need
- 1 ball RED HEART® Holiday yarn in 9040 Red/Silver, designated Colour A
- 1 ball RED HEART® Holiday yarn in 140 White/Silver, designated Colour B
- One 5.5 mm crochet hook, US I-9
- One split-ring stitch marker
- A small amount of stuffing
- One yarn needle
The metallic effect is part of the original festive appearance. If the specified yarn is unavailable, select a yarn with a comparable weight and check the label for fibre and care information. A different yarn weight or hook size may alter the dimensions, firmness and amount of stuffing required.
Step-by-step instructions
Abbreviations
- ch: chain
- sc: single crochet
- st/sts: stitch/stitches
- slip st: slip stitch
Numbers following a dash give the completed stitch count. Chains are not included in those totals unless the instructions state otherwise.
Heart 1: Front
With Colour A, ch 15.
Round 1: Work 3 sc in the second ch from the hook. Sc in each of the next 5 ch. Skip the next 2 ch. Sc in each of the next 5 ch, then work 3 sc in the next ch.
Turn the work so you can crochet along the unused loops on the opposite side of the beginning chain. Sc in each of the next 5 ch. Work (sc, ch 2, sc) in the ch-2 space created by the two skipped chains. Sc in the last 5 ch. 28 sc
Round 2: Work 2 sc in each of the next 3 sts. Sc in the next 4 sts. Skip the next 2 sts. Sc in the next 4 sts. Work 2 sc in each of the next 3 sts. Sc in the next 6 sts. Work (sc, ch 2, sc) in the ch-2 space. Sc in the last 6 sts. 34 sc
Round 3: Repeat (2 sc in the next st, sc in the next st) 3 times. Sc in the next 3 sts. Skip the next 2 sts. Sc in the next 4 sts. Repeat (2 sc in the next st, sc in the next st) 3 times. Sc in the next 6 sts. Work (sc, ch 2, sc) in the ch-2 space. Sc in the last 7 sts. 40 sc
Round 4: Sc in the next st. Repeat (2 sc in the next st, sc in each of the next 2 sts) 3 times. Sc in the next st. Skip the next 2 sts. Sc in the next 3 sts. Repeat (2 sc in the next st, sc in each of the next 2 sts) 3 times. Sc in the next 7 sts. Work (sc, ch 2, sc) in the ch-2 space. Sc in the last 8 sts. 48 sc
Fasten off.
Heart 1: Back and assembly
With Colour A, repeat Rounds 1–4 exactly as for the front. Do not fasten off after Round 4.
Place the front and back together with their wrong sides facing. Align the top indentation, rounded lobes and bottom chain spaces. Work the following round through both layers.
Round 5: Sc in the next 14 sts. Ch 20, then slip st in the 20th ch from the hook to form the hanging loop. Sc in the next 23 sts. Work 3 sc in the ch-2 space.
Add a small amount of stuffing, distributing it evenly without overfilling. Sc in the last 9 sts to close the opening.
Round 6: Slip st in every sc around.
Fasten off and weave in the ends securely.
Heart 2
With Colour B, repeat all instructions for Heart 1. Both panels, the joining round and the hanging loop are worked in white-and-silver yarn.
After Round 6, fasten off and weave in the ends.
Heart 3
With Colour A, make the front by repeating Rounds 1–4 of the Heart 1 front. Fasten off.
With Colour B, make the back by repeating Rounds 1–4, but do not fasten off after Round 4.
Hold the panels with the wrong sides together. Using Colour B, repeat Rounds 5 and 6 to join, stuff and edge the ornament.
Fasten off and weave in all remaining ends.
Finished project inspiration
Hang the completed hearts individually on a Christmas tree, or space them along a crocheted chain to make a garland. They also work well when tied to a wreath, door handle or festive table favour.
For gift presentation, use a heart in place of a disposable bow. The recipient can remove it and keep it as an ornament. A set of three makes a thoughtful stocking filler, host gift or handmade addition to a Christmas hamper.
If making them for a craft stall or handmade shop, present the coordinated trio together and state the materials used. As stuffed decorations can pose risks if small parts or loose fibres become accessible, treat them as décor rather than toys unless you have ensured compliance with all relevant safety requirements.
Cleaning and storage
Check the yarn-band directions before washing, as those instructions take priority. Metallic yarns and stuffing generally benefit from gentle handling.
- Spot-clean light marks with cool water and a mild detergent.
- If fuller washing is permitted by the yarn label, place the ornament in a mesh laundry bag and choose a delicate cycle, or wash it gently by hand.
- Avoid twisting or wringing, which may distort the point and rounded lobes.
- Press out moisture between clean towels.
- Reshape the heart and dry it flat.
- Keep it away from high heat, which can affect synthetic fibres and stuffing.
- Test red yarn for colour transfer before washing it alongside pale decorations.
- Store the hearts clean and completely dry in a box that will not crush them.
Strong wet blocking is unlikely to be necessary. Gentle reshaping should be enough, particularly because the stuffing supports the finished outline.
Common mistakes to avoid
- Mark the start of each round. The design is worked continuously, so a split-ring marker makes the round boundary easier to find.
- Count every round. You should have 28, 34, 40 and 48 single crochet stitches after Rounds 1–4 respectively.
- Keep the centre skips aligned. Skipping the specified two stitches creates the top indentation. Missing this step will produce an oval rather than a heart.
- Do not crochet into the chain-2 space as an ordinary stitch. Work the complete
(sc, ch 2, sc)group into that space to maintain the bottom point. - Use even tension around the starting chain. Tight stitches can make the centre pucker, while loose stitches may leave visible gaps.
- Align both panels before joining. Pinch the matching points together and confirm that the lobes sit evenly.
- Stuff lightly. Too much filling stretches the stitches, rounds off the point and can make the edge ripple.
- Secure metallic yarn carefully. Weave each tail through several stitches in more than one direction rather than trimming it close to the fabric.
- Keep the loop chain relaxed but tidy. Excessively tight chains may twist or shorten the hanger.
Personalise your crochet
Try traditional red and green, winter white and blue, or neutral cream and gold. A front and back in contrasting colours produce a reversible ornament, as demonstrated by Heart 3.
You can embroider initials, a date or simple snowflake details onto a panel before assembly. Sewn-on beads can add sparkle to adult décor, but they are unsuitable where children or pets might pull them free.
For a contrasting edge, complete the panels in one colour and use another for Rounds 5 and 6. If you choose a textured or fluffy yarn, stitch definition may be harder to see, particularly at the centre indentation.
Changing the yarn weight and hook together can alter the ornament’s size. Thicker yarn should create a larger, bulkier heart and will require more filling; finer yarn should produce a smaller heart. Because no alternative stitch counts are supplied, changing the number of foundation chains is not a straightforward size adjustment and would require recalculating the shaping.
Your questions answered
Is this heart ornament pattern suitable for beginners?
It is suitable for a confident beginner familiar with chains, single crochet and slip stitches. Working around both sides of a starting chain and following shaped rounds may be challenging for someone completing their very first project.
Why does the pattern skip two stitches at the top?
Those skipped stitches pull the fabric inward to form the heart’s centre indentation. Keep the skips centred and do not replace them with chains.
What should I do if my stitch count is wrong?
Stop and recount the current round in small sections. Check the repeated increase groups, the two skipped stitches and the stitches worked around the chain-2 space. Correcting the error before beginning another round prevents mismatched panels.
Can I use ordinary yarn instead of metallic holiday yarn?
Yes, provided it has a comparable weight. The ornament will lose some sparkle, and a different fibre may alter its texture. Make both matching panels with the same yarn type so they align during assembly.
Can I use a different hook size?
You can, but it will affect the dimensions and fabric density. A larger hook generally creates a looser, larger heart; a smaller hook creates a denser, smaller one. The fabric should be firm enough to conceal the stuffing without becoming difficult to work.
Why is my heart curling?
Slight curling can occur while the panel is incomplete. Severe curling often indicates tight tension, missed increases or an incorrect stitch count. Lay the panel flat after every round and verify the totals before continuing.
How much stuffing should I add?
Use only enough to give the heart a soft, gently padded shape. Stop if the stitches begin to spread or the edges become distorted.
Can I make the hanging loop longer?
Yes. Add chains to the loop in Round 5, then join it in the corresponding chain rather than the stated 20th chain. A longer loop may stretch more, especially in a soft yarn.
Can finished ornaments made from this pattern be sold?
The supplied instructions do not state commercial-use permissions. Check the original designer or publisher’s current usage terms before selling finished pieces, and do not reproduce or distribute the written pattern without permission.
How should I wash the ornaments?
Follow the yarn label. Gentle spot-cleaning is usually the safest choice, followed by reshaping and flat drying. Avoid heat and vigorous agitation.
Conclusion
These stuffed hearts combine straightforward stitches with thoughtful shaping, making them an appealing seasonal project once you are comfortable counting rounds. For the publisher’s reference, consult the free Red Heart Christmas Love Hearts ornament pattern.
If you want to practise the shape before starting the stuffed set, this guide to crocheting a heart explains the general form, while this collection of quick and versatile crochet heart patterns offers further inspiration.
For another dimensional approach, consider this Christmas heart amigurumi pattern. You can also browse these cosy crochet ornament ideas for the holidays when planning a coordinated handmade tree.