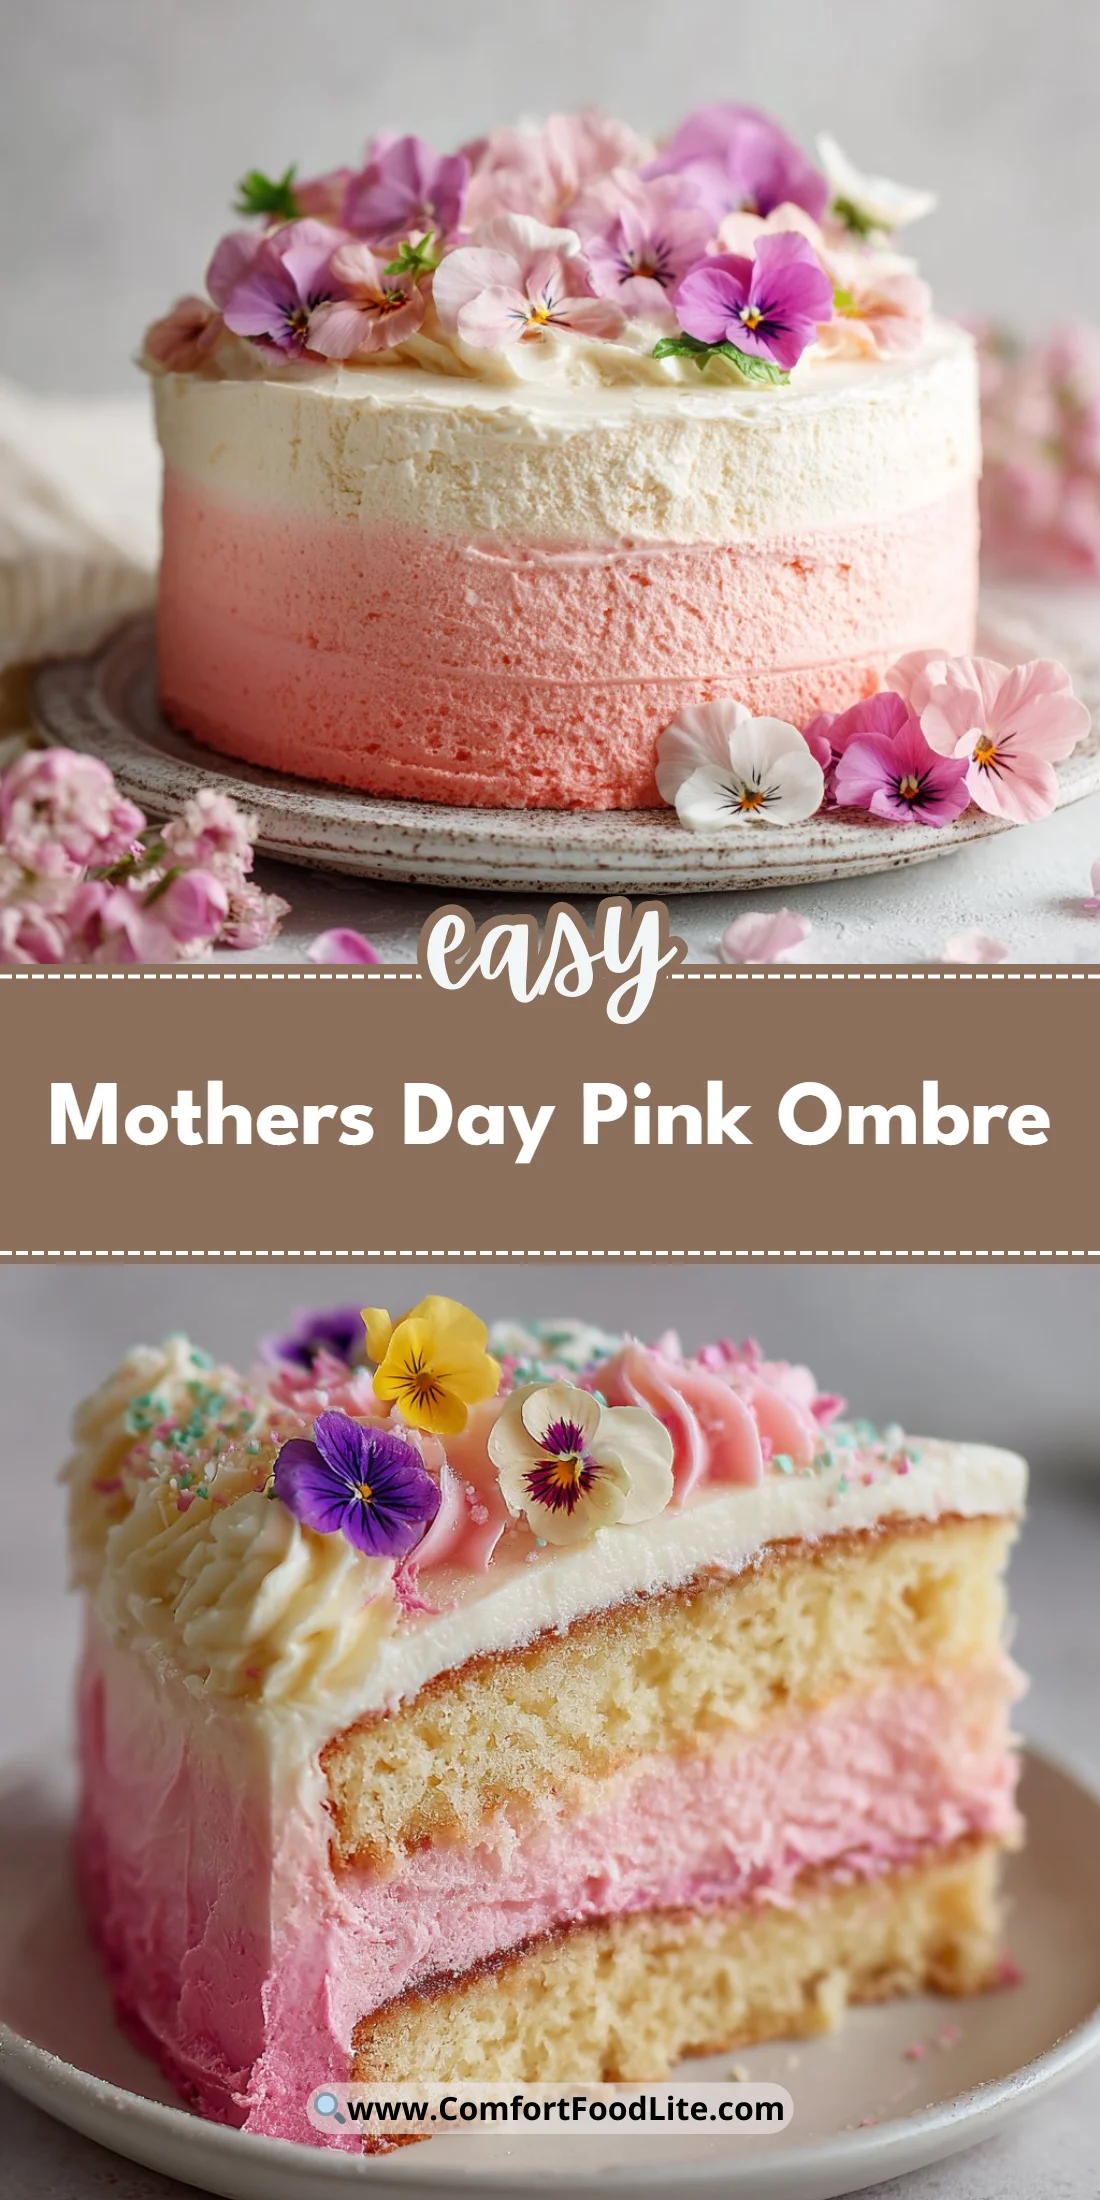
Weeknights are brutal enough without having to stress over dessert, am I right? I once tried to make a cake for Mother’s Day, and let’s just say my family ended up eating something that could barely pass as a pancake. But that’s just it; baking can be a bit chaotic, especially when you’re trying to impress the important people in your life. That’s why I’m excited to share this gorgeous and totally manageable pink ombre cake that will have your loved ones in awe, without the baking breakdown!
What Makes This Recipe Work
– The soft, buttery layers create a tender cake that melts in your mouth.
– An easy-to-make buttercream that holds its shape yet is creamy enough to spread smoothly.
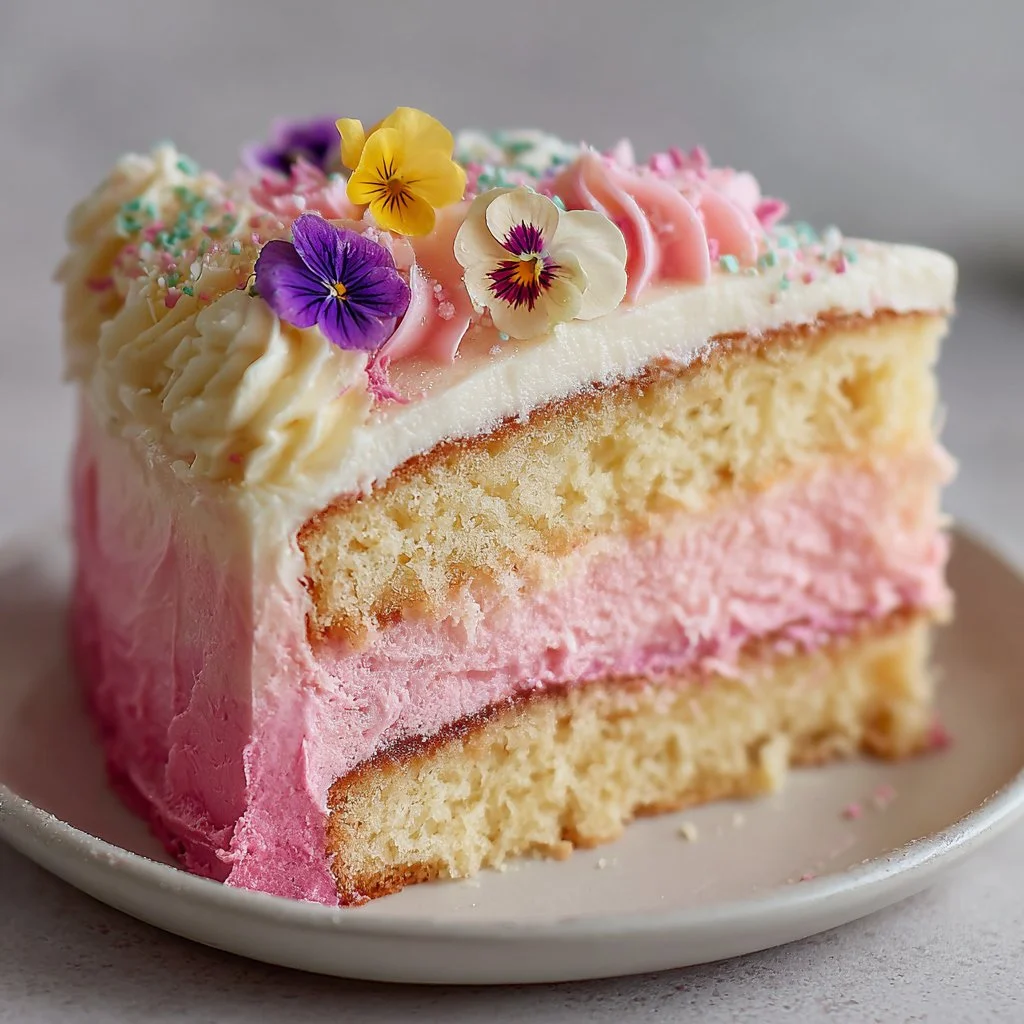
– The ombre effect adds a stunning visual appeal, perfect for special occasions.
– Minimal baking time and simple ingredients make this a breeze for any home cook.
– Beautiful edible flower decorations elevate the cake from homemade to WOW.
Key Ingredients
Butter is the star of this cake. It creates richness and a tender crumb in each layer. Use unsalted butter for better control over the saltiness of your cake.
Next up is sugar. Granulated sugar sweetens not just the cake, but also the frosting, contributing to a fluffy texture. Using high-quality sugar matters—go for something fine to ensure it blends well.
Lastly, whole milk provides moisture. It keeps your cake from drying out while also enhancing the flavor. Make sure it’s at room temperature for the best mixing results; cold milk can lead to a lumpy batter.
Full Ingredient List
– 2½ cups all-purpose flour
– 2½ teaspoons baking powder
– ½ teaspoon salt
– 1 cup unsalted butter, room temperature
– 2 cups granulated sugar
– 4 large eggs, room temperature
– 1 tablespoon pure vanilla extract
– 1 cup whole milk, room temperature
– 1½ cups unsalted butter, room temperature (for frosting)
– 5 cups powdered sugar, sifted
– 2-3 tablespoons milk or heavy cream
– 2 teaspoons pure vanilla extract (for frosting)
– Pink gel food coloring
– Edible flowers such as violets, pansies, or rose petals for decoration
– Non-edible flower toppers, optional
How to Make It
Step 1: Preheat and Prepare
Preheat your oven to 350°F. Grease and line three 8-inch round cake pans with parchment paper.
Pro Tip: Parchment paper helps the cake layers release easily, preventing any sticky disasters.
Step 2: Whisk Your Dry Ingredients
In a medium bowl, whisk together the flour, baking powder, and salt.
Pro Tip: Sifting your flour before measuring helps to avoid clumps and ensures an even texture.
Step 3: Cream Butter and Sugar
In a large bowl, cream the butter and sugar until light and fluffy, approximately 3-4 minutes.
Pro Tip: The fluffier the mixture, the better the cake’s texture will be—so take your time here!
Step 4: Incorporate Eggs and Vanilla
Beat in the eggs one at a time, mixing well after each addition. Then add the vanilla extract.
Pro Tip: Room temperature eggs blend more smoothly into the batter, giving you an even consistency.
Step 5: Mix in the Dry Ingredients and Milk
Add the flour mixture to the butter mixture in three parts, alternating with the milk and beginning and ending with flour. Mix until just combined.
Pro Tip: Overmixing can lead to tough cake; stop as soon as you don’t see any flour streaks.
Step 6: Bake the Cake Layers
Divide the batter evenly between the three prepared pans. Bake for 25-30 minutes, or until a toothpick inserted into the center comes out clean. Let the cakes cool in pans for 10 minutes, then turn out onto wire racks to cool completely.
Pro Tip: Your cakes should feel springy to the touch when they’re done—don’t forget to smell them!
Step 7: Make the Buttercream
Beat the softened butter on high speed until creamy, about 2-3 minutes. Gradually add powdered sugar on low speed. Add vanilla and milk, then beat on high for 3 minutes until fluffy.
Pro Tip: Keep the mixer on low initially to avoid a sugary cloud!
Step 8: Color the Buttercream
Divide the buttercream into four bowls. Leave one bowl white and tint the other three with varying amounts of pink gel food coloring to create the ombre effect.
Pro Tip: Add a little gel color at a time to avoid going too dark too fast.
Step 9: Assemble the Cake
Place the first layer on a serving plate and spread the darkest pink buttercream. Add the second layer and spread the medium pink buttercream, then add the final layer and spread the light pink buttercream on top. Use remaining white buttercream for the sides.
Pro Tip: An offset spatula helps create a beautifully smooth finish.
Step 10: Final Touches
Smooth the buttercream with an offset spatula and optionally use a bench scraper to blend the ombre effect up the sides. Decorate with edible flowers or non-edible flower toppers if desired. Chill for 30 minutes before slicing.
Pro Tip: Chilling makes for cleaner cuts, leaving you with that perfect slice!
Tips for Best Results
– Use room temperature ingredients for a smoother batter.
– Don’t rush the creaming process; use a stand mixer to get it fluffy.
– Bake one cake at a time if your oven has hot spots, to ensure even baking.
– Invest in a good set of cake pans; they make a big difference.
– Avoid doubling the recipe unless you have a large enough mixer; it can overload the motor.
Storage & Reheating
Store leftover cake in an airtight container in the fridge for up to 5 days. For longer storage, you can freeze individual slices, wrapped in plastic wrap and foil, for up to 3 months. Just let them thaw in the fridge overnight when you’re ready to enjoy.
Variations to Try
– **Chocolate Ombre**: Swap out some of the flour for cocoa powder to create a chocolate version—deliciously rich!
– **Lemon Zest**: Add lemon zest to the batter for a bright twist; it pairs beautifully with the sweet buttercream.
– **Fruit Layers**: Add layers of fresh berries between the cake layers to give it additional flavor and texture.
Common Questions
**Can I make this cake in advance?**
Absolutely! Bake the layers a day ahead and store them in the fridge. Just frost when you’re ready to serve.
What if I can’t find edible flowers?
No problem! You can use fresh fruits like berries or a bit of edible glitter for decoration instead.
How do I know when my cake is done?
A toothpick inserted into the center should come out clean or with a few moist crumbs, not wet batter.
Can I use other colors besides pink?
For sure! You can create any color gradient you like; just match your food coloring to your event theme.
Ready to Try It?
This pink ombre cake is sure to brighten up your Mother’s Day celebration! Rate below and don’t forget to save this recipe to your Pinterest board for easy access later.
Conclusion
Baking a beautiful cake can turn an ordinary day into something special, especially for Mother’s Day. Whether you’re a seasoned pro or a novice baker, this pink ombre treat is an easy way to make Mom feel cherished. Looking for even more ideas? Check out those beautiful cake ideas from CakeWhiz, or consider enhancing your celebration with fun decorations from I Like To Bake. And if you’re looking for a thoughtful gift, the stylish pink pen would be a perfect touch!

Pink Ombre Cake
Ingredients
Cake Ingredients
- 2.5 cups 2½ cups all-purpose flour Sift before measuring for even texture.
- 2.5 teaspoons 2½ teaspoons baking powder
- 0.5 teaspoon ½ teaspoon salt
- 1 cup 1 cup unsalted butter, room temperature Creates richness and tender crumb.
- 2 cups 2 cups granulated sugar Use fine sugar for a fluffy texture.
- 4 large 4 large eggs, room temperature Blend smoothly into batter.
- 1 tablespoon 1 tablespoon pure vanilla extract
- 1 cup 1 cup whole milk, room temperature Prevents drying and enhances flavor.
Frosting Ingredients
- 1.5 cups 1½ cups unsalted butter, room temperature
- 5 cups 5 cups powdered sugar, sifted Sifting prevents clumps.
- 2-3 tablespoons 2-3 tablespoons milk or heavy cream Adjust for desired consistency.
- 2 teaspoons 2 teaspoons pure vanilla extract For frosting flavor.
- Pink gel food coloring For creating ombre effect.
- Edible flowers such as violets, pansies, or rose petals for decoration
- Non-edible flower toppers, optional
Instructions
Preparation
- Preheat your oven to 350°F. Grease and line three 8-inch round cake pans with parchment paper.
- In a medium bowl, whisk together the flour, baking powder, and salt.
- In a large bowl, cream the butter and sugar until light and fluffy, approximately 3-4 minutes.
- Beat in the eggs one at a time, mixing well after each addition. Then add the vanilla extract.
- Add the flour mixture to the butter mixture in three parts, alternating with the milk, beginning and ending with flour. Mix until just combined.
Baking
- Divide the batter evenly between the three prepared pans. Bake for 25-30 minutes, or until a toothpick inserted into the center comes out clean.
- Let the cakes cool in pans for 10 minutes, then turn out onto wire racks to cool completely.
Frosting
- Beat the softened butter on high speed until creamy, about 2-3 minutes.
- Gradually add powdered sugar on low speed. Add vanilla and milk, then beat on high for 3 minutes until fluffy.
- Divide the buttercream into four bowls. Leave one bowl white and tint the other three with varying amounts of pink gel food coloring.
Assembly
- Place the first layer on a serving plate and spread the darkest pink buttercream. Add the second layer and spread the medium pink buttercream.
- Add the final layer and spread the light pink buttercream on top. Use remaining white buttercream for the sides.
- Smooth the buttercream with an offset spatula and optionally use a bench scraper to blend the ombre effect up the sides.
- Decorate with edible flowers or non-edible flower toppers if desired. Chill for 30 minutes before slicing.