A tray of bite-sized sandwiches brightens any gathering and makes snacking feel deliberate and festive.
They come together in minutes with humble ingredients, and they travel well for picnics or potlucks.
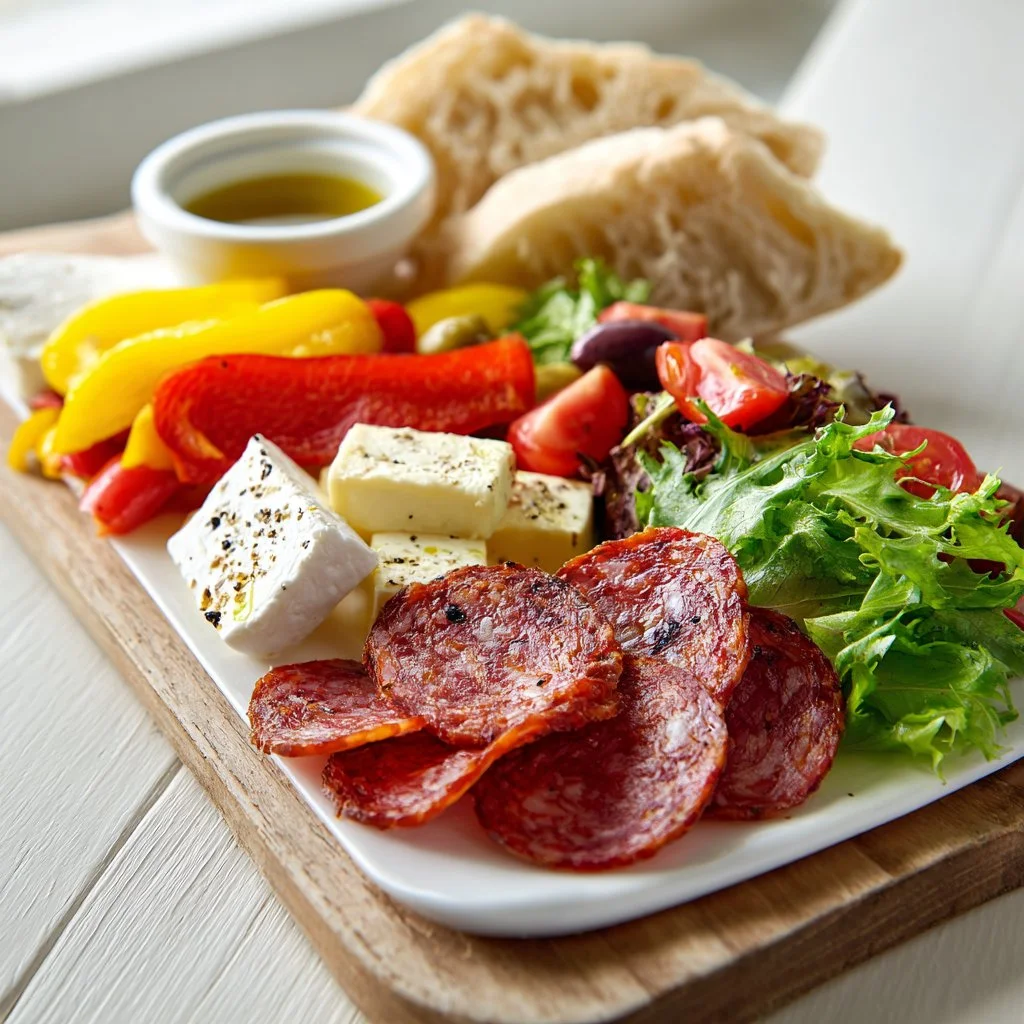
These little sandwiches let you mix bold cured meats with creamy cheeses and crisp vegetables for satisfying contrast.
If you love easy party food, you’ll want several variations on rotation; they’re also perfect for pairing with a simple dessert like 3-ingredient brownie bites for a sweet finish.
Why You’ll Love This Bite-sized Sandwiches
– Perfect for entertaining: single-bite portions keep plates tidy and conversations flowing.
– Fast to assemble: minimal prep and no cooking required.
– Highly customizable: swap meats, cheeses, and veg to suit any diet.
– Great for travel: they hold up well in a cooler for picnics or road trips.
– Balanced bites: fat, salt, acid, and crunch in every mouthful.
– Visually appealing: colorful layers make an attractive platter.
These Bite-sized Sandwiches deliver a satisfying interplay of textures—crusty bread gives way to silky cheese and tender cured meat, while fresh vegetables add snap and brightness. The olive oil ties flavors together and keeps the mouthfeel rich rather than dry.
"Five stars! I made a platter for a weekend brunch and everyone kept going back. The balance of salty chorizo, creamy goat cheese, and crisp peppers was perfect." — A happy reader
Key Ingredients for Bite-sized Sandwiches
Bread (e.g., baguette, ciabatta)
Bread defines the bite—choose a loaf with a crunchy crust and slightly chewy crumb so each piece holds toppings without disintegrating. Buy a day-old baguette or ciabatta for the best texture; fresh, super-soft bread can collapse under toppings. If you substitute with soft sandwich rolls, expect a denser, less crunchy experience.
Cured meats (e.g., chorizo, salami)
Cured meats bring concentrated umami and salt, which are crucial for flavor punch in small bites. Buy thinly sliced, high-quality charcuterie from the deli counter or pre-sliced from a reputable brand to ensure even layering. If you swap for cooked meats like turkey, you’ll lose some intense savory complexity but gain a milder, crowd-pleasing option.
Cheeses (e.g., manchego, goat cheese)
Cheese provides creaminess and a flavor anchor; firm cheeses like manchego add bite while soft goat cheese adds tang. Choose cheeses that are easy to slice or spread—buy a wedge to slice freshly for the best texture. Replacing cheese with a vegan alternative will change the mouthfeel; pick a firm plant-based cheese to mimic structure.
Fresh veggies (e.g., lettuce, tomatoes, bell peppers)
Fresh vegetables bring acidity, crunch, and color. Select firm, ripe tomatoes, crisp bell peppers, and freshly washed lettuce to avoid soggy sandwiches. If you substitute with pickles or roasted vegetables, expect more acidity or smokiness, which will shift the overall flavor profile.
Full Ingredient List for Bite-sized Sandwiches
– Cured meats (e.g., chorizo, salami)
– Cheeses (e.g., manchego, goat cheese)
– Fresh veggies (e.g., lettuce, tomatoes, bell peppers)
– Bread (e.g., baguette, ciabatta)
– Olive oil
– Salt and pepper
Step-by-Step Instructions for Bite-sized Sandwiches
Step 1: Slice the bread into bite-sized pieces.
Choose a sturdy baguette or ciabatta and cut into 1–1.5 inch rounds or small rectangles so each piece is a single bite. If the loaf is airy, press down gently as you slice to get uniform pieces that won’t topple when layered.
Pro Tip: Look for uniform rounds about the size of a quarter to half-dollar; they should feel firm in your hand and show a crunchy edge.
Step 2: Layer with a slice of cured meat, a slice of cheese, and fresh veggies.
Place a thin slice of cured meat directly on the bread, then add cheese and a small piece of vegetable—keep layers compact so the sandwich holds together. Alternate textures: a folded meat slice, a thin wedge of manchego or a smear of goat cheese, and a crisp strip of bell pepper or a halved cherry tomato.
Pro Tip: Visually the top layer should show colorful vegetables or a peek of cheese; the stack should sit flat and not topple.
Step 3: Drizzle with olive oil and season with salt and pepper to taste.
Finish each bite with a light drizzle of good-quality olive oil and a pinch of flaky salt and freshly ground pepper. The oil adds sheen and richness while a tiny hit of salt amplifies the cured meat and cheese.
Pro Tip: The aroma should be slightly herbaceous from the olive oil and the top should glisten without pooling oil around the base.
Step 4: Serve immediately or pack for a picnic.
Arrange sandwiches on a platter for immediate serving or layer them gently in a shallow container with paper towels to absorb any moisture for travel. If packing, keep dressings or wet ingredients separate until just before serving when possible.
Pro Tip: For travel, the sandwiches should feel cool to the touch and the bread should still hold its shape with no soggy bottoms.
Expert Tips for Bite-sized Sandwiches
– Temperature tip: Keep cold ingredients chilled until assembly; serve at cool-room temperature, not warm, to preserve texture and food safety.
– Texture troubleshooting: If bread becomes soggy, try lightly toasting slices or spread a thin layer of butter or cheese to act as a moisture barrier.
– Equipment tips: Use a serrated knife for clean bread slices and a small offset spatula or butter knife for spreading soft cheese without tearing the bread.
– Common mistakes: Avoid overfilling each bite—too many layers makes them collapse or fall apart when picked up.
– Timing tip: Assemble no more than 30–45 minutes before serving for best texture; for longer holds, keep components separate and assemble on-site.
– Flavor balance tip: If sandwiches taste flat, add an acidic note—half a squeeze of lemon on tomatoes or a sliver of pickled pepper brightens each bite.
– Presentation tip: Alternate colors across the platter and stagger rows so the largest, most colorful bites are front and center.
– Pairing tip: Offer one sweet element and one acidic condiment on the side to let guests customize contrast—think honey drizzle or a grainy mustard for layered flavors.
Storage & Freezing for Bite-sized Sandwiches
Fridge storage: Store assembled sandwiches in an airtight container lined with paper towels to absorb moisture; consume within 24 hours for best texture. For longer fridge time, keep meat and cheese together and pack vegetables separately to add later.
Freezer storage: These sandwiches are not ideal for long-term freezing due to fresh vegetable texture; however, you can freeze the bread and cured meat separately for up to 1 month in freezer bags. Thaw in the fridge overnight before assembling.
Thawing and reheating: Thaw frozen bread and meat in the refrigerator; if you want warm bites, briefly toast the bread and assemble with room-temperature cheese and fresh vegetables. Reheating fully assembled sandwiches will wilt veggies and soften textures, so avoid microwaving complete sandwiches.
Containers and times: Use shallow, sealed plastic containers or reusable silicone boxes for best stacking. Keep refrigerated components at 40°F (4°C) or below, and label containers with the date; eat within 24 hours when pre-assembled, or within 3–5 days when components stored separately.
Variations & Substitutions for Bite-sized Sandwiches
Mediterranean variation
Swap cured meats for thin slices of prosciutto, use manchego or a firmer sheep’s milk cheese, and add a slice of roasted red pepper and a basil leaf. The result is a fragrant, slightly salty bite with herbaceous lift.
Vegetarian variation
Replace cured meats with marinated grilled vegetables or roasted mushrooms and use creamy goat cheese with a drizzle of olive oil. You’ll get a smoky, umami-rich bite that still has creamy and crunchy contrasts.
Spicy chorizo & pepper jam variation
Use spicy chorizo, a mild manchego, and a small smear of pepper jam or harissa mayonnaise. Expect a punchy, slightly sweet heat that pairs well with cold beers or sparkling wine.
Cheese-forward picnic variation
Choose several small wedges of different cheeses—soft chèvre, aged cheddar, and a blue—and top with thin apple slices or pear. This creates a sophisticated tasting flight in miniature form that’s great for wine pairing.
Frequently Asked Questions About Bite-sized Sandwiches
What is the best bread for Bite-sized Sandwiches?
Choose a crusty loaf like a baguette or ciabatta for durability and contrast. Day-old bread firms up slightly and slices cleanly without compressing; avoid very soft sandwich bread which can turn soggy quickly under moist toppings.
How long can assembled Bite-sized Sandwiches sit out?
Assembled sandwiches with perishable ingredients should not sit out for more than 2 hours at room temperature. If temperatures exceed 90°F (32°C), reduce that time to 1 hour to reduce food-safety risks.
Can I make Bite-sized Sandwiches ahead of time for a party?
You can prepare components ahead—slice bread, pre-slice meats and cheeses, and chop vegetables—to speed final assembly. For best results, assemble no more than 30–45 minutes before serving, or keep moist elements separate until just before guests arrive.
What are good condiment options for Bite-sized Sandwiches?
Simple olive oil and flaky salt work beautifully, but grainy mustard, fig jam, or a smear of pesto can elevate flavors. Offer a small board of condiments so guests can customize each bite without oversaturating the bread.
How do I prevent soggy bottoms on picnic Bite-sized Sandwiches?
Use a thin barrier like cheese or a smear of butter on the bread before adding wetter components like tomato, or pack tomatoes and dressings separately and add them right before serving. Keeping sandwiches chilled in an insulated box also helps.

Final Thoughts on Bite-sized Sandwiches
These Bite-sized Sandwiches are a simple, flexible solution for gatherings and solo snacks alike. Leave a star rating in the recipe card below and pin this to Pinterest if you enjoyed the ideas.

Bite-sized Sandwiches
Ingredients
Bread
- 1 loaf Baguette or ciabatta, day-old preferred Choose a sturdy loaf for best texture.
Cured Meats
- 8 slices Chorizo or salami Use thinly sliced, high-quality deli meats.
Cheeses
- 8 slices Manchego or goat cheese Choose easy to slice or spread cheeses.
Fresh Veggies
- 1 cup Lettuce, tomatoes, and bell peppers, sliced Use firm, ripe vegetables.
Oils & Seasonings
- 2 tablespoons Olive oil Add for flavor and richness.
- 1 pinch Salt To taste.
- 1 pinch Pepper To taste.
Instructions
Preparation
- Slice the bread into bite-sized pieces, about 1–1.5 inches in size.
- Layer each piece of bread with a slice of cured meat, a slice of cheese, and fresh veggies.
- Drizzle with olive oil and season with salt and pepper.
- Serve immediately or pack for a picnic, ensuring to layer carefully.