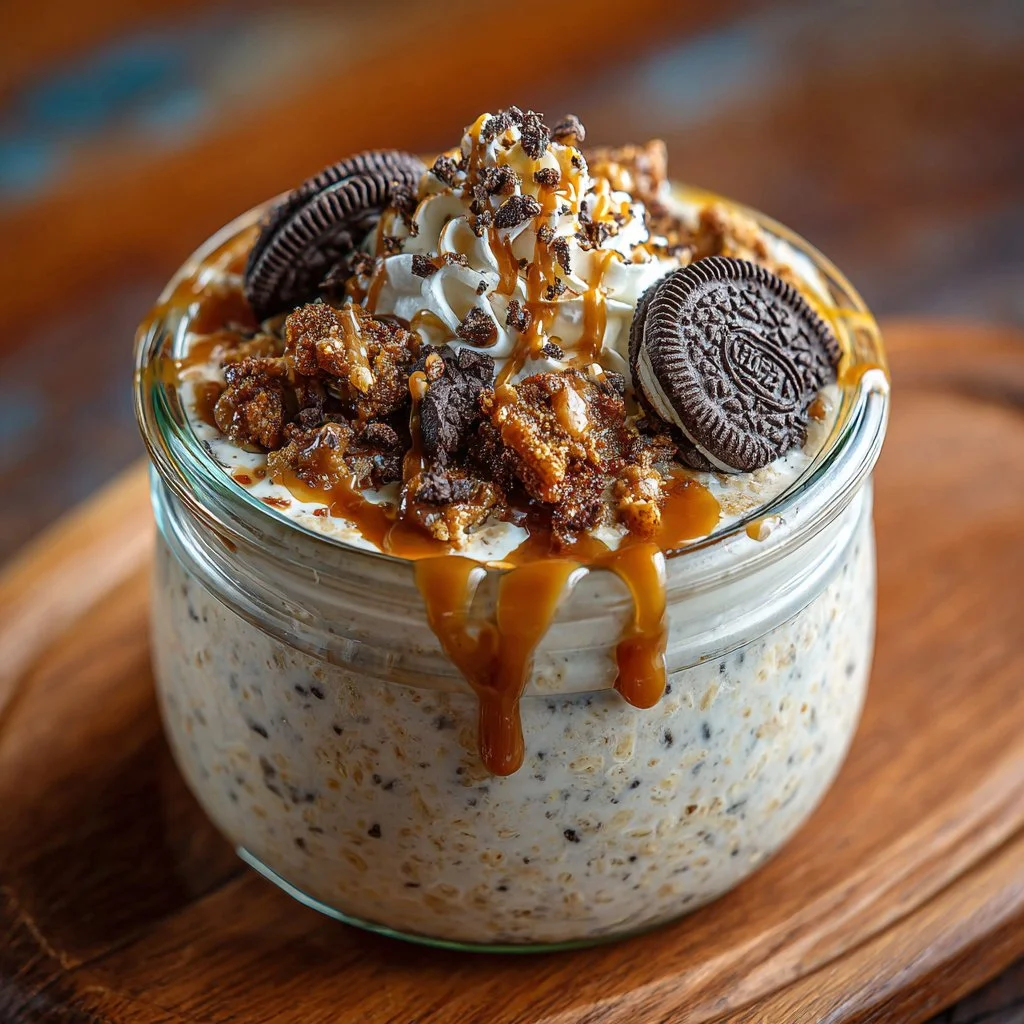
The first time I made these Oreo Overnight Oats I was skeptical — could breakfast really taste like dessert and still feel like a smart choice?
It surprised me: creamy, chocolaty, and just the right amount of cookie crunch without being sticky-sweet.
This recipe is fast to throw together the night before and genuinely elevates weekday mornings.
Why You’ll Love This Recipe
- No-cook breakfast that tastes like a treat.
- Ready in under five minutes, the night before.
- Customizable for dairy-free, lower-sugar, or extra-indulgent versions.
- Portable: jar-friendly for work or school breakfasts.
The texture balances creamy oats and yogurt with little pockets of Oreo crumbs that soften but still give a satisfying bite.
The yogurt and milk hydrate the oats so they turn tender and spoonable, while crushed Oreos add cocoa notes and light crunch that make each spoonful feel decadent.
“Five stars — my kid called it ‘breakfast cake’ and asked for it every morning. Easy to prep and never soggy.” — Jenna, reader
Key Ingredients
Rolled oats: Use old-fashioned rolled oats rather than instant or steel-cut for the best overnight texture. Rolled oats absorb liquid evenly and create that creamy, slightly chewy mouthfeel; instant oats can get mushy while steel-cut oats need more time and different liquid ratios.
Yogurt (Greek or regular): Yogurt is the anchor for creaminess and flavor. Greek yogurt gives more tang and thickness, which reduces the need for extra milk, while regular yogurt produces a silkier, lighter finish. Choose plain or vanilla to control sweetness.
Crushed Oreos: This is the flavor star. Crushed Oreos distribute cocoa and cream flavors throughout the oats; they’ll soften overnight but still leave tiny chocolate flecks. If you’re picky about brands, any sandwich cookie works, but use fresh cookies for best texture.
Milk (dairy or non-dairy): Milk hydrates the oats and sets the final consistency. Whole milk creates a richer result, while almond, oat, or soy milk keep it dairy-free and slightly lighter. Pick a milk with a neutral flavor if you want the Oreo to shine.
Full ingredients list:
- 1 cup rolled oats
- 1 cup yogurt (Greek or regular)
- 1 cup milk (dairy or non-dairy)
- 1/2 cup crushed Oreos
- 1 tablespoon honey or maple syrup (optional)
- Toppings: additional crushed Oreos, chocolate chips, or whipped cream (optional)
Step-by-Step Instructions
Step 1: Combine oats, yogurt, and milk
In a large bowl, stir together 1 cup rolled oats, 1 cup yogurt, and 1 cup milk until everything is evenly mixed.
Use a spatula to scrape the sides so there are no dry pockets of oats.
Pro Tip: You’ll know it’s well-mixed when the oats look fully coated and the mixture holds together without clumps of dry oats.
Step 2: Fold in crushed Oreos and sweetener
Gently fold in 1/2 cup crushed Oreos and 1 tablespoon honey or maple syrup if you want added sweetness.
Mix just until the Oreo crumbs are distributed — over-mixing will break down the cookie pieces too much.
Pro Tip: Leave a tablespoon of crumbs to sprinkle on top in the morning for texture contrast and presentation.
Step 3: Portion into jars or containers
Divide the mixture evenly into jars or sealable containers. Choose wide-mouth jars for easy stirring the next day.
Seal each jar with a tight lid to avoid fridge odors and moisture changes.
Pro Tip: Fill jars to about 3/4 full to leave room for toppings and easy stirring in the morning.
Step 4: Refrigerate overnight
Refrigerate the sealed jars overnight or for at least 4 hours so the oats hydrate and flavors meld.
Longer chilling (up to 48 hours) is fine, but texture will firm up slightly with time.
Pro Tip: If you plan to make these for a busy week, prepare jars on Sunday and consume within 3 days for best flavor.
Step 5: Stir and top before serving
In the morning, stir the oats to reincorporate any separated liquid and break up softened cookie pieces.
Add desired toppings like extra crushed Oreos, chocolate chips, or a dollop of whipped cream before serving.
Pro Tip: If the oats are too thick, stir in a splash of milk to loosen them to your preferred spoonable consistency.
Expert Tips for Success
- Measure by volume for home use: Use level measuring cups for oats and liquids. Rolled oats compact differently, so leveling gives consistent texture.
- Choose oat quality: Fresh, properly stored oats will taste clean; rancid or old oats impart off flavors that even Oreos can’t hide. Buy from a reliable brand or local bulk bin if you go that route.
- Adjust dairy vs. dairy-free: If using thick Greek yogurt and full-fat milk, reduce milk by 1-2 tablespoons to avoid overly loose oats. Conversely, if using plant milks that are thinner, add an extra tablespoon of yogurt for creaminess.
- Balance sweetness intentionally: The Oreos provide significant sweetness. Skip the honey/maple syrup on sweeter cookies or if using vanilla yogurt. Add the sweetener only if you prefer a more dessert-like bowl.
- Control cookie texture: Crush Oreos coarsely for visible chunks, or pulse quickly for a finer crumb that melds into the oats. Crushing with a rolling pin in a zip-top bag gives control without mess.
- Layering for presentation: If gifting or serving, layer the oat mixture with whole or halved Oreos and a few chocolate chips on top for a bakery-style look. It makes the jars look like a treat and signals the cookie flavor inside.
- Jar size and breathability: Use sealed jars for storage, but let them cool slightly before sealing if you warm any ingredient (not typical here). Airtight seals protect flavors, but don’t overfill to preserve room for expansion.
- Avoid soggy disappointment: These oats won’t become soggy the way cooked oats do; but storing longer than 4 days changes texture and cookie integration — eat within 3 days for best contrast.
- Make ahead for a crowd: Multiply recipe by jar count and assemble in the evening. Bring toppings separately to keep textures perfect at serving time.
- Spoon-test for readiness: After chilling, a proper consistency is creamy and scoopable, not watered down or rock-hard. Stirring will show you whether to add milk or let sit a bit longer at room temperature.
Storage & Freezing
Fridge storage: Store prepared jars in the refrigerator for up to 3 days.
Keep lids tight to prevent fridge odors and moisture shifts.
Freezer option: You can freeze the oat mixture in freezer-safe jars for up to one month.
Defrost overnight in the fridge before serving and stir well; texture will be slightly softer after freezing.
Reheating: These are designed to be eaten cold, but for a warm version transfer to a microwave-safe bowl and heat for 30–60 seconds, stirring halfway.
If microwaving, add a splash of milk to refresh the creaminess and prevent dryness.
Variations & Substitutions
Cookies-and-cream protein boost: Add a scoop of chocolate or vanilla protein powder to the milk before mixing.
This increases satiety and turns breakfast into a post-workout option.
Nut butter swirl: Stir in a tablespoon of peanut butter or almond butter for a nutty layer that complements the Oreo flavor.
If nut allergies are a concern, sunflower seed butter works as a neutral, safe swap.
Fruit and crunch swap: Fold in sliced bananas or raspberries before chilling for a fruity contrast.
For extra texture without more cookies, add toasted oats or granola at serving time.
Lower-sugar or gluten-free: Use a lower-sugar sandwich cookie (or a gluten-free cookie) and unsweetened yogurt.
Make sure to pick certified gluten-free oats if celiac-safe oats are required.
Frequently Asked Questions
Q: Can I use instant oats for Oreo Overnight Oats?
A: You can, but instant oats absorb liquid more quickly and can become mushy overnight. Rolled oats give the best texture — tender but not gluey. If you use instant oats, reduce liquid slightly and check after 3-4 hours.
Q: Will the Oreos make the oats soggy?
A: Oreos soften overnight and integrate into the mix, but they won’t make the entire jar soggy. Crushing to the size you prefer controls the mouthfeel — larger chunks keep a bit of bite while fine crumbs blend more.
Q: Is this recipe suitable for kids?
A: Yes, it’s very kid-friendly. To reduce sweetness for smaller children, skip the added honey/maple syrup and use plain yogurt or low-sugar vanilla yogurt.
Q: Can I meal prep these for the week?
A: Absolutely — prepare up to 3 jars at once and store in the fridge for up to 3 days. Keep toppings separate to maintain crunch.
Q: How can I make this vegan?
A: Use plant-based milk (oat, almond, soy) and a dairy-free yogurt. Use dairy-free sandwich cookies if you need a fully vegan option; most mainstream Oreos are technically vegan in some countries but check ingredients to be sure.
Final Thoughts
This Oreo Overnight Oats recipe hits the sweet spot between indulgence and convenience, perfect for weekend brunches or grab-and-go mornings.
If you tried it, please leave a star rating in the recipe card below or pin this to Pinterest so others can find a better breakfast hack.
For more inspiration and variations from other creators, see Oreo Overnight Oats – Wholly Tasteful and Oreo Overnight Oats – Modest Munchies.

Oreo Overnight Oats
Ingredients
Base Ingredients
- 1 cup rolled oats Use old-fashioned rolled oats for the best texture.
- 1 cup yogurt (Greek or regular) Greek yogurt adds thickness and tang.
- 1 cup milk (dairy or non-dairy) Choose whole milk for richness or plant-based for a lighter option.
Flavor Ingredients
- 1/2 cup crushed Oreos Use fresh cookies for the best texture.
- 1 tablespoon honey or maple syrup Optional, adjust based on sweetness preference.
Optional Toppings
- to taste additional crushed Oreos, chocolate chips, or whipped cream Add for extra sweetness and decadence.
Instructions
Preparation
- In a large bowl, stir together rolled oats, yogurt, and milk until evenly mixed.
- Gently fold in crushed Oreos and honey or maple syrup if desired.
- Divide the mixture evenly into jars or sealable containers, filling to about 3/4 full.
- Seal jars with a tight lid and refrigerate overnight.
Serving
- In the morning, stir the oats to reincorporate any separated liquid.
- Add desired toppings before serving.