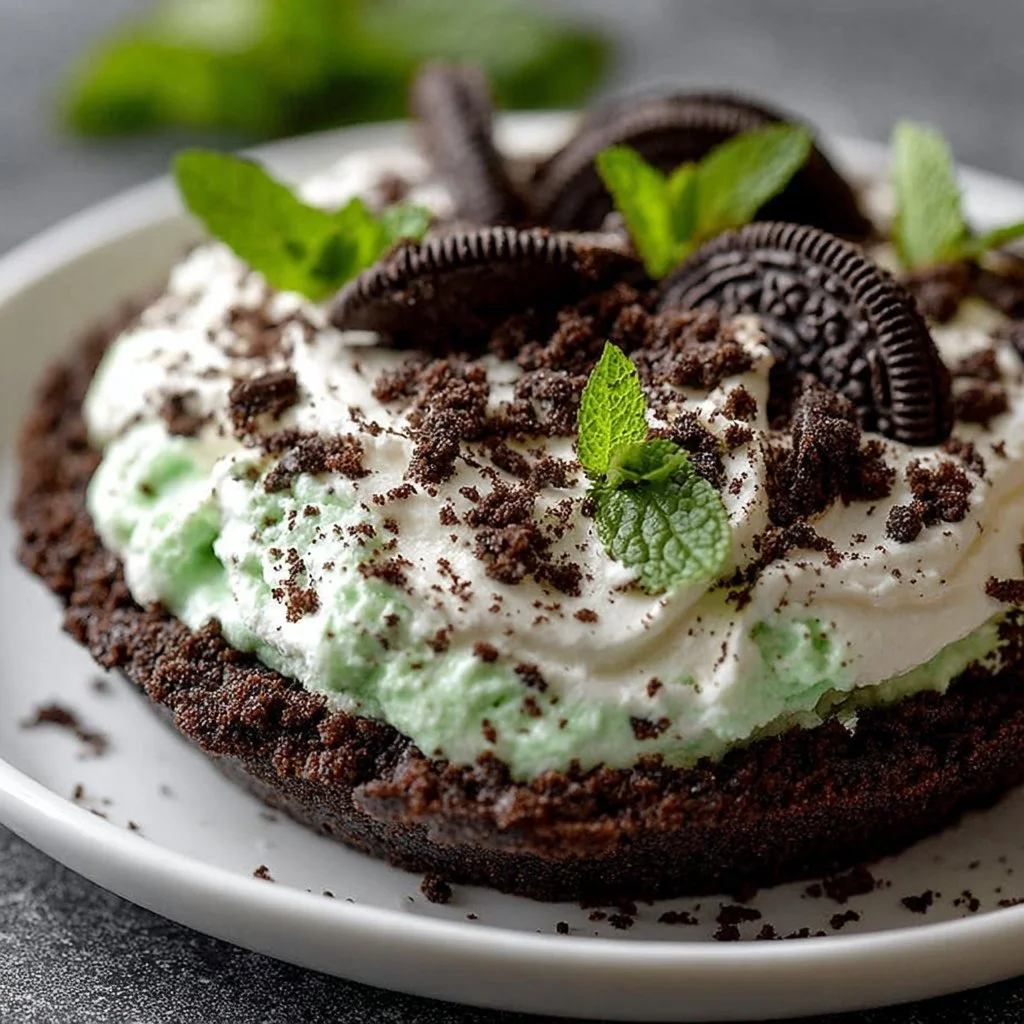
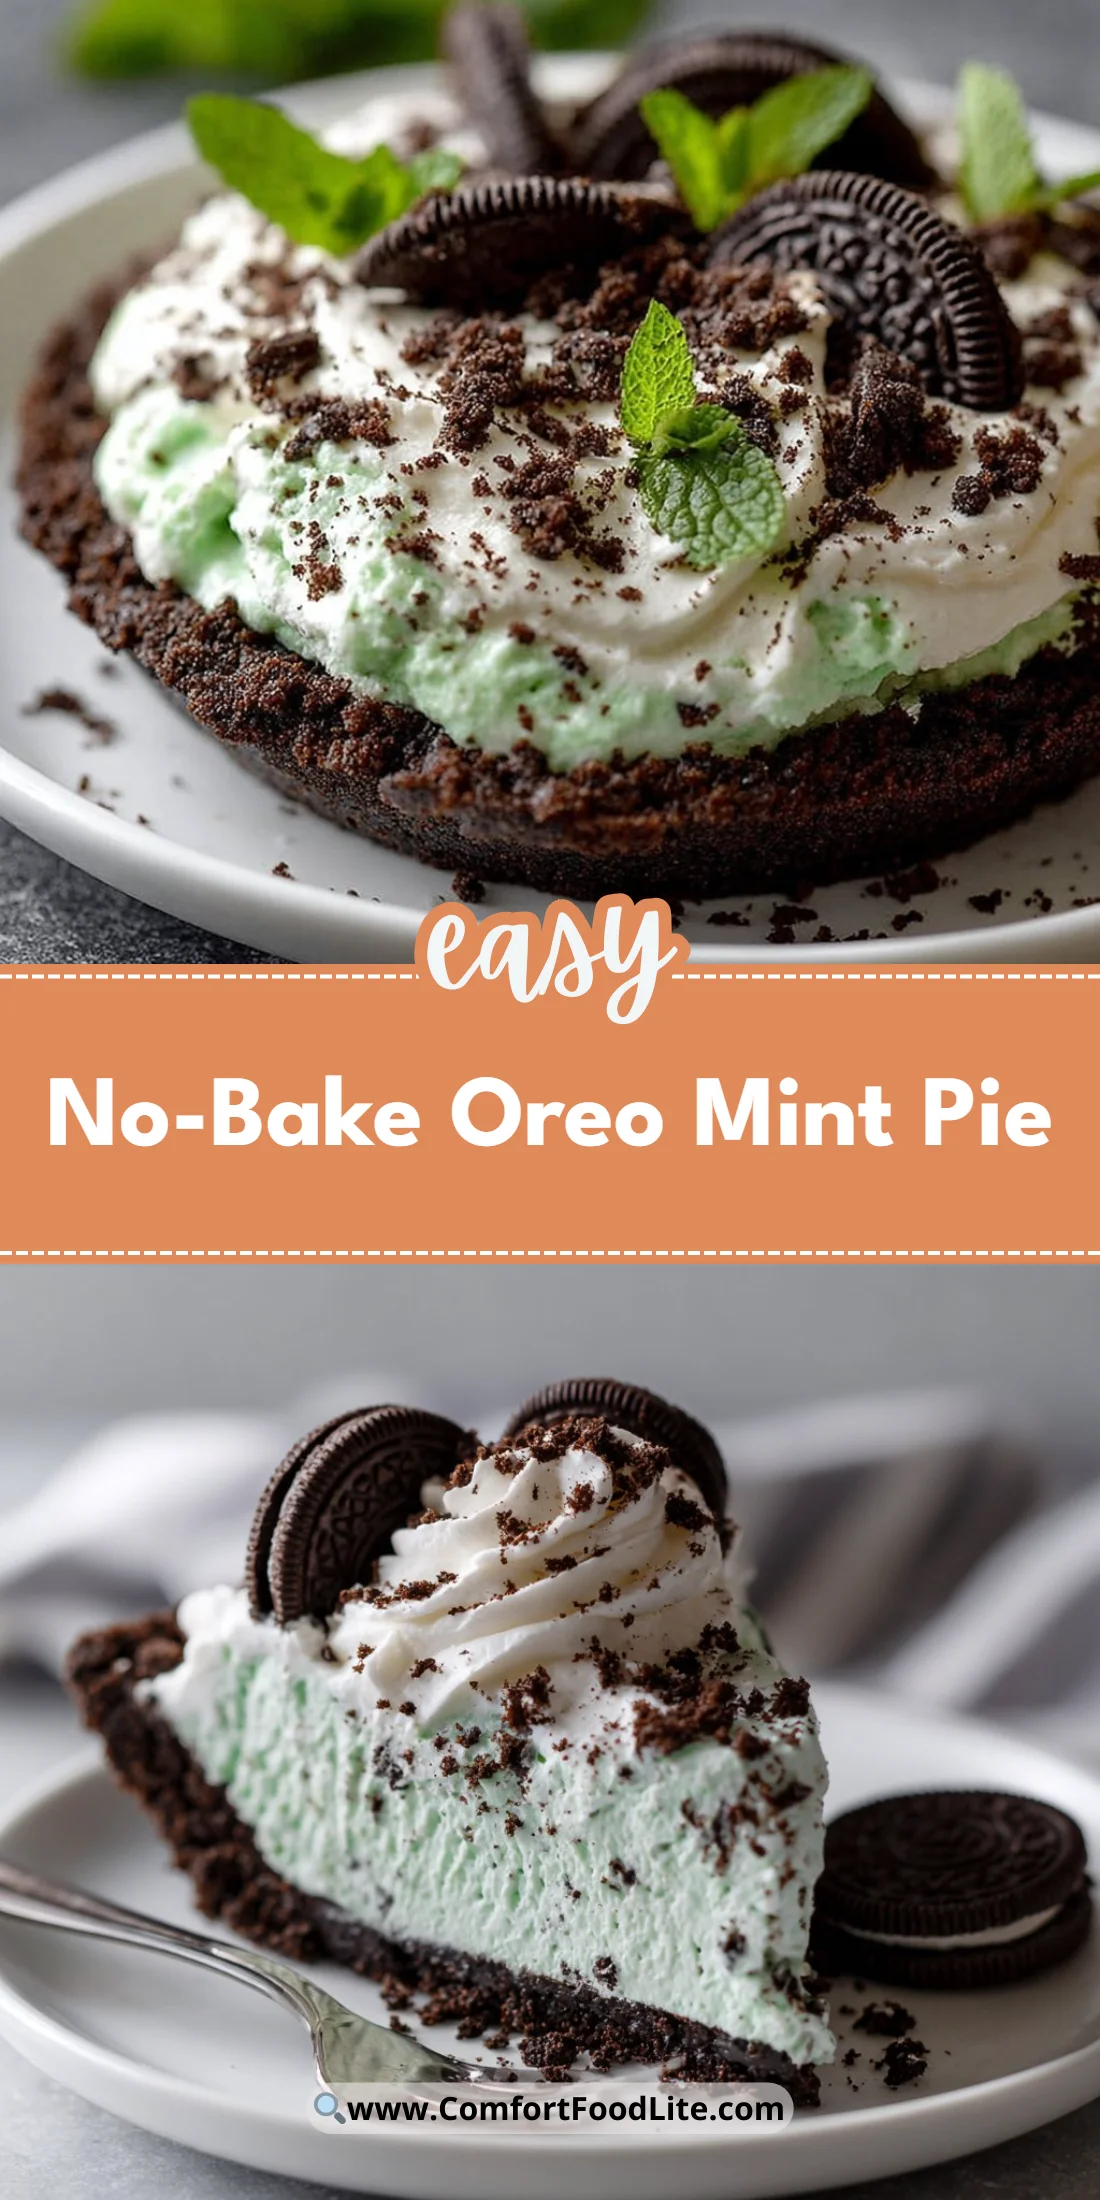
The first bite of this pie is all cool mint and creamy, with a chocolate-crisp halo that snaps just right. It’s a fridge-friendly showstopper that comes together in minutes and needs no baking.
This No-Bake Oreo Mint Pie is perfect for warm nights, last-minute guests, and holiday dessert tables. It’s simple enough for weeknights and pretty enough to bring to potlucks.
If you like quick, minty desserts with familiar cookie crunch, you’ll want to bookmark this recipe and try it alongside other no-bake treats like the 3-Ingredient Easy No-Bake Brownie Bites for a full dessert spread.
Why You’ll Love This No-Bake Oreo Mint Pie
– Fast, ready in minutes plus chilling time.
– No oven required; ideal for hot weather.
– Kid-friendly and crowd-pleasing peppermint flavor.
– Silky, mousse-like filling balanced by crunchy Oreo crust.
– Customizable color and garnish for holidays.
– Minimal equipment and pantry-stable ingredients.
This pie tastes like a mint-chocolate dream — cool peppermint fused with creamy, tangy cream cheese and long, chocolatey cookie bites. The texture is a contrast of velvety filling and crisp, buttery cookie shell that holds its shape but melts in your mouth.
"A party hit every time — minty, not too sweet, and the crust gave it the perfect crunch. Five stars!" — Sarah T., home baker
Key Ingredients for No-Bake Oreo Mint Pie
Pick the best base ingredients and the whole pie comes together with confidence. Below are the four most important components and why they matter.
Mint Oreos for No-Bake Oreo Mint Pie
Mint Oreos form the structure and main chocolate flavor of the crust. Choose fresh cookies (check the best-by date) and aim for full cookies with intact cream centers so the crumbs have both chocolate and mint notes. If you substitute with plain Oreos, you’ll lose the minty backbone — add a little peppermint extract to the filling to compensate.
Unsalted Butter for No-Bake Oreo Mint Pie
Butter binds the crumbs into a pressable crust and adds richness. Use unsalted so you control salt levels and melt it gently to avoid overheating. Substitute with coconut oil for a dairy-free crust; it will firm up differently and add a faint coconut aroma.
Cream Cheese for No-Bake Oreo Mint Pie
Cream cheese gives the filling structure, tang, and stability so the pie sets in the fridge instead of collapsing. Soften it to room temperature for smooth mixing and avoid graininess. If you substitute with mascarpone or Greek yogurt, texture and tang will change — mascarpone yields a richer pie, yogurt a tangier, looser one.
Whipped Cream or Cool Whip for No-Bake Oreo Mint Pie
Whipped cream folds light air into the filling, creating a mousse-like lift; Cool Whip is an easy stable swap. Freshly whipped cream gives a silkier mouthfeel, while Cool Whip offers convenience and firmer hold. Using none will make the filling dense and less airy.
Full Ingredient List for No-Bake Oreo Mint Pie
– 24 Mint Oreos
– 1/4 cup unsalted butter, melted
– 1 package (8 oz) cream cheese, softened
– 1 cup powdered sugar
– 1 cup whipped cream or Cool Whip
– 1 teaspoon peppermint extract
– Green food coloring (optional)
– Extra Mint Oreos for garnish
Step-by-Step Instructions for No-Bake Oreo Mint Pie
Step 1: Make the crust — Crush the 24 Mint Oreos and mix with melted butter
Place the Mint Oreos in a food processor and pulse to fine crumbs. Pour in the melted butter and pulse again until evenly moistened. Press the crumb mixture firmly and evenly into the bottom and up the sides of a 9-inch pie pan, creating a compact shell that will hold the filling.
Pro Tip: The crust should look evenly glossy and hold together when you press a bit into it; it should not be greasy or falling apart.
Step 2: Prepare the filling — Beat cream cheese, add powdered sugar, then fold in whipped cream
Beat the softened cream cheese until completely smooth and free of lumps. Gradually add powdered sugar and beat until silky. Fold in the whipped cream (or Cool Whip), then gently stir in peppermint extract and a few drops of green food coloring if you want holiday color.
Pro Tip: The filling should feel light and billowy — not runny — and hold soft peaks when lifted with a spatula.
Step 3: Assemble pie — Pour the filling into the prepared crust and smooth the top
Spoon the filling into the Oreo crust and spread it evenly with a spatula. Tap the pie pan on the counter once to release trapped air and to settle the filling.
Pro Tip: The top should be smooth with no large air pockets; tiny air bubbles are fine but the surface should appear glossy and even.
Step 4: Chill — Refrigerate for at least 4 hours or overnight until firm
Cover the pie loosely with plastic wrap and chill in the refrigerator for at least 4 hours, or overnight for best sliceability. The chilling time lets the cream cheese set and the crust firm.
Pro Tip: When chilled sufficiently, the pie will feel firm to the touch and the filling will no longer wobble when the pan is gently shaken.
Step 5: Garnish and serve — Add extra Mint Oreos and slice with a hot knife
Before serving, press extra Mint Oreos around the edge or crumble them over the top. Run a sharp knife under hot water, dry it, then slice the pie in clean motions to get neat pieces.
Pro Tip: Slices should come away cleanly with neat edges; if slices are squashed, the pie needed more chilling time.

Expert Tips for No-Bake Oreo Mint Pie
– Chill time matters: four hours is minimum; overnight is ideal for clean slices.
– Room temperature cream cheese only: cold cream cheese makes lumpy filling. Let it sit 30–60 minutes depending on fridge temp.
– Use a food processor for fine, even crumbs; pulsing prevents overworking the crust.
– Temperature tip: keep the pie refrigerated until serving; warm kitchens soften the filling quickly.
– Texture troubleshooting: if filling is too dense, fold in an extra 1/4 cup whipped cream to lighten.
– Equipment tip: a springform pan gives cleaner removal for display, but a standard pie pan works fine.
– Common mistake: adding too much peppermint extract — start with 1/2 teaspoon and taste before adding more.
– Visual cue: press the crust firmly with the bottom of a measuring cup to avoid crumbly edges that break when sliced.
Storage & Freezing for No-Bake Oreo Mint Pie
Fridge storage: keep the pie refrigerated in an airtight container or tented with plastic wrap for up to 4 days. For best texture, consume within 2–3 days.
Freezer storage: wrap the cooled pie tightly in plastic wrap and then in foil, or freeze individual slices in sealed containers. Freeze up to 2 months for best quality.
Thawing: move frozen pie or slices to the refrigerator and thaw for 6–8 hours or overnight. Avoid thawing at room temperature; the filling softens and loses structure.
Reheating: this is a cold dessert — do not reheat. If you want a softer slice, let a refrigerated slice sit 10 minutes at room temperature before serving.
Variations & Substitutions for No-Bake Oreo Mint Pie
– Chocolate Ganache Swirl: Fold a few tablespoons of cooled chocolate ganache into half the filling and swirl for a marbled effect; the pie will taste richer and look more dramatic.
– Thin Mint Crust: Swap Mint Oreos for Thin Mints cookies and add a teaspoon of melted butter more if crumbs are dry; expect a brighter, intense mint-chocolate profile.
– Nutty Crunch: Press chopped toasted almonds or pecans into the bottom of the crust before filling for added texture; the pie becomes texturally richer but slightly less mint-forward.
– Lower-Sugar Version: Use a reduced-fat cream cheese and powdered sugar substitute; note the filling will be slightly less creamy and may need extra chilling to firm up.
Frequently Asked Questions About No-Bake Oreo Mint Pie
Q: Can I make this pie ahead of time for a party?
A: Yes. Make it up to 48 hours in advance for best texture and flavor. Keep refrigerated and add garnish shortly before serving to preserve the crispness of extra Oreos.
Q: Why is my filling grainy or lumpy?
A: Graininess usually comes from cold cream cheese or under-sifted powdered sugar. Soften the cream cheese fully and sift powdered sugar if it’s clumpy, then beat until completely smooth.
Q: Can I use regular Oreos instead of Mint Oreos?
A: You can, but the mint flavor will be missing. Compensate by adding 3/4 to 1 teaspoon peppermint extract to the filling and consider a few drops of green food coloring if you want the classic look.
Q: How do I get clean slices without smearing the filling?
A: Use a hot, dry knife. Heat the blade under hot water, dry it completely, and slice in one smooth motion. Reheat the knife between cuts for best results.
Q: Is this recipe safe to freeze and serve later?
A: Yes — freeze whole or sliced. Thaw in the fridge overnight and serve cold. Expect a slight change in texture (a touch firmer) after freezing but overall very good quality.
Final Thoughts on No-Bake Oreo Mint Pie
This No-Bake Oreo Mint Pie is an effortless, crowd-pleasing dessert that combines cool peppermint flavor with a crunchy chocolate crust. It’s quick to assemble and keeps well, making it ideal for holidays or last-minute gatherings.
Please leave a star rating in the recipe card below and pin this to Pinterest if you loved it.
Conclusion: No-Bake Oreo Mint Pie
For a twist on minty no-bake pies, see how The Best No-Bake Grasshopper Pie Recipe layers mint and chocolate in a classic way. If you want a different texture profile, try this No Bake Mint Chocolate Chip Pie for more chips and crunch. For a cheesecake-style comparison and more assembly tips, check out this Easy No Bake Oreo Mint Cheesecake.

No-Bake Oreo Mint Pie
Ingredients
Crust
- 24 pieces Mint Oreos Choose fresh cookies with intact cream centers.
- 1/4 cup unsalted butter, melted Can be substituted with coconut oil for a dairy-free option.
Filling
- 1 package (8 oz) cream cheese, softened Ensure it is at room temperature for smooth mixing.
- 1 cup powdered sugar Sifted to avoid lumps.
- 1 cup whipped cream or Cool Whip Freshly whipped cream yields a silkier texture.
- 1 teaspoon peppermint extract Start with less if sensitive to mint flavor.
- green food coloring (optional) For coloring during holidays.
- Extra pieces Mint Oreos for garnish For added crunch and visual appeal.
Instructions
Make the crust
- Crush the 24 Mint Oreos in a food processor until fine crumbs form.
- Mix the crushed Oreos with melted butter until evenly moistened.
- Press the mixture firmly into the bottom and sides of a 9-inch pie pan.
Prepare the filling
- Beat the softened cream cheese until completely smooth.
- Gradually add powdered sugar and beat until silky.
- Fold in the whipped cream, then stir in peppermint extract and food coloring if desired.
Assemble pie
- Pour the filling into the prepared crust and smooth the top.
- Tap the pie pan on the counter to release air bubbles.
Chill
- Cover the pie and refrigerate for at least 4 hours or overnight until firm.
Garnish and serve
- Add extra Mint Oreos for garnish before serving.
- Slice with a hot knife for neat pieces.