The first time I made this Valentine Bark it vanished in two hours at a kid’s classroom party.
It’s one of those recipes that looks impressive but takes almost no skill or special equipment.
This version uses a single pound of chocolate and a few festive toppings to make a show-stopping, giftable treat.
You can make it with milk, dark, or white chocolate depending on the crowd.
It’s budget-friendly, great for last-minute gifting, and perfect for decorating with seasonal candies.
Treats like this are my go-to when I need something pretty fast that still feels homemade.
Why You’ll Love This Recipe
- Quick to make in under 30 minutes of active time.
- Customizable for kids, adults, or dietary needs.
- No baking required and minimal cleanup.
- Scales easily up or down for gifts and parties.
- Makes a beautiful, shareable snack that travels well.
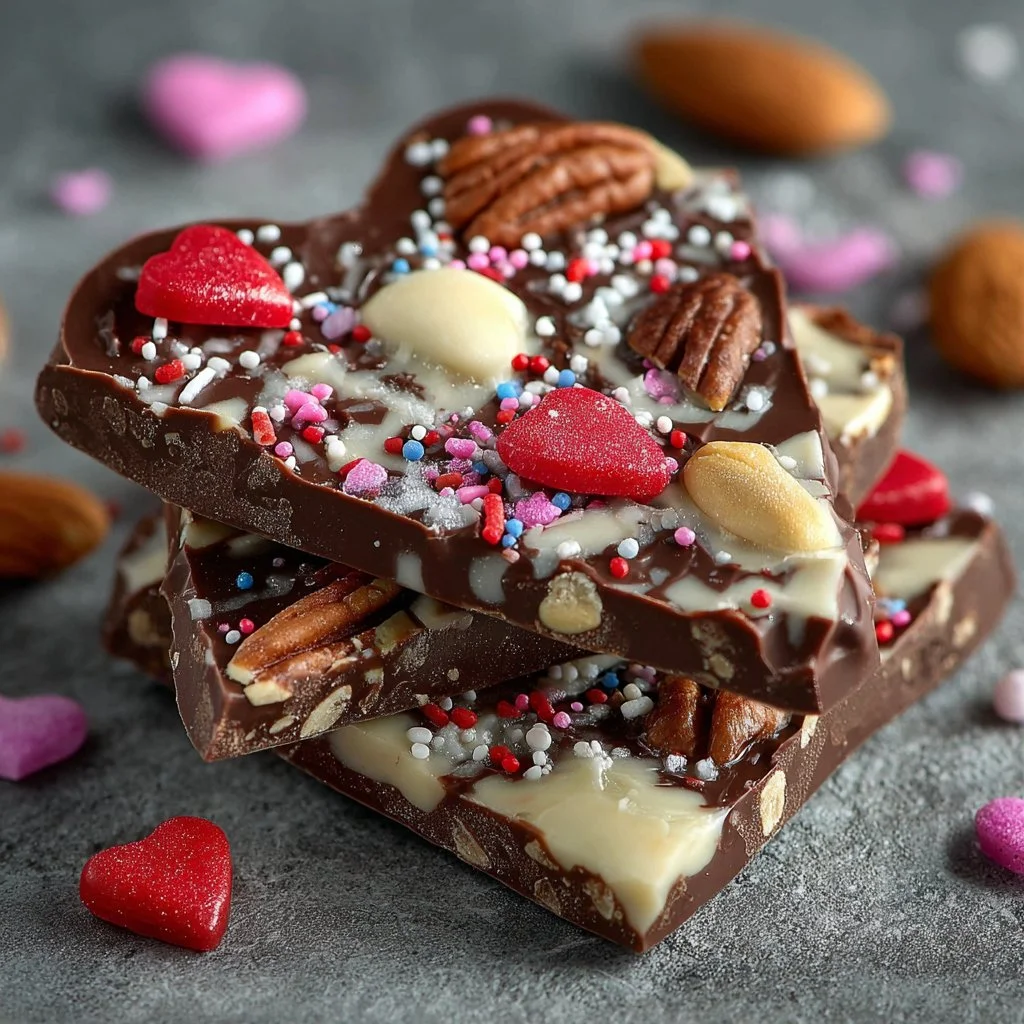
Valentine Bark delivers a contrast of textures: glossy, snap-able chocolate contrasted with crunchy nuts and the little pop of sugar from heart candies and sprinkles.
The chocolate base melts in your mouth, while toppings add chew, crunch, and bursts of color that make each piece feel special.
It’s simple but satisfying—the kind of treat that tastes like you spent an hour when you really spent ten minutes.
“This bark saved Valentine’s Day last minute — crunchy, chocolatey, and my kids demanded seconds. Five stars!” — Jenna, reader
Key Ingredients
Milk, dark, or white chocolate (1 pound)
Choose high-quality baking or couverture chocolate for the smoothest finish.
I reach for a 55–70% dark chocolate when I want deeper flavor, or a good white chocolate bar (not a candy coating) for creamy sweetness.
If melting chips are what you have, mix them with a tablespoon of vegetable oil per cup for shine.
Festive sprinkles
Sprinkles are mainly visual, but they also add a tiny crunchy contrast and personality.
Nonpareils and jimmies hold up best against chocolate’s moisture—avoid wet-looking sugar decorations that can bleed color.
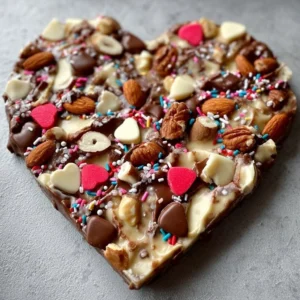
Heart-shaped candies
These create focal points on the bark and deliver that easy "Valentine" message without extra work.
Use small hearts or conversation-heart-like candies so they don’t overpower each bite.
Favorite nuts (almonds, pecans, walnuts)
Nuts add fat, crunch, and a savory balance to the sweetness of the chocolate.
Lightly toasting nuts for a few minutes dries them out and brings out aromatics, improving texture and flavor.
Full ingredient list:
- 1 pound chocolate (milk, dark, or white)
- Festive sprinkles
- Heart-shaped candies
- Favorite nuts (e.g., almonds, pecans, walnuts)
Step-by-Step Instructions
Step 1: Prepare the sheet pan
Line a baking sheet with parchment paper, leaving an overhang for easy removal.
Gather toppings in small bowls so you can sprinkle quickly.
Pro Tip: Use a rimmed sheet pan to prevent slippage; the parchment should lay flat with no wrinkles.
Step 2: Melt the chocolate
Chop chocolate into even pieces if using bars and place in a microwave-safe bowl or double boiler.
Microwave in 20–30 second bursts, stirring between each, until smooth; or use a double boiler over simmering water, stirring often.
You’ll know it’s smooth and ready when there are no lumps and it flows easily from a spoon.
Step 3: Pour and spread
Pour the melted chocolate onto the prepared parchment and tilt the pan or use an offset spatula to spread to your desired thickness—about 1/8–1/4 inch is standard.
Work quickly but gently to avoid air bubbles and rippling.
Pro Tip: For uniform pieces, score the chocolate lightly with the edge of a knife while it’s cooling but not fully set.
Step 4: Add toppings while warm
Scatter sprinkles, heart candies, and nuts evenly over the surface while the chocolate is still glossy and tacky.
Press larger items very gently so they adhere but don’t sink.
Visual cue: If a topping sits firmly and doesn’t slide when you tilt the pan, it’s set correctly.
Step 5: Let it set
Let the bark cool at room temperature until firm, or pop it in the fridge for 15–20 minutes to speed things up.
Avoid condensation by keeping the pan covered loosely if you refrigerate.
Pro Tip: If your kitchen is humid, chill the bark on a wire rack over a tray to prevent moisture from collecting on the surface.
Step 6: Break and serve
Lift the parchment by the overhang and transfer to a cutting board, or use your hands to break the bark into irregular pieces.
Package in small cellophane bags or tins for gifting.
Pro Tip: For neat edges, use a large chef’s knife to cut bars after chilling, wiping the knife between cuts.
Expert Tips for Success
- Tempering vs. quick-melt: If you want a glossy snap and stable shelf life at room temperature, temper your chocolate properly. Tempering aligns cocoa butter crystals and prevents bloom. Use a thermometer: dark chocolate 88–90°F, milk 86–88°F, white 82–84°F.
- Use good chocolate: Higher cocoa butter content yields a smoother melt and better mouthfeel. If budget is tight, mix a lower-cost melting chocolate with a few ounces of high-quality chocolate to improve flavor.
- Control thickness: Spread to about 3–6 mm for the best bite. Too thin and the toppings dominate; too thick and you lose the delicate snap that makes bark enjoyable.
- Toast nuts first: Spread nuts on a sheet and toast at 325°F for 6–8 minutes until fragrant. Cool before adding to the warm chocolate to avoid steam softening the surface.
- Avoid moisture: Chocolate hates water—any steam or wet utensils can seize melted chocolate. Dry tools and bowls thoroughly before using.
- Add texture in layers: For a cleaner look and more varied texture, pour and set a base layer of chocolate, chill briefly, then add a second contrasting chocolate layer before topping. This creates defined ribbons and ribbon contrast.
- Work quickly when topping: Sprinkle while chocolate is still glossy; once it starts to dull, toppings won’t adhere well. If a few fall off, press them gently to secure.
- Troubleshooting seized chocolate: If your chocolate seizes into a grainy paste, try adding a teaspoon of neutral oil or warm cream and whisk gently to smooth; this can rescue small amounts.
- Store at consistent temp: Chocolate blooms (white streaks) when it experiences temperature swings. Keep bark in a cool, dry place away from strong odors.
- Presentation matters: Line gift boxes with parchment and separate layers with tissue to keep pieces from sticking; use patterned sprinkes sparingly for a high-end look.
Storage & Freezing
Fridge storage: Store bark in an airtight container layered with parchment between pieces.
Keep the container in the coolest part of the fridge, not the door, to avoid temperature fluctuation.
Chocolate will last up to two weeks refrigerated, but nuts may soften slightly.
Freezer storage: For long-term storage, freeze bark tightly wrapped in plastic wrap and placed in a freezer bag or airtight container.
Freeze flat and remove as much air as possible to prevent freezer burn and scent migration.
Frozen bark can keep for 2–3 months with minimal quality loss.
Thawing and reheating: Thaw overnight in the refrigerator first to avoid condensation forming on the chocolate.
Bring to room temperature while still wrapped before unwrapping to minimize moisture.
Avoid reheating chocolate directly—if you want to remelt pieces for dipping or decorating, do so slowly using low heat.
Variations & Substitutions
Salted caramel twist: Drizzle warm caramel over the base chocolate before adding toppings, then sprinkle flaky sea salt for contrast.
Use caution with chilled chocolate—caramel can create steam; add it while chocolate is warm.
Nut-free option: Replace nuts with toasted seeds (pumpkin or sunflower) or crisped rice cereal to keep crunch without allergens.
This makes the recipe safer for classrooms and nut-free gatherings.
Spiced white chocolate: Stir in 1/4 teaspoon ground cardamom or cinnamon into melted white chocolate for a grown-up flavor.
Pair with pistachios and ruby red dried cranberries for a festive color palette.
Vegan/dairy-free: Use dairy-free or vegan chocolate bars and substitute honey-sweet candies for dairy-free alternatives.
Choose toasted coconut and chopped dried fruit instead of milk-based confections.
Frequently Asked Questions

Q: Can I use chocolate chips instead of chopping a chocolate bar?
A: Yes. Chocolate chips can be used, but many chips contain stabilizers that affect melt and shine.
If you use chips, consider stirring in a tablespoon of neutral oil per cup for better gloss, or adding a few ounces of a higher-quality chopped bar to improve flavor.
Q: How long will Valentine Bark stay fresh at room temperature?
A: Stored in an airtight container in a cool, dry place, it will stay good for about 1–2 weeks.
Avoid sunlight, heat sources, and humidity to prevent melting and bloom.
Q: My chocolate looks streaky or dull after chilling—what happened?
A: That’s called bloom, caused by fat or sugar crystals migrating to the surface due to temperature swings or improper tempering.
It’s safe to eat but less pretty; tempering chocolate or storing at stable temperatures prevents this.
Q: Can I use leftover chocolate from a candy bar?
A: Yes. Chop bars into even pieces and treat them like baking chocolate.
Be aware that fillings or flavorings in candy bars will change the texture and melt behavior.
Q: How do I keep sprinkles from bleeding color into white chocolate?
A: Use non-dyed or "gum paste" style decorations when working with white chocolate.
Apply sprinkles just before the chocolate fully sets and avoid refrigerated condensation, which can make colors run.
Final Thoughts
Valentine Bark is proof that beautiful, giftable treats don’t require fuss or fancy tools.
Make a batch, snap into pieces, and watch it disappear at parties or into care packages.
Please leave a star rating in the recipe card below and pin this to Pinterest if you enjoyed it.
Conclusion
For a fast, pretty recipe you can rely on, see a similar easy approach at Quick and Easy Valentine Bark Candy which inspired some topping ideas.
If you want layered chocolate techniques and visual inspiration, check this helpful guide: Easy Layered Valentine’s Day Chocolate Bark – Slow The Cook Down.
For a cookie-and-bark mash-up idea, this riff offers creative topping combinations: valentine cookie bark l sheri silver.
Valentine Bark
Ingredients
Main ingredients
- 1 pound chocolate (milk, dark, or white) Choose high-quality baking or couverture chocolate for the smoothest finish.
Toppings
- festive sprinkles Use nonpareils and jimmies to avoid bleeding and maintain visual appeal.
- heart-shaped candies Use small heart candies for an easy 'Valentine' message.
- favorite nuts (almonds, pecans, walnuts) Lightly toast for better flavor and crunch.
Instructions
Preparation
- Line a baking sheet with parchment paper, leaving an overhang for easy removal.
- Gather toppings in small bowls so you can sprinkle quickly.
Melting the Chocolate
- Chop chocolate into even pieces if using bars and place in a microwave-safe bowl or double boiler.
- Microwave in 20–30 second bursts, stirring between each, until smooth, or use a double boiler over simmering water.
Pour and Spread
- Pour the melted chocolate onto the prepared parchment and spread to a thickness of about 1/8–1/4 inch.
Adding Toppings
- Scatter sprinkles, heart candies, and nuts evenly over the surface while the chocolate is still glossy and tacky.
Setting the Bark
- Let the bark cool at room temperature or refrigerate for 15–20 minutes until firm.
Breaking and Serving
- Lift the parchment and transfer to a cutting board, or break into irregular pieces.
- Package in small cellophane bags or tins for gifting.