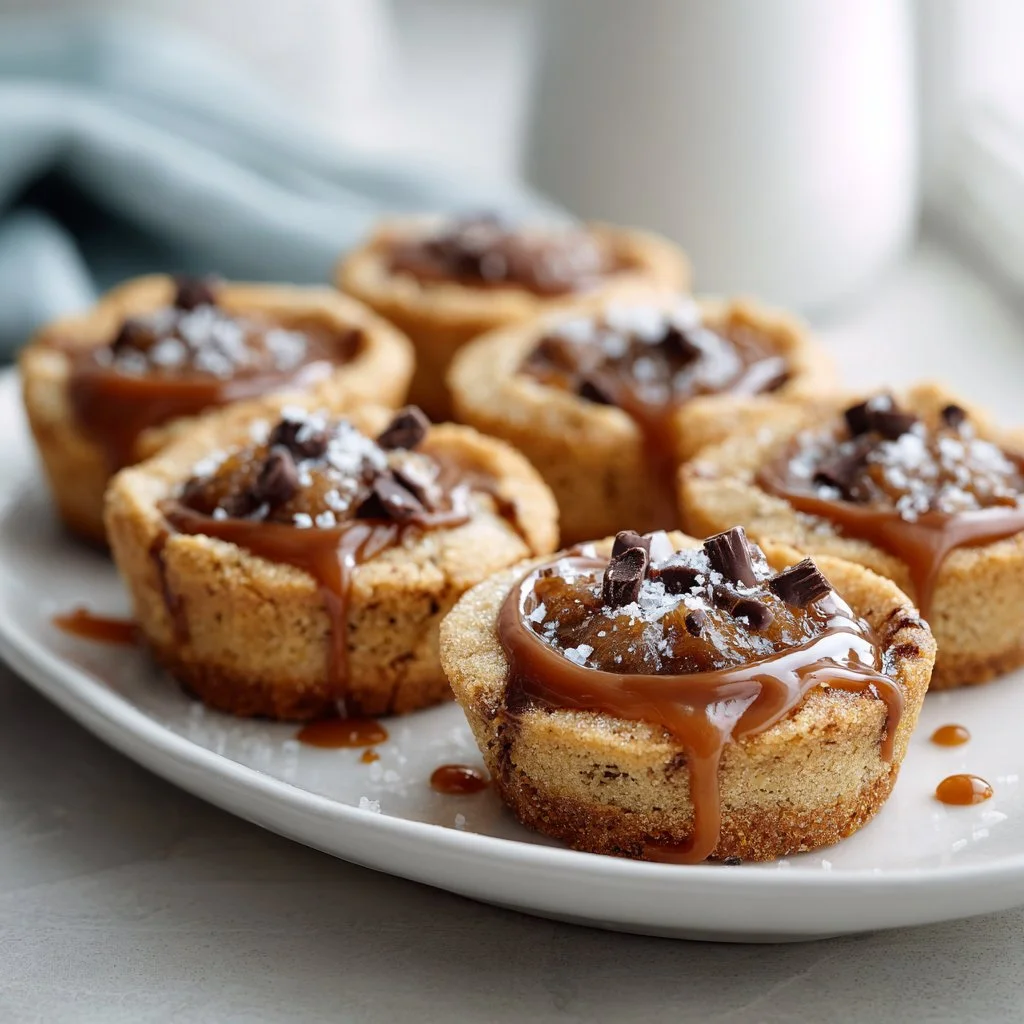
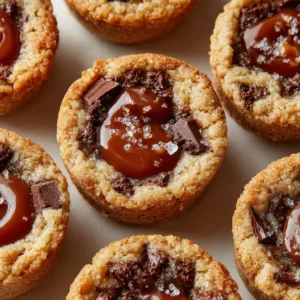
Start with a buttery, caramel-studded cookie that’s snackable, nostalgic, and shockingly simple to make. These Twix Cookie Cups deliver a pocket of shortbread-like cookie, a gooey caramel center, and a glossy chocolate top in every bite.
They’re perfect for parties, lunchboxes, or midnight cravings. Make a double batch — they’ll vanish fast.
If you like other one-bite favorites, try a similarly easy twist on banana bread cookies while these chill.
Why You’ll Love This Twix Cookie Cups
– Bite-sized, fuss-free treats that taste like Twix bars in cookie form.
– Quick dough with pantry staples — no chilling required.
– Customizable caramel and chocolate layers for dietary swaps.
– Make-ahead friendly: bake now, fill later.
– Crowd-pleasing texture contrast: crisp edges, soft base, molten center.
– Great for gifting in boxes or tins.
These Twix Cookie Cups combine a lightly crisp cookie shell with a chewy, buttery interior and a molten caramel core topped with smooth, tempered chocolate. The contrast of textures and familiar sweet-salty balance makes each cup addictive without being overly complicated. The taste is buttery and caramel-forward, with chocolate rounding out each mouthful into a tidy little dessert.
★★★★★ “I made these for a bake sale and they disappeared first. The caramel is perfectly gooey and the cookie holds together — everyone asked for the recipe.” — Jamie R.
Key Ingredients for Twix Cookie Cups
Butter (1/2 cup, softened) plays the lead role in flavor and mouthfeel. Choose high-quality unsalted butter for the cleanest, most controllable taste; European-style butter adds richness thanks to higher butterfat. If you substitute margarine or a low-fat spread, expect a flatter flavor and a softer, greasier texture that won’t crisp at the edges.
Brown Sugar (1/2 cup) is critical for moisture and that toffee-like depth. Light or dark brown sugar both work, but dark brown sugar gives a richer molasses note closer to Twix. Swapping in granulated sugar will make the cookies drier and less complex; a mix of granulated and brown can work but reduces chewiness.
All-Purpose Flour (1 cup) gives the structure for the cookie cups. Use fresh flour and measure by spooning into the cup then leveling; overpacking yields dense, tough shells. If you try a 1:1 gluten-free flour, expect a different crumb and possibly crumbling — add a binder like xanthan gum if your blend doesn’t contain one.
Caramel Sauce or Soft Caramels (about 1 tablespoon per cup) create the signature molten center. Store-bought caramel sauce gives consistency and easy portioning, while soft caramel candies require slight melting and give a chewier, more homemade texture. If you skip caramel entirely, substitute a thick jam or dulce de leche for a different but still luscious center.
Full Ingredient List for Twix Cookie Cups
– 1 cup All-Purpose Flour
– 1/2 cup Butter, softened
– 1/2 cup Brown Sugar
– 1 large Egg
– 1/4 teaspoon Salt
– 1 teaspoon Vanilla Extract
– Caramel Sauce or Soft Caramels (about 1 tablespoon per cup)
– Chocolate Chips or Chopped Chocolate (about 1 tablespoon per cup)
Step-by-Step Instructions for Twix Cookie Cups
Step 1: Cream the butter and brown sugar
Start by creaming softened butter and brown sugar together until the mixture is light and fluffy. Use a stand mixer with the paddle or a hand mixer on medium speed, scraping the bowl once so everything blends evenly.
Pro Tip: Visual cue — the mixture should look paler than when you started and feel airy when you lift the beater.
Step 2: Add the egg and vanilla
Mix in the large egg and vanilla extract until fully combined. Beat just until the egg is incorporated; overbeating can lead to a tougher cookie.
Pro Tip: Visual cue — the batter will look smooth and slightly glossy, with no streaks of raw egg.
Step 3: Stir in flour and salt
Gradually add the all-purpose flour and salt, stirring continuously until a soft dough forms. Mix just until no dry flour is visible to avoid overworking the gluten.
Pro Tip: Visual cue — the dough will come together into a soft ball that holds shape but is still slightly tacky, not dry or crumbly.
Step 4: Press dough into muffin tins
Press the cookie dough evenly into greased muffin tins, creating small wells in the center of each cup to hold the layers of caramel and chocolate later on. Aim for about 1 tablespoon of dough per tin for 12 standard cups, adjusting thickness as desired.
Pro Tip: Visual cue — each well should have a uniform rim that can support filling without breaking; the center should be slightly thinner than the edges.
Step 5: Bake cookie shells
Bake the cookie shells in a preheated oven at 350°F (175°C) for 10 to 12 minutes or until the edges turn lightly golden. Remove from oven and allow them to cool slightly while still in the muffin tin so they firm up but remain warm for filling.
Pro Tip: Visual cue — the edges will be faintly golden and the centers will look set but not puffed; they should spring back slightly when touched.
Step 6: Add the caramel
Place a spoonful of caramel sauce or softened caramels into each cookie well. If using wrapped soft caramels, melt them gently — a few seconds in the microwave or a low simmer in a saucepan — then spoon into the wells. Gently press so the caramel fills the cavity without overflowing the edges.
Pro Tip: Visual cue — the caramel should be glossy and slightly domed; it will flatten a bit as it cools but should still sit neatly inside the cookie.
Step 7: Top with chocolate
Sprinkle chocolate chips or chopped chocolate over the warm caramel layer so it melts slightly, creating a smooth, glossy chocolate topping. Tap the tray gently so the chocolate spreads; if needed, use the back of a spoon to smooth the top.
Pro Tip: Visual cue — the chocolate should melt just enough to look shiny and start to meld with the caramel, not run off the sides.
Step 8: Chill and unmold
Transfer the muffin tin to the refrigerator and chill for at least 30 minutes to let the chocolate harden. Once set, carefully remove the Twix Cookie Cups from the tin by running a thin spatula around each cup or popping them out gently with your fingers.
Pro Tip: Visual cue — the chocolate will be firm to the touch and the caramel will be set but still yielding when pressed lightly.
Expert Tips for Twix Cookie Cups
– Temperature tip: Use room-temperature butter and egg to ensure even creaming; cold ingredients won’t incorporate properly.
– Baking tip: Rotate the muffin tin halfway through baking if your oven has hot spots to achieve uniform browning.
– Texture troubleshooting: If cookie cups come out too soft, bake 1–2 minutes longer and ensure dough is pressed thinner along edges.
– Equipment tip: Nonstick or silicone muffin tins make unmolding easier; if using metal, grease well or use liners for a cleaner release.
– Chocolate topping tip: For a shiny finish, stir a teaspoon of neutral oil into the melted chocolate before spooning over caramel.
– Common mistake: Overfilling with caramel leads to overflow; measure about 1 tablespoon per cup and leave a little headspace.
– Flavor boost: Sprinkle a tiny pinch of flaky sea salt on the chocolate after chilling for a professional sweet-salty finish.
– Make-ahead tip: Bake and store shells separately from caramel and chocolate if you want to fill and assemble the day of serving.
For related texture experiments and flavor play, consider how variations in fat and sugar affect cookies by comparing to a brown-butter approach like in brown butter cookie recipes.
Storage & Freezing for Twix Cookie Cups
Refrigerator storage: Place Twix Cookie Cups in an airtight container with parchment layers to prevent sticking. Store in the fridge for up to 5 days for best texture.
Freezer storage: Freeze on a tray until firm, then transfer to a freezer-safe container with parchment between layers. Freeze for up to 3 months. Thaw in the fridge overnight for best texture rather than at room temperature, which can make caramel runny.
Thawing and reheating: Thaw in the refrigerator for several hours. To revive a slightly soft chocolate top, place cups at room temperature for 15 minutes then chill briefly to re-firm. Avoid microwave reheating — it melts chocolate and softens cookie bases unevenly.
Use shallow, rigid containers for storage so the chocolate tops don’t crack under weight, and label with date for rotation. For travel, pack snugly in a box with parchment dividers.
For alternative packaging and gifting ideas, reference sturdy bar cookie storage techniques similar to those in chewy cookie bars guides.
Variations & Substitutions for Twix Cookie Cups
Salted Pretzel Twix Cookie Cups — Add a crushed pretzel to the dough and top with a sprinkle of pretzel pieces before chilling. The result is a pronounced salty crunch that contrasts beautifully with the caramel and chocolate.
Peanut Butter Twix Cookie Cups — Mix 2 tablespoons of creamy peanut butter into the dough and use peanut butter-filled caramels or a spoon of natural peanut butter in the center. Expect a nuttier flavor profile and slightly denser texture.
Gluten-Free Twix Cookie Cups — Swap the all-purpose flour for a cup-for-cup gluten-free flour blend containing xanthan gum, and bake a touch longer if the cups feel wetter. The texture will be slightly different but still satisfying; for a tested GF take, see a gluten-free adaptation like specialty recipes for tips on binding and crisping.
Miniature Cheesecake Twix Cookie Cups — After baking the cookie shells, spoon a thin layer of no-bake cheesecake filling atop the cooled base, then add caramel and chocolate. This creates a creamier, tangy layer under the caramel for a dessert hybrid.
Frequently Asked Questions About Twix Cookie Cups
Q: Can I make Twix Cookie Cups ahead of time for a party?
A: Yes. Bake the cookie shells up to 3 days ahead and store them in an airtight container at room temperature. Keep caramel and chocolate separate if you want the freshest shine; fill and chill the day of the event to avoid sticky toppings that attract dust.
Q: What’s the best way to get the caramel smooth and not grainy?
A: If using soft caramels, melt them slowly with a teaspoon of cream or butter over low heat, stirring constantly. Microwave in short bursts, stirring between each, to avoid overheating. Store-bought caramel sauce is a reliable shortcut that’s smooth out of the jar.
Q: My cookie cups are breaking when I remove them from the tin. How do I prevent that?
A: Grease the muffin tin well or use silicone liners. Let the cups cool slightly so the cookie firms, but don’t let them fully harden — slightly warm helps them pop out more easily. If using metal tins, run a thin offset spatula around each edge before turning them out.
Q: Can I temper the chocolate for a crisp snap?
A: Yes. Tempering yields a glossy, snappy top that resists finger smudges. If you don’t temper, the chocolate will still set but may bloom over time; stirring a little coconut oil into melted chocolate can mimic some shine without full tempering.
Q: How do I adjust baking time for mini or jumbo tins?
A: For mini tins, reduce bake time to 8–10 minutes and check early for golden edges. For jumbo tins, increase to 12–14 minutes and monitor the centers; large cups need extra time to set while maintaining crisp edges. Always look for lightly golden rims as your cue.

Final Thoughts on Twix Cookie Cups
These Twix Cookie Cups are an easy, crowd-pleasing way to capture the cookie-bar-candy experience in a single bite. Leave a star rating in the recipe card below and pin this recipe to Pinterest to save it for your next bake.
For more inspiration and variations, check these related takes on Twix Cookie Cups from other bloggers: Twix Cookie Cups (From Scratch) – Sweetest Menu, an alternate method at Twix Cookie Cups | Moribyan, and a gluten-free version at Delicious Twix Cookie Cups! (gluten-free) – rachLmansfield.
Twix Cookie Cups
Ingredients
For the cookie cups
- 1 cup All-Purpose Flour Use fresh flour and measure correctly to avoid dense cookies.
- 1/2 cup Butter, softened Use high-quality unsalted butter for best flavor.
- 1/2 cup Brown Sugar Light or dark brown sugar works; dark has a richer flavor.
- 1 large Egg Ensure it’s at room temperature for better incorporation.
- 1/4 teaspoon Salt
- 1 teaspoon Vanilla Extract
For the filling
- 1 tablespoon Caramel Sauce or Soft Caramels Use about 1 tablespoon per cup.
- 1 tablespoon Chocolate Chips or Chopped Chocolate Use about 1 tablespoon per cup.
Instructions
Preparation
- Cream the softened butter and brown sugar together until light and fluffy using a stand mixer or hand mixer.
- Add the egg and vanilla extract, mixing until fully combined but not overbeating.
- Gradually stir in the all-purpose flour and salt until a soft dough forms.
- Press the dough evenly into greased muffin tins, creating small wells in the center.
Baking
- Bake the cookie shells in a preheated oven at 350°F (175°C) for 10 to 12 minutes until lightly golden.
- Remove from the oven and cool slightly in the muffin tin.
Filling
- Place a spoonful of caramel sauce or melted caramels into each cookie well.
- Sprinkle chocolate chips or chopped chocolate over the caramel, allowing it to melt slightly.
- Chill the muffin tin in the refrigerator for at least 30 minutes to let the chocolate harden.
Serving
- Carefully unmold the Twix Cookie Cups using a thin spatula or fingers.