
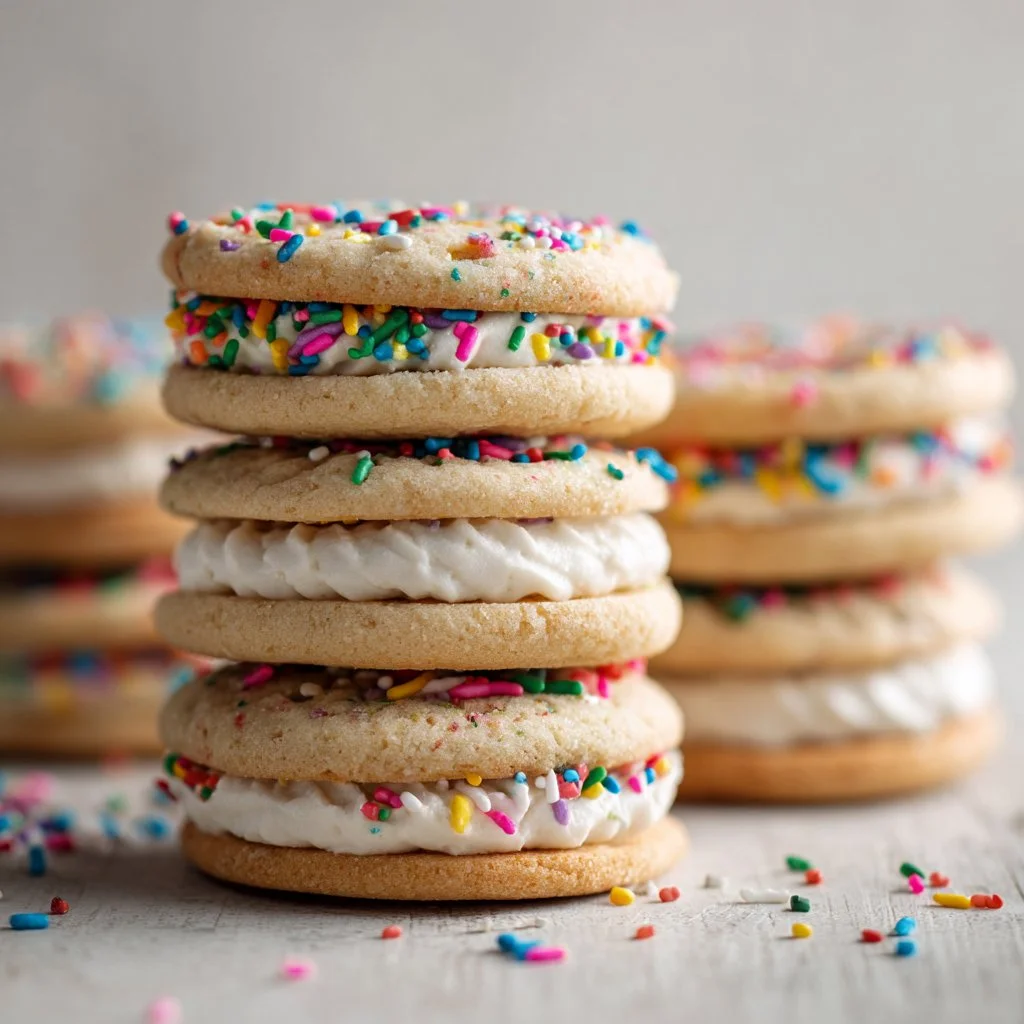
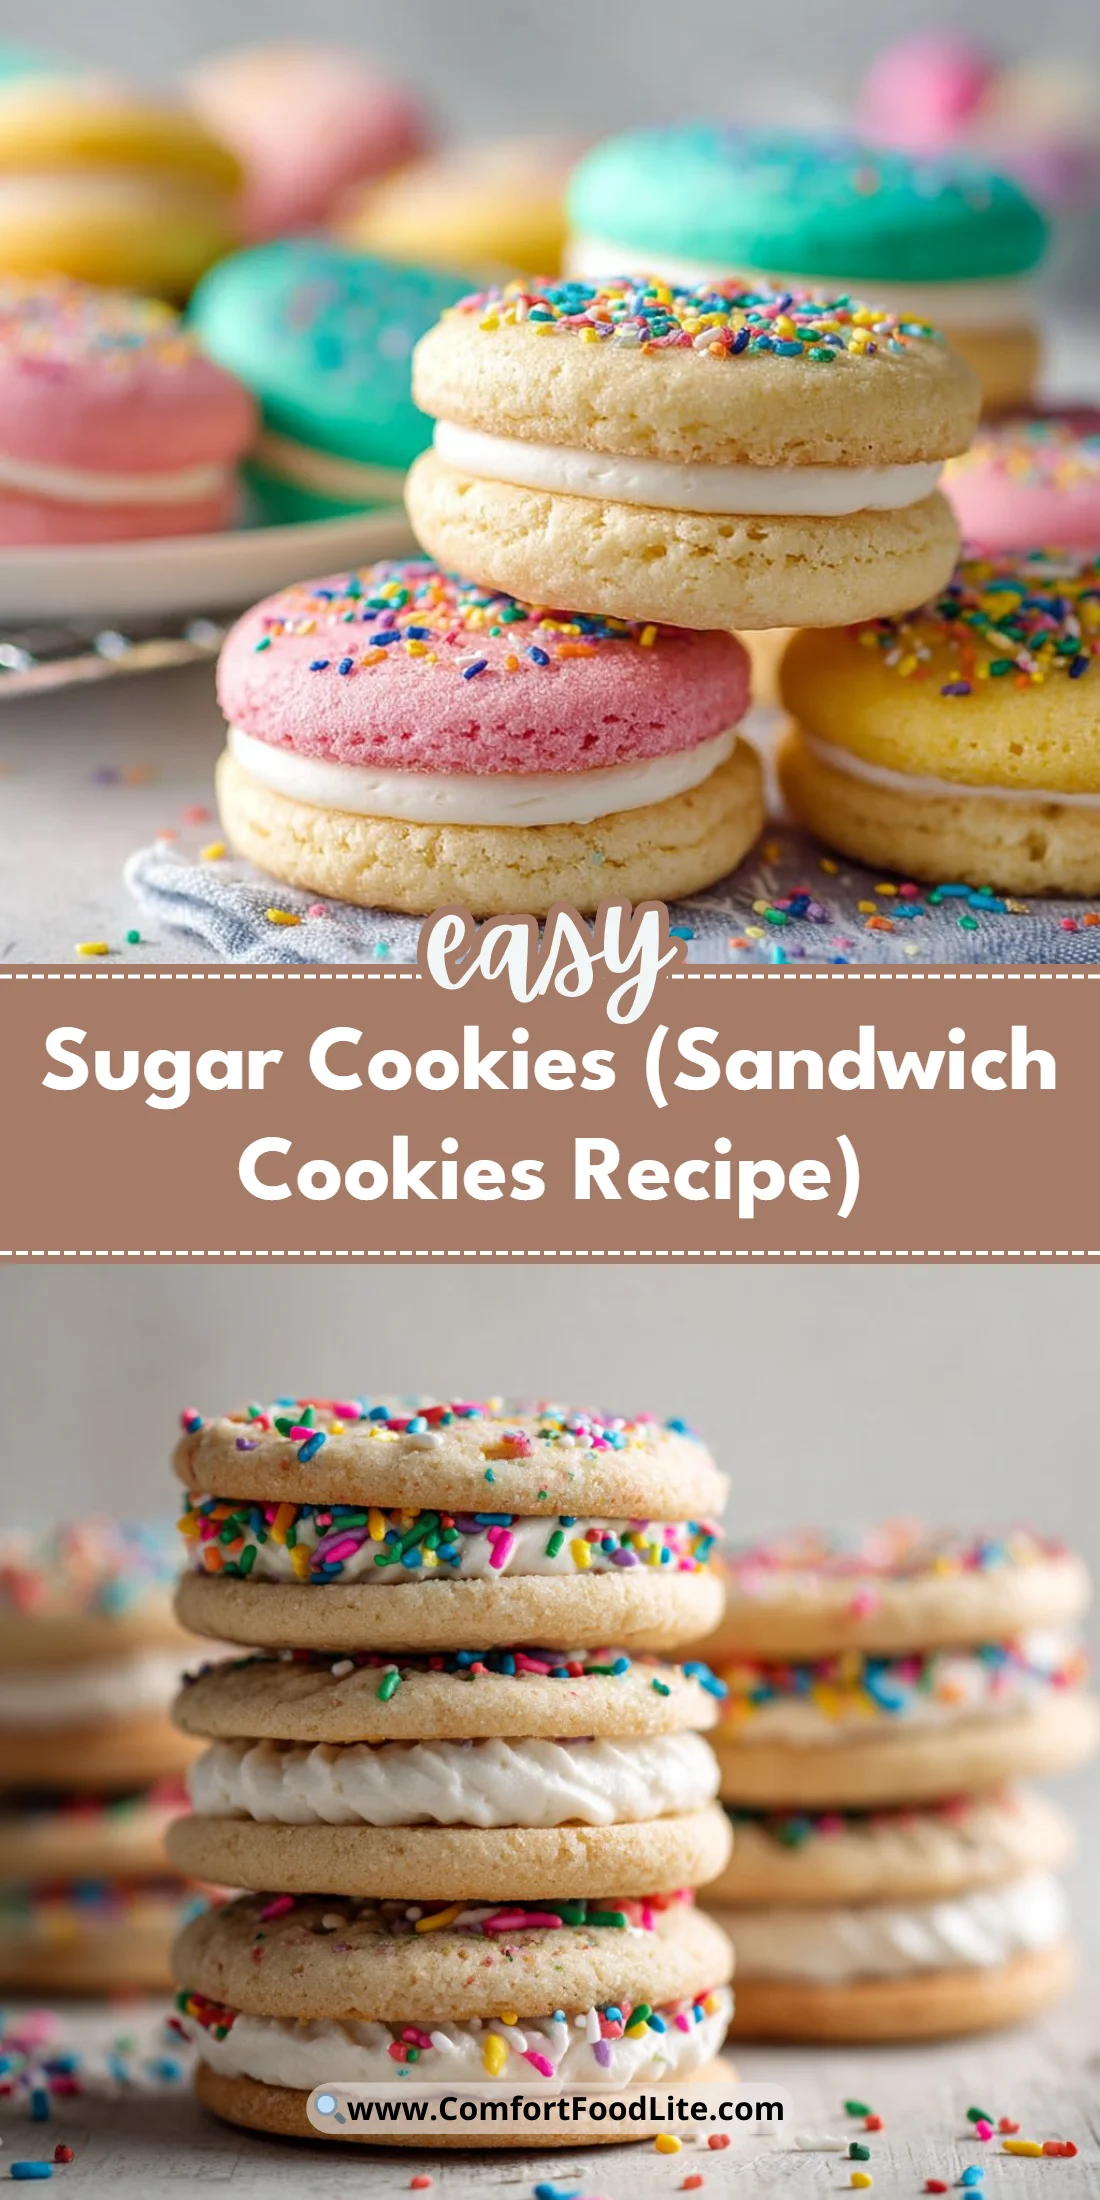
The first time I made these sugar sandwich cookies I was surprised by how simple they are and how festive the colors look when sandwiched with buttercream.
They bake up tender at the edges and slightly crisp in the center—perfect for decorating or just nibbling with coffee.
This recipe is a family-friendly, no-fuss way to make sandwich cookies that travel well and keep their texture.
If you like experimenting with cookie textures, you might enjoy the technique in this other take on sugar cookies I use sometimes for softer results: fluffy sourdough discard sugar cookies.
Why You’ll Love This Recipe
- Colorful sandwich cookies that are as pretty as they are delicious.
- A reliable butter cookie base that holds up to filling without becoming soggy.
- Quick to make and easy to portion for parties or lunchboxes.
- Versatile: change the coloring, swap extracts, or add citrus zest for variety.
The texture is the real winner here: the cookies are tender but with a slight snap at the edge. The butter-forward dough gives a rich, slightly sandy crumb that contrasts with the smooth, creamy buttercream in the middle. The overall bite is clean and pleasant—sweet, buttery, and not overly dense.
"These were a hit at my daughter’s birthday—bright, soft, and the frosting wasn’t too sweet. Five stars!" — reader review
Key Ingredients
Unsalted butter (softened) — Butter is the backbone of these cookies. Use real unsalted butter for the cleanest flavor and control over salt. If you want a deeper butter note, try a European-style butter like Plugrá or KerryGold.
Granulated sugar — This recipe calls for 1 1/2 cups. The fine crystals help with structure and a little lightness when creamed with butter. Use a reliable brand and measure by spooning into the cup for accuracy.
All-purpose flour — The 2 1/2 cups of AP flour provide the right protein level for a tender-but-stable cookie. For a slightly softer result, you can swap 2–4 tablespoons with cake flour, but keep total flour the same.
Powdered sugar (for frosting) — Powdered sugar makes the buttercream smooth and stable. Sift it if it’s lumpy and use a name-brand confectioners’ sugar for the most consistent texture.
Full ingredient list:
- All-purpose flour – 2 1/2 cups
- Baking soda – 1 teaspoon
- Baking powder – 1/2 teaspoon
- Salt – 1/2 teaspoon
- Unsalted butter, softened – 1 cup
- Granulated sugar – 1 1/2 cups
- Large egg – 1
- Vanilla extract – 1 1/2 teaspoons
- Gel food coloring – 4 colors
- Unsalted butter (for frosting) – 1 cup
- Powdered sugar – 4 cups
- Vanilla extract (for frosting) – 1 teaspoon
- Pinch of salt
Step-by-Step Instructions
Step 1: Prep the oven and dry ingredients
Preheat the oven to 350°F. Line a cookie sheet with parchment paper so cookies bake evenly and release cleanly.
In a medium bowl, whisk together the flour, baking soda, baking powder, and salt until evenly combined. Set the dry mix aside while you cream the butter.
Pro Tip: Measure your flour properly—spoon it into the cup and level with a knife. You’ll avoid dense cookies when you do this.
Step 2: Cream butter and sugar
In a large bowl, beat 1 cup of softened unsalted butter with 1 1/2 cups granulated sugar using a hand mixer. Beat until the mixture is noticeably lighter in color and fluffy in texture.
Add the egg and 1 1/2 teaspoons vanilla extract. Mix on medium speed until fully combined and smooth.
Visual cue: The creamed mixture should hold soft peaks and look almost pale yellow when ready.
Pro Tip: If the butter was too cold, give it a few extra seconds or let it sit at room temperature for a few minutes. Overheated butter will make the batter greasy.
Step 3: Combine dry into wet
Add the dry ingredients to the wet mixture gradually, about 1 cup at a time. Beat on low speed until just combined between additions to avoid overworking the dough.
The dough will be soft but not sticky; it should hold together when squeezed gently in your hand.
Pro Tip: If the dough feels too soft to scoop, chill it for 15–20 minutes. Slightly firmer dough makes rounder cookies.
Step 4: Divide and color the dough
Divide the dough into four equal portions in separate bowls. Add 2–3 drops of different gel food coloring to each bowl and mix until the color is uniform and streak-free.
Use gel rather than liquid food coloring to avoid thinning the dough.
Pro Tip: Start with fewer drops; gel color can intensify as it sits. You can always add more if needed.
Step 5: Scoop, shape, and bake
Scoop 1 tablespoon of dough at a time, roll each into a ball, and place them on the prepared cookie sheet about 1.5 inches apart to allow for slight spreading.
Bake for 7–8 minutes, or until the edges are just barely golden but the centers still look soft. Let cookies cool on the pan for 5 minutes before moving them to a wire rack to cool completely.
Visual cue: Cookies will still be soft in the center when removed; they firm as they cool.
Pro Tip: Rotate the pan halfway through the bake if your oven has hot spots.
Step 6: Make the buttercream and assemble
To make the frosting, beat 1 cup of butter with 2 cups of powdered sugar until smooth. Add the remaining 2 cups powdered sugar, 1 teaspoon vanilla, and a pinch of salt. Beat for about 3 minutes until the frosting is pale and fluffy.
Pipe or spread buttercream onto the bottom of one cooled cookie and sandwich with a matching or contrasting color cookie.
Pro Tip: If your buttercream seems too thin, chill for 10 minutes; if too stiff, beat in a teaspoon of milk.
Expert Tips for Success
Control your butter temperature. Use butter softened to the point where it gives slightly under pressure but isn’t greasy. Too cold and you’ll get lumps; too warm and your cookies will spread excessively.
Don’t overmix after adding flour. Overworking develops gluten and makes the cookies tough. Mix only until the dry ingredients disappear.
Use gel food coloring. Gel provides concentrated color without adding liquid. Brands like AmeriColor and Wilton are reliable for vibrant, consistent hues.
Chill for shape control. If you prefer perfectly round, tidy cookies, chill the scooped dough for 10–20 minutes before baking. This reduces spreading and improves uniformity.
Watch baking time closely. These are thin cookies and bake fast. Start checking at 6 1/2 minutes if your oven runs hot. They should be pale with barely golden edges.
Make a smooth buttercream by sifting powdered sugar if it’s clumpy. Beat the frosting long enough to trap air for a light, pipeable texture. If you want a tangier filling, fold in 2–4 tablespoons of cream cheese.
Use a small cookie scoop for consistent size. Uniform cookies bake evenly and make sandwiching easier.
Adjust sweetness with salted butter if desired. If you use salted butter, omit the extra pinch of salt in the frosting to keep balance.
For a more tender bite, experiment with swapping 2 tablespoons of AP flour for cornstarch. It softens the crumb without changing structure.
If planning for an event, bake a day ahead. Cookies keep well and flavors meld, making them taste even better the next day. For ideas on decorated sugar cookies with different textures, see this recipe for soft Valentines sugar cookies with pink buttercream.
Storage & Freezing
Fridge: Store assembled sandwich cookies in an airtight container in the refrigerator for up to 5 days. The buttercream will stay stable and the cookies will stay tender. Let them come to room temperature for 20–30 minutes before serving for the best texture.
Unassembled cookies: Store baked, cooled cookies in an airtight container at room temperature for up to 3 days. Add a parchment layer between cookies to prevent sticking.
Freezer (cookies only): Freeze baked, cooled cookies in a single layer on a baking sheet until solid, then transfer to a freezer-safe bag or container. They keep well for up to 3 months. Thaw at room temperature for 30–60 minutes before filling.
Freezer (assembled sandwiches): You can freeze assembled sandwich cookies for up to 1 month. Place them in a single layer with parchment between layers, then thaw in the refrigerator overnight before serving to avoid condensation softening the buttercream.
Reheating: These cookies don’t need reheating. If you prefer a warm center, microwave a single sandwich cookie for 6–8 seconds at 50% power—be careful, it warms quickly.
Variations & Substitutions
Lemon or orange zest: Add 1–2 teaspoons of citrus zest to the dough and 1/2 teaspoon of juice to the buttercream for a bright, fresh variation.
Chocolate-hazelnut filling: Swap the buttercream for a thin layer of Nutella or a whipped chocolate ganache for a richer sandwich.
Gluten-free swap: Use a 1:1 gluten-free flour blend that contains xanthan gum. Expect slightly different spread; chill the dough if it’s too loose.
Reduced-sugar option: Cut granulated sugar by 1/4 cup and compensate with a splash of maple syrup for flavor. Note: this will affect browning and texture slightly.
Strawberry twist: Fold 2 tablespoons of freeze-dried strawberry powder into the buttercream for a natural pink color and authentic flavor. For a full strawberry sugar cookie approach, check this recipe for inspiration: strawberry sugar cookies for Valentine’s Day.
Frequently Asked Questions
Q: Can I make the dough ahead and freeze it?
A: Yes. Scoop the dough onto a baking sheet and freeze until solid. Transfer the frozen dough balls to a freezer bag and bake from frozen, adding 1–2 minutes to the baking time. This is ideal for prepping cookie assortments ahead of time.
Q: Why did my cookies spread too much?
A: Common causes are too-warm butter, too-much sugar, or an oven running hot. Chill the dough, measure flour correctly, and ensure butter is at the proper softened stage to prevent excess spread.
Q: Can I use liquid food coloring instead of gel?
A: You can, but liquid colors add moisture and can change dough consistency. If you must use liquid, use less and add small amounts until you reach the shade you want, then compensate by chilling the dough.
Q: How do I get a firmer frosting for piping?
A: Chill the buttercream for 10–15 minutes to firm it up. Alternatively, reduce the butter by 1–2 tablespoons and increase powdered sugar by the same amount to thicken.
Q: Are these cookies good for shipping?
A: Yes—sandwich cookies travel well when packed snugly in an airtight container with parchment between layers. For long trips, consider freezing unassembled cookies and filling them at the destination to avoid softened filling.
Final Thoughts
These sugar sandwich cookies strike a great balance between buttery cookie and fluffy buttercream, and they’re easy enough for weekday baking or party prep.
If you tried them, please leave a star rating in the recipe card below and pin this page to your favorite baking board on Pinterest.
Conclusion
If you want a creamier alternative to the buttercream shown here, try the slightly tangier approach in this Sugar Sandwich Cookies with Cream Cheese Frosting recipe for a different flavor profile.
For a straight buttercream sandwich cookie technique that focuses on frosting texture and assembly, I recommend this detailed Buttercream Sandwich Cookie Recipe – The Sugar Coated Cottage post.
If you want festive, seasonal ideas and decorating inspiration, this variation on Christmas sugar cookie sandwiches has helpful tips: Christmas Sugar Cookie Sandwiches – Two Sisters.

Sugar Sandwich Cookies
Ingredients
Cookie Ingredients
- 2.5 cups All-purpose flour
- 1 teaspoon Baking soda
- 0.5 teaspoon Baking powder
- 0.5 teaspoon Salt
- 1 cup Unsalted butter, softened Real unsalted butter preferred.
- 1.5 cups Granulated sugar Measured by spooning into the cup.
- 1 large Egg
- 1.5 teaspoons Vanilla extract
- 4 colors Gel food coloring Use gel instead of liquid.
Buttercream Ingredients
- 1 cup Unsalted butter
- 4 cups Powdered sugar Sift if lumpy.
- 1 teaspoon Vanilla extract For frosting.
- a pinch Salt
Instructions
Preparation
- Preheat the oven to 350°F and line a cookie sheet with parchment paper.
- In a medium bowl, whisk together the flour, baking soda, baking powder, and salt.
Creaming
- In a large bowl, beat the softened butter and granulated sugar until fluffy and light in color.
- Add the egg and vanilla extract, mixing until smooth.
Dough Combination
- Gradually add the dry ingredients to the wet mixture, mixing until just combined.
- If the dough feels too soft, chill it for 15-20 minutes.
Coloring and Shaping
- Divide the dough into four portions and color each with different gel food coloring.
- Scoop 1 tablespoon of dough, roll into balls, and place on the prepared cookie sheet.
Baking
- Bake for 7-8 minutes until edges are golden but centers are soft.
- Let cool for 5 minutes on the pan, then transfer to a wire rack.
Making Buttercream
- To make the frosting, beat 1 cup of butter with 2 cups of powdered sugar until smooth.
- Add the remaining powdered sugar, vanilla extract, and pinch of salt, then beat until fluffy.
Assembly
- Spread buttercream on the bottom of one cookie and sandwich with another.