The first time I made these Strawberry Kiss Cookies I was skeptical that a packet of gelatin could flavor a whole batch so vividly.
They turned out soft, tender, and unmistakably strawberry without any fresh fruit on hand.
If you want a festive, fast cookie that feels special, this is the one to keep in your repertoire.
These cookies are forgiving and perfect for baking with kids, last-minute gifts, or a pink bake sale table.
If you like a classic buttery shortbread base with a pop of strawberry and a chocolate finish, you’ll be hooked.
For a slightly different take and serving suggestions, see a close variation I adapted from another tried recipe: homemade strawberry kiss cookies.
Why You’ll Love This Recipe
- Bright strawberry flavor from an easy pantry ingredient.
- Buttery, melt-in-your-mouth texture that still holds a kiss in the center.
- Fast prep with no chilling of dough beyond a short firming step, if you’re in a hurry.
- Excellent for themed parties, valentine treats, or gift tins.
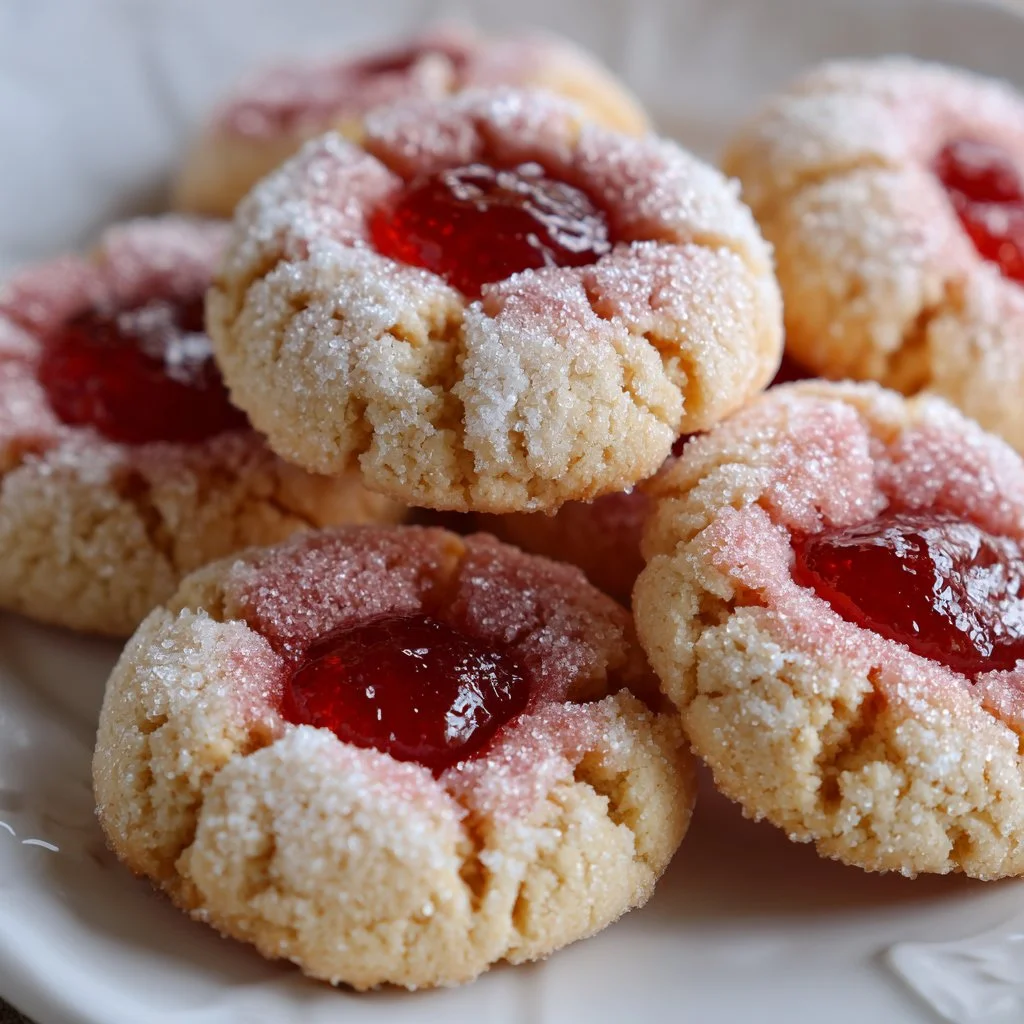
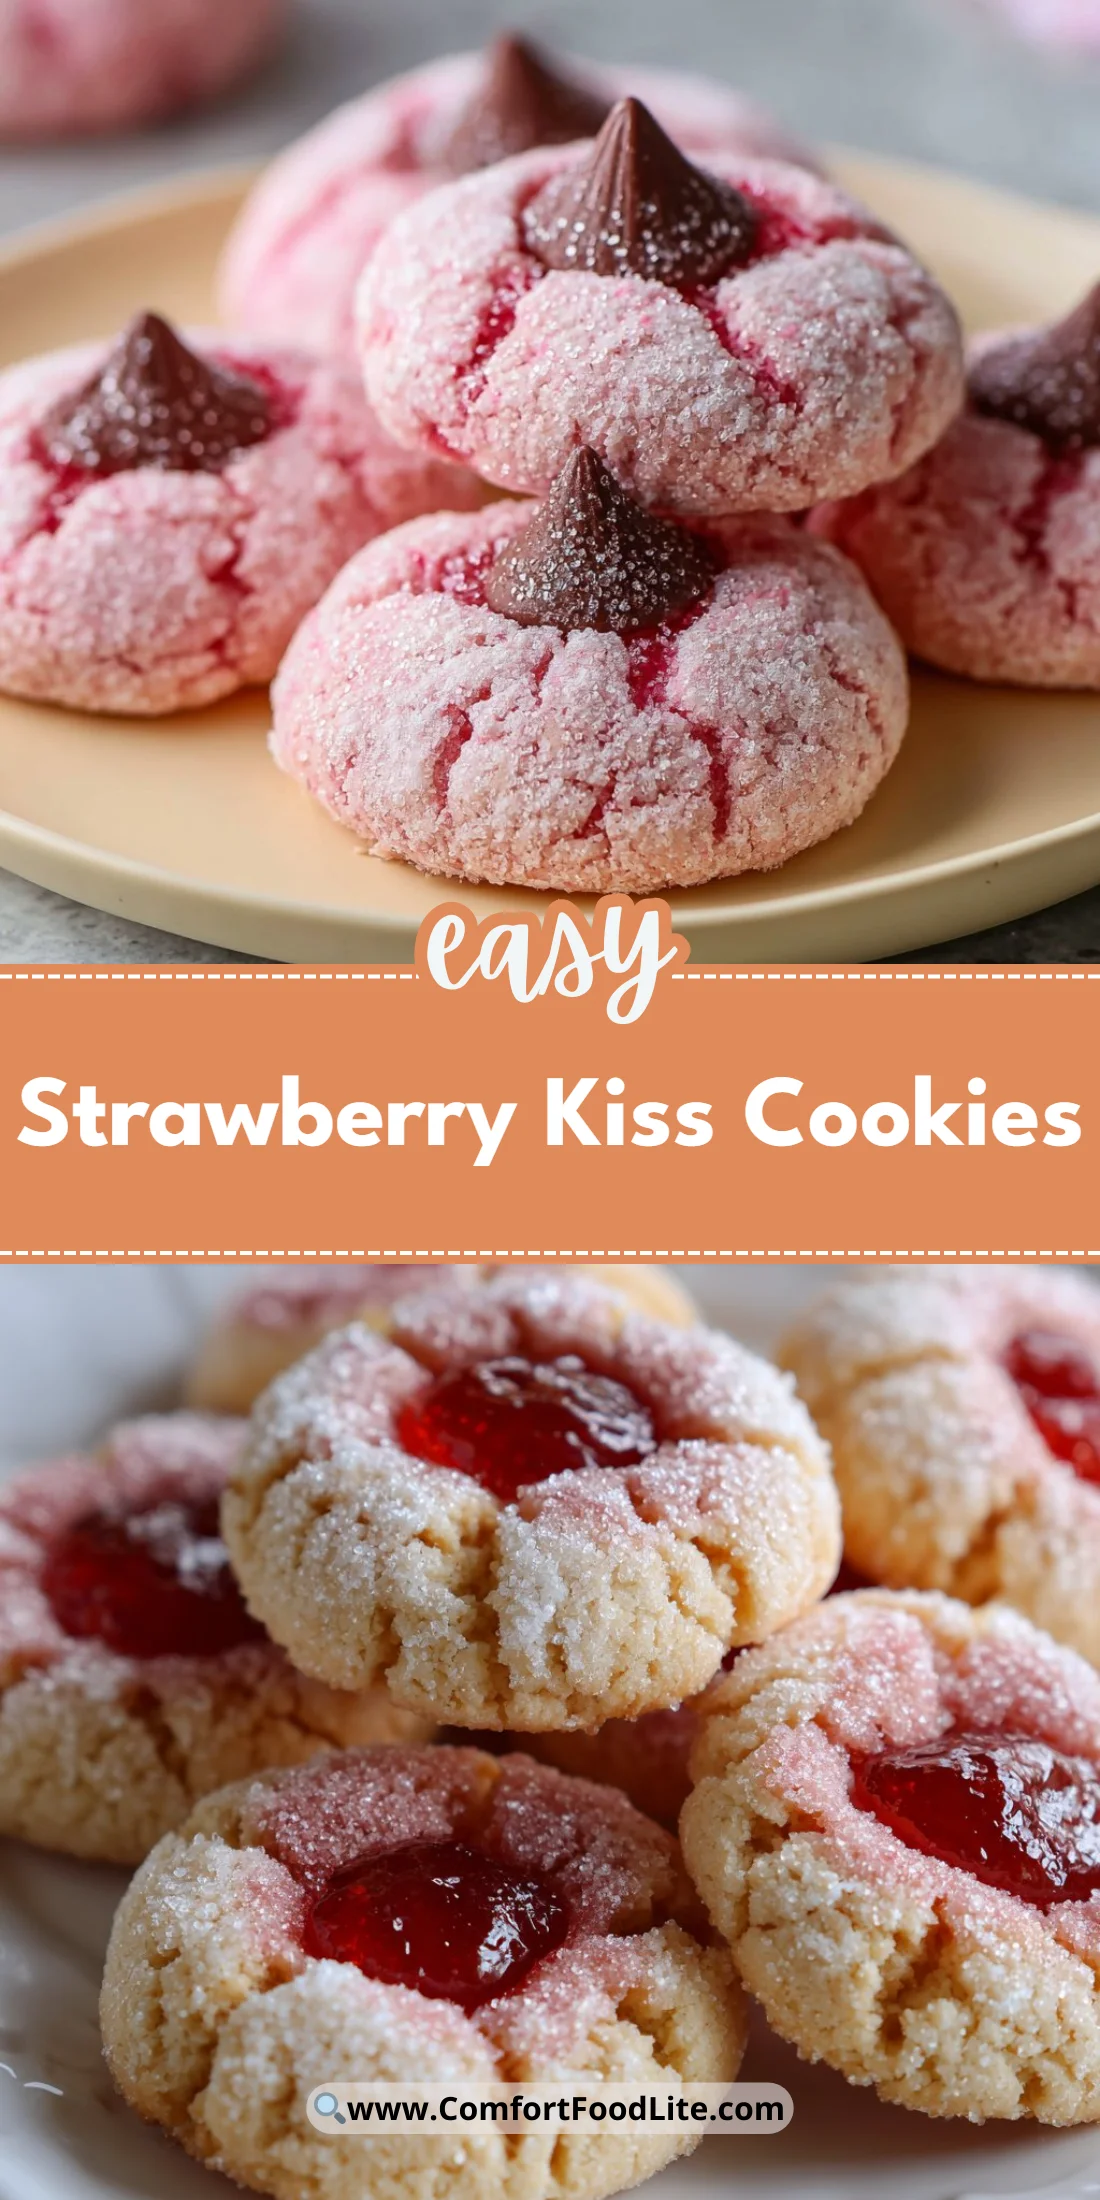
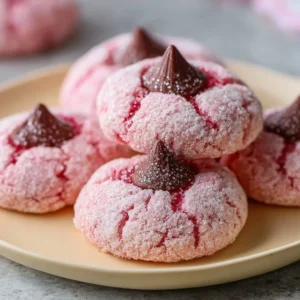
The texture lands between a soft shortbread and a sugar cookie — tender crumbs that dissolve on the tongue with a buttery backbone. The strawberry gelatin adds both flavor and a subtle rosy color without adding moisture, so the cookies bake up with delicate edges and a soft center that firms up as they cool. Pressing a chocolate kiss into the warm cookie creates a glossy dome that nestles in the center without bleeding into the pink dough.
“I made these for a school bake sale and they disappeared in an hour — everyone wanted the pink cookies with the chocolate on top. Perfect texture and so easy!” — Rachel, reader
Key Ingredients
Unsalted butter (1 cup / 226g)
Butter is the foundation here: it provides flavor and a tender crumb. Use a high-quality European-style butter if you want a richer flavor — the higher butterfat gives a silkier mouthfeel. Make sure it’s softened, not melted; soft butter creams with sugar to trap air that helps the cookies rise slightly.
Strawberry-flavored gelatin mix (1 package / 3 oz)
This packet is doing double duty: it flavors and lightly colors the dough. I prefer a name-brand gelatin for consistent flavor intensity. It dissolves into the batter so you get even pinkness without adding extra liquid or fresh fruit.
All-purpose flour (2 cups + 2 tbsp / 280g)
Flour determines structure. Measuring by weight gives the most reliable result; 280g is precise for this dough. If your dough seems sticky, adding up to two extra tablespoons is better than overworking the dough, which can make cookies tough.
Chocolate kiss candies (24–30, unwrapped)
Classic milk chocolate kisses add a creamy finish and a pleasant textural contrast. Use fresh candies — older kisses can bloom or dry out. If you prefer dark chocolate, a high-quality 60–70% bar cut into small pieces also works well.
Full ingredient list:
- 1 cup (226g) unsalted butter, softened
- 1 cup (200g) granulated sugar
- 1 large egg, at room temperature
- 1 tsp vanilla extract
- 1/2 tsp almond extract (optional)
- 2 cups + 2 tbsp (280g) all-purpose flour
- 1 tsp baking powder
- 1/4 tsp salt
- 1 package (3 oz) strawberry-flavored gelatin mix
- 1/4 cup powdered sugar, for dusting
- 24-30 chocolate kiss candies, unwrapped
Step-by-Step Instructions
Step 1: Mixing the dough
In a large bowl, beat the softened butter and granulated sugar until light and fluffy, about 2–3 minutes.
Add the egg, vanilla, and almond extract (if using), and beat until combined.
Stir in the strawberry gelatin powder until fully mixed and the batter is uniformly pink.
Pro Tip: You’ll know the butter and sugar are ready when the mixture is pale and slightly airy — it should hold soft peaks when lifted with the beater for a second.
Step 2: Combine dry ingredients
In a separate bowl, whisk the flour, baking powder, and salt together.
Gradually add the dry ingredients to the wet mixture on low speed until a soft dough forms.
If the dough feels too sticky, incorporate 1–2 extra tablespoons of flour, adding sparingly.
Pro Tip: Look for a cohesive dough that leaves the sides of the bowl clean. Overmixing tightens gluten; stop as soon as the streaks of flour disappear.
Step 3: Shape and chill the dough
Scoop about 1 tablespoon of dough and roll between your palms to make smooth balls.
Place the dough balls on a lined baking sheet. Chill in the refrigerator for at least 1 hour, or up to overnight, to prevent excess spreading during baking.
Pro Tip: Chilling firms the butter so the cookies bake with defined shape. If rushed, 20–30 minutes in a colder section of the fridge helps, but the longer chill produces the best texture.
Step 4: Bake
Preheat oven to 350°F (175°C). Arrange chilled dough balls on a parchment-lined baking sheet about 2 inches apart.
Do NOT press an indentation into the dough before baking — this can cause excess spreading.
Bake 11–13 minutes, until the edges look set and slightly firm. Centers may seem soft but will finish as they cool.
Pro Tip: Rotate the tray halfway through for even browning. The cookies are done when edges are set and centers appear faintly glossy.
Step 5: Add the chocolate kisses
Remove from oven and let the cookies sit on the baking sheet for 2 minutes. While warm, gently press a chocolate kiss into the center of each cookie so the base nests into the dough without sinking.
Pro Tip: Waiting 2 minutes keeps the kiss from fully melting but lets it adhere. If the chocolate doesn’t stick, the cookie likely cooled too much; warm the cookie slightly and press again.
Step 6: Cool and dust
Transfer cookies to a wire rack to cool completely and allow the chocolate to set.
Dust lightly with powdered sugar before pressing in kisses to avoid powdered sugar on the chocolate surface.
Pro Tip: Dust the cookie first, then place the kiss as described; this prevents a white bloom on the chocolate and keeps the presentation clean.
For more background on similar recipes and presentation ideas, compare techniques in this roundup I reviewed earlier: strawberry kiss cookies.
Expert Tips for Success
- Temperature matters: Use room-temperature egg and softened (not melted) butter. Room-temperature ingredients emulsify more easily and trap air for a lighter cookie.
- Weigh your flour: Cups vary. Use a kitchen scale to measure 280g for consistent texture and to avoid dryness from too much flour.
- Don’t skip chilling: Chilling prevents over-spread. Even 60 minutes in the fridge makes a noticeable difference in shape and chew.
- Flour adjustments: If your kitchen is humid, dough can feel softer; add up to two tablespoons of extra flour gradually. If dough becomes crumbly, add a teaspoon of milk to bring it together.
- Use fresh gelatin packets: The flavor intensity varies by brand and age. New packets deliver stronger strawberry flavor; if your packet is older, add a pinch more for the same effect.
- Chocolate choice: Standard milk chocolate kisses give a nostalgic finish; for a richer contrast, try a darker kiss or a sea-salt-studded chocolate. Keep candies sealed until use.
- Baking sheet prep: Use parchment paper to prevent bottoms from browning too quickly. If you bake multiple sheets, allow the pan to cool between batches for even performance.
- Visual doneness cue: Edges should look set and slightly firm while centers remain slightly glossy. Cookies continue to firm off the heat; removing them too late leads to crisp edges.
- Make-ahead dough: Dough can be rolled into balls and frozen on a sheet tray, then stored in bags for up to 3 months. Bake from frozen with an extra 1–2 minutes in the oven.
- Kid-friendly steps: Let kids roll dough balls and place kisses; supervise the oven steps. This recipe’s short list of ingredients makes it an ideal beginner cookie.
For other plating ideas and a variation with sprinkles, see this themed guide: strawberry kiss cookies variations.
Storage & Freezing
Refrigerator storage: Place cooled cookies in an airtight container layered with parchment to prevent sticking. Stored in the fridge, they keep 4–5 days, though the chocolate may firm and the texture will slightly densify.
Freezer storage — baked: To freeze baked cookies, arrange cooled cookies in a single layer on a sheet tray and freeze until solid. Transfer to a freezer-safe container with parchment layers. They keep up to 3 months.
Freezer storage — dough: Roll dough into balls and freeze solid on a baking sheet. Once frozen, move to a resealable bag and freeze up to 3 months. Bake from frozen, adding 1–2 minutes to the baking time and watch for the same visual cues.
Reheating: For just-baked softness, heat individual cookies 8–10 seconds in the microwave or 3–4 minutes on a baking sheet in a 300°F oven. Avoid overheating chocolate; a brief warm-up makes the cookie tender again and melts the chocolate slightly for serving.
Variations & Substitutions
- Lemon-strawberry twist: Replace the strawberry gelatin with lemon gelatin and add 1 tsp lemon zest for a citrus-kissed pink cookie. The tartness brightens the butter.
- Gluten-free swap: Use a 1:1 gluten-free flour blend that contains xanthan gum. Reduce flour slightly if the dough feels too dry and rest the dough 10 minutes before rolling.
- Vegan option: Substitute vegan butter and a flax egg (1 tbsp ground flax + 2.5 tbsp water). Flavor may be slightly different, so add 1/4 tsp extra vanilla for balance.
- Nut topping: Press a thin slice of toasted almond into the cookie base before adding the kiss for a nutty crunch that complements the strawberry.
- Chocolate variation: Instead of kisses, drop a teaspoon of thick ganache in the center after baking for a glossy, decadent center.
Frequently Asked Questions
Q: Can I make these cookies without the gelatin packet?
A: Yes, but the characteristic strawberry flavor and pink color will be lost. If you skip gelatin, substitute 1–2 teaspoons freeze-dried strawberry powder or 1 tablespoon strawberry jam, but reduce other liquids slightly to maintain dough consistency.
Q: My cookies spread too much — what went wrong?
A: The most common reasons are too-warm butter, insufficient chilling, or too little flour. Chill the dough longer, make sure butter is just softened (not melty), and add an extra tablespoon of flour if the dough flattens easily.
Q: Can I press the kiss into the cookie before baking?
A: No — placing the kiss before baking causes excess spreading and chocolate bloom. Bake first, rest two minutes, then gently press the kiss in while the cookie is warm.
Q: How do I prevent powdered sugar from sticking to the chocolate?
A: Dust the baked cookies with powdered sugar before pressing in the kisses. This ensures the sugar settles on the cookie surface, not the chocolate.
Q: Will these cookies work at high altitude?
A: At high altitude, reduce baking powder slightly (about 1/8–1/4 tsp less) and increase flour by 1–2 tablespoons to stabilize structure. Monitor baking time closely, as cookies can finish faster.
Final Thoughts
These Strawberry Kiss Cookies are a quick, nostalgic treat that feel elevated while staying simple to make.
If you bake them, please leave a star rating in the recipe card below and pin this to Pinterest for later.
Conclusion
If you want to compare a similar classic version, check this well-loved recipe at Mama Needs Cake’s Strawberry Kiss Cookies for an alternate technique and staging ideas.
For another take that focuses on a streamlined, few-ingredient approach, read the tested method at Simply Recipes’ Strawberry Kiss Cookie recipe.
Strawberry Kiss Cookies
Ingredients
Cookie Base
- 1 cup unsalted butter, softened Use high-quality European-style butter for richer flavor.
- 1 cup granulated sugar
- 1 large egg, at room temperature Room temperature helps with emulsification.
- 1 tsp vanilla extract
- 1/2 tsp almond extract (optional) For added flavor.
- 2 cups + 2 tbsp all-purpose flour 280g is the preferred weight measurement.
- 1 tsp baking powder
- 1/4 tsp salt
- 1 package strawberry-flavored gelatin mix (3 oz) Adds flavor and color without moisture.
- 1/4 cup powdered sugar, for dusting
- 24-30 pieces chocolate kiss candies, unwrapped Use fresh kisses for best results.
Instructions
Mixing the dough
- In a large bowl, beat the softened butter and granulated sugar until light and fluffy, about 2–3 minutes.
- Add the egg, vanilla, and almond extract (if using), and beat until combined.
- Stir in the strawberry gelatin powder until fully mixed and the batter is uniformly pink.
- Pro Tip: The mixture should hold soft peaks when lifted with the beater for a second.
Combine dry ingredients
- In a separate bowl, whisk the flour, baking powder, and salt together.
- Gradually add the dry ingredients to the wet mixture on low speed until a soft dough forms. If the dough feels too sticky, incorporate 1–2 extra tablespoons of flour, adding sparingly.
- Pro Tip: Look for a cohesive dough that leaves the sides of the bowl clean.
Shape and chill the dough
- Scoop about 1 tablespoon of dough and roll between your palms to make smooth balls.
- Place the dough balls on a lined baking sheet. Chill in the refrigerator for at least 1 hour, or up to overnight.
- Pro Tip: Chilling firms the butter so the cookies bake with defined shape.
Bake
- Preheat oven to 350°F (175°C). Arrange chilled dough balls on a parchment-lined baking sheet about 2 inches apart.
- Bake 11–13 minutes, until the edges look set and slightly firm.
- Pro Tip: Rotate the tray halfway through for even browning.
Add the chocolate kisses
- Remove from oven and let the cookies sit on the baking sheet for 2 minutes.
- While warm, gently press a chocolate kiss into the center of each cookie.
- Pro Tip: Waiting 2 minutes helps the kiss adhere without fully melting.
Cool and dust
- Transfer cookies to a wire rack to cool completely and allow the chocolate to set.
- Dust lightly with powdered sugar before pressing in kisses to avoid powdered sugar on the chocolate surface.