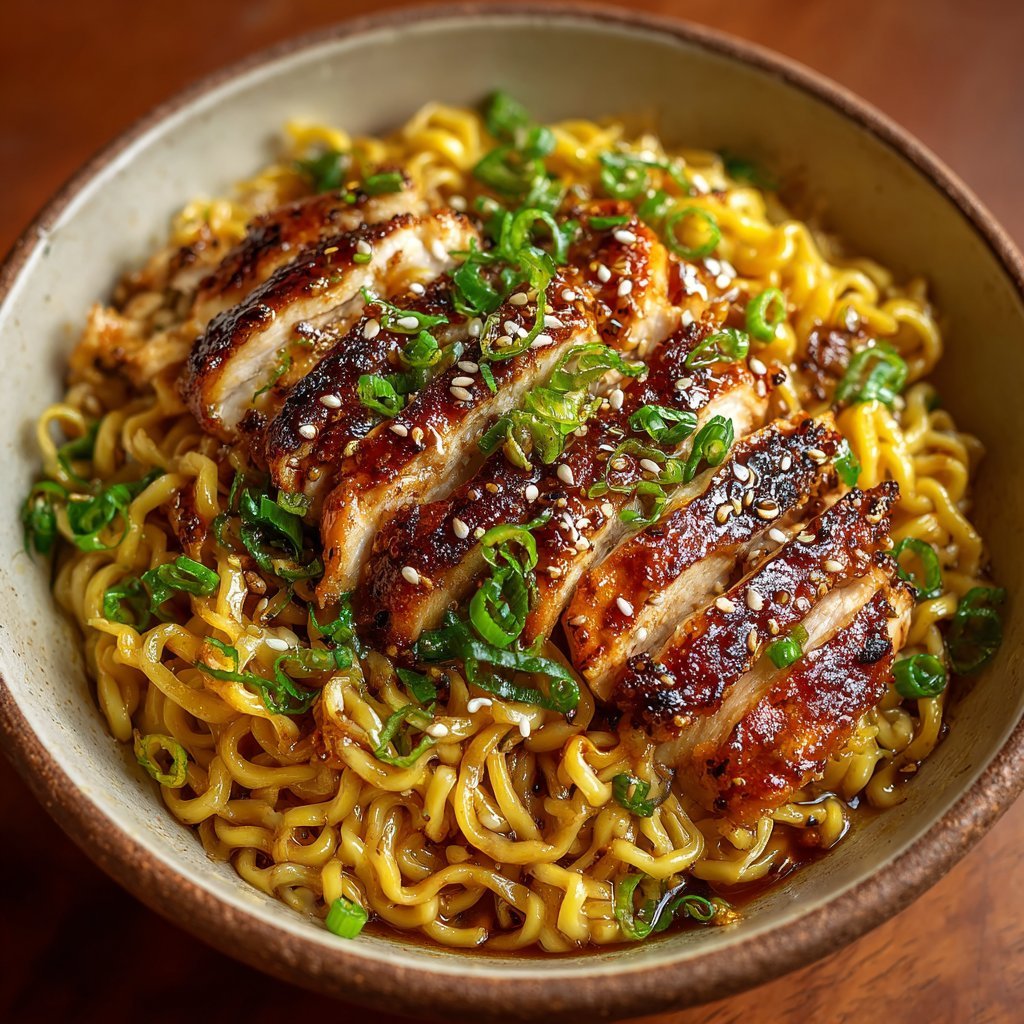
The first time I made these Sticky Garlic Chicken Noodles I thought it was too simple to be memorable.
One pan, a handful of pantry staples, and a glossy honey-soy sauce that clings perfectly to tender chicken and springy noodles.
This recipe is a weeknight winner: fast, flexible, and outrageously flavorful.
Why You’ll Love This Recipe
- Quick to make on busy nights.
- Minimal ingredients, maximum flavor.
- Sticky, sweet-savory sauce that glazes the noodles and chicken.
- Easily doubled or adapted for meal prep.
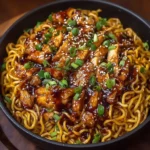
The texture here is everything: properly cooked egg noodles give a slight chew that contrasts with tender, bite-sized chicken. The sauce reduces to a glossy, clingy coating so every forkful has sweet honey, salty soy, and a garlic punch. A drizzle of sesame oil at the end gives a toasty finish that lifts the whole dish.
“I made this for dinner and my kids asked for seconds — easy, fast, and addictive. Five stars!” — Jenna, reader
Key Ingredients
Garlic (4 cloves, minced)
Garlic is the backbone of the dish. Use fresh cloves — the raw bite mellows and then blooms into savory sweetness when cooked briefly in hot oil. Pre-minced garlic in a jar can work, but fresh gives the cleanest, brightest flavor.
Soy sauce (¼ cup)
Pick a naturally brewed soy sauce such as Kikkoman or Yamasa for depth. It provides the salt and umami base that balances the honey and vinegar; lighter or low-sodium versions change the balance, so taste as you go.
Honey (2 tablespoons)
Honey gives both sweetness and body to the glaze. Use clear, runny honey for a shiny finish; darker varietals (like buckwheat) will deepen the color and add robust notes. The honey-to-soy ratio is key to that sticky, lacquered texture.
Cornstarch (1 tablespoon)
Cornstarch is what turns the liquid into a glossy, clingy sauce. Mix it into the sauce before adding to hot pan to prevent lumps. If you prefer a gluten-free soy alternative, tapioca starch is a fine swap.
Full ingredient list:
- 2 boneless, skinless chicken breasts, sliced
- 8 ounces egg noodles or your preferred noodles
- 4 cloves garlic, minced
- ¼ cup soy sauce
- 2 tablespoons honey
- 1 tablespoon rice vinegar
- 1 tablespoon cornstarch
- 1 tablespoon vegetable oil
- 1 teaspoon sesame oil
- 2 green onions, chopped
- Sesame seeds for garnish (optional)
- Salt and pepper, to taste
Step-by-Step Instructions
Step 1: Cook the Noodles
Boil the noodles according to package instructions until just tender. Drain them well and set aside to prevent the starch from making the sauce gummy.
Pro Tip: Rinse egg noodles briefly under hot water if they seem to be sticking, and toss with a teaspoon of oil if you must hold them before tossing with sauce.
Step 2: Whisk the Sauce
In a small bowl, whisk together soy sauce, honey, rice vinegar, and cornstarch until the mixture is smooth. Make sure the cornstarch is fully dissolved so it thickens evenly.
Pro Tip: For an ultra-smooth glaze, warm the soy sauce slightly before whisking to help the honey dissolve.
Step 3: Brown the Chicken
Heat the vegetable oil in a large skillet over medium-high heat. Add the sliced chicken and season lightly with salt and pepper. Cook, turning occasionally, until each piece is browned and cooked through, about 5–7 minutes.
Pro Tip: Don’t overcrowd the pan. Work in a single layer for caramelized edges — that Maillard color adds flavor to the sauce.
Step 4: Add the Garlic
Stir in the minced garlic and cook for about one minute until fragrant. Be careful not to burn the garlic; it should turn aromatic and slightly golden.
Pro Tip: If your pan is very hot, pull it off the heat briefly before adding garlic to avoid bitterness.
Step 5: Combine Sauce and Chicken
Pour the prepared sauce over the chicken and stir to coat evenly. Return to medium heat and let the sauce come to a simmer.
Pro Tip: Stir continuously for the first 30–45 seconds so the cornstarch activates and the sauce stays silky.
Step 6: Thicken to a Sticky Glaze
Allow the sauce to simmer for 2–3 minutes while stirring occasionally. It will thicken and become glossy, clinging to the chicken.
Visual Cue: You’ll know it’s ready when the liquid reduces and coats the back of a spoon like a shiny syrup.
Step 7: Toss in the Noodles
Add the cooked noodles to the skillet and toss thoroughly so every strand gets coated. Heat for a minute more so the noodles warm through and pick up the sauce.
Pro Tip: If the pan looks dry, add a tablespoon of water or chicken stock to loosen things up — then let it reduce again for shine.
Step 8: Finish with Sesame Oil and Garnish
Drizzle the teaspoon of sesame oil over the dish and toss once more. Remove from heat and sprinkle with chopped green onions and sesame seeds if desired.
Pro Tip: Sesame oil is aromatic and potent — add it at the end to preserve its fragrance.
Step 9: Serve
Serve the Sticky Garlic Chicken Noodles warm, straight from the pan for the best glossy presentation and texture. Enjoy!
By following these steps you’ll create a dish that is not only delicious but also visually appealing.
Expert Tips for Success
- Use high heat for browning, then reduce to medium before adding the sauce. High heat builds flavor on the chicken while moderate heat prevents the sauce from burning.
- Slice the chicken thin and even for uniform cooking. Thin slices cook quickly and stay tender; you don’t want dry, overcooked edges.
- Don’t skip the cornstarch — it’s the difference between a thin soy mixture and a sticky glaze that clings. Mix cornstarch with the liquid first to avoid clumps.
- Taste and adjust salt gradually. Soy sauce adds salt, and some brands are saltier than others. Add low-sodium soy if you’re unsure, then finish with a pinch of salt if needed.
- Reserve a little noodle water or broth before draining. A splash of starchy water helps the sauce emulsify with the noodles if it looks too thick.
- Use a nonstick or well-seasoned heavy skillet. A stainless pan needs a bit more oil and attention to prevent sticking, but either works if you manage the heat.
- If you want a deeper umami, add a teaspoon of dark soy or a few drops of fish sauce to the sauce. Start small — these ingredients are potent.
- For an extra glossy finish, remove the pan from the heat and swirl in a small knob of cold butter just before serving; it enriches and smooths the glaze.
- Garlic timing matters: add it right after the chicken is nearly done so it cooks briefly and keeps its flavor without burning.
- For meal prep, keep noodles and sauce slightly separate when storing; reheat together in a pan with a splash of water to loosen the sauce and regain texture.
Storage & Freezing
Fridge: Store leftovers in an airtight container for up to 3–4 days. Cool to room temperature before sealing to avoid condensation.
Reheat gently in a skillet over medium-low heat with a splash of water or broth to revive the sauce and prevent drying.
Freezer: Freezing is possible but not ideal for texture. Put cooled portions into freezer-safe containers for up to 2 months. Use plastic wrap directly over the surface to limit freezer burn.
Thaw overnight in the fridge before reheating. Reheat in a skillet with a tablespoon of water or broth and finish with a quick drizzle of sesame oil to refresh flavor.
Make-ahead tip: Cook the noodles al dente and cool them quickly; they’ll hold up better when reheated.
Variations & Substitutions
- Vegetarian Swap: Replace chicken with tofu. Use firm tofu, press out excess water, and pan-fry until golden for a satisfying alternative.
- Different Proteins: Try thinly sliced beef, shrimp, or pork for variation. Each protein will change cooking times, so adjust accordingly.
- Noodle Choices: Use rice noodles, udon, or even spaghetti in a pinch. Adjust cooking times and sauce volume — thicker noodles may need more sauce.
- Spice It Up: Add red pepper flakes, a tablespoon of chili oil, or a splash of gochujang for heat and depth. Balance with a touch more honey if needed.
- Veg Boost: Stir in quick-cooking vegetables like snap peas, bell pepper strips, or shredded carrot in Step 7 for color and crunch.
Frequently Asked Questions
Q: Can I make this gluten-free?
A: Yes. Use tamari or a gluten-free soy sauce substitute, and check that your noodles are gluten-free (rice noodles are a good choice). Cornstarch is naturally gluten-free, but double-check labels for cross-contamination if you’re sensitive.
Q: How can I keep the noodles from getting mushy?
A: Cook noodles al dente, drain well, and avoid overcooking when tossing with the sauce. Toss quickly over medium heat so the noodles only absorb enough sauce for flavor without getting soggy.
Q: What’s the best way to prevent the sauce from becoming gritty?
A: Whisk the cornstarch fully into the cold sauce before adding to the hot pan. Stir constantly once added and allow it to reach a gentle simmer to activate the thickener evenly.
Q: Can I double the recipe for a crowd?
A: Absolutely. Use a larger skillet or two pans to avoid overcrowding, and increase sauce by 1.5x to 2x depending on how saucy you like it. Taste and adjust seasoning as you scale.
Q: My sauce separated — how do I fix it?
A: Add a splash of hot water or chicken broth and whisk over medium heat to bring it back together. A small pat of butter can also help re-emulsify and smooth the sauce.
Final Thoughts
This Sticky Garlic Chicken Noodles recipe is a reliable, weeknight backbone — fast, forgiving, and endlessly tweakable.
If you loved the caramelized glaze and simple technique, please leave a star rating in the recipe card below or pin this recipe to Pinterest for later.
Conclusion
If you enjoyed the sweet-savory balance here, you might like other sticky, garlicky mains that use similar techniques and flavors. Try this Amazing Thai Cashew Chicken Recipe – Authentic and Easy to Make! for a nutty, savory alternative. For a pork-based twist on the honey-garlic glaze, check out Easy Garlic Ginger Glazed Sticky Pork. If you want a very quick chicken variation that cooks up in about 20 minutes, see Honey Garlic Chicken (20 Minutes!) – Tiffy Cooks. And for wings with that same glossy honey-garlic finish, I recommend Sticky Honey Garlic Wings Recipe & Video – Seonkyoung Longest.
Sticky Garlic Chicken Noodles
Ingredients
Main ingredients
- 2 pieces boneless, skinless chicken breasts, sliced Slice thin for even cooking.
- 8 ounces egg noodles or your preferred noodles Cook according to package instructions.
- 4 cloves garlic, minced Fresh garlic is recommended for the best flavor.
- ¼ cup soy sauce Use naturally brewed soy sauce for depth.
- 2 tablespoons honey Clear, runny honey is preferred for shine.
- 1 tablespoon rice vinegar Adds acidity to balance flavors.
- 1 tablespoon cornstarch Pre-mix with sauce to prevent lumps.
- 1 tablespoon vegetable oil For browning the chicken.
- 1 teaspoon sesame oil Add at the end for aroma.
- 2 pieces green onions, chopped For garnish.
- to taste salt and pepper Season to preference.
- as needed sesame seeds for garnish (optional)
Instructions
Preparation
- Boil the noodles according to package instructions until just tender. Drain them well and set aside to prevent sticking.
- In a small bowl, whisk together soy sauce, honey, rice vinegar, and cornstarch until smooth.
Cooking
- Heat the vegetable oil in a large skillet over medium-high heat. Add the sliced chicken, seasoning lightly with salt and pepper. Cook until browned and cooked through, about 5–7 minutes.
- Add the minced garlic and cook for about one minute until fragrant.
- Pour the prepared sauce over the chicken, stir to coat evenly, and let it come to a simmer.
- Allow the sauce to simmer for 2–3 minutes until it thickens and becomes glossy.
- Add the cooked noodles and toss thoroughly to coat. Heat briefly to warm through.
- Drizzle sesame oil over the dish and toss again. Garnish with chopped green onions and sesame seeds, if desired.