A familiar childhood flavor gets a playful twist with these peanut butter and jelly sushi rolls. They’re fast to make, delightfully portable, and perfect for lunches or picnics.
Little hands love rolling and slicing, while grown-ups like how tidy and customizable they are. They’re also forgiving, which makes them ideal for teaching basic kitchen skills.
This recipe is a bridge between nostalgia and convenience. You can tuck in extra fruit for nutrition or keep them classic for the pure PB&J comfort.
Why You’ll Love This Peanut Butter & Jelly Sushi Rolls
– Fast assembly in under 5 minutes for a single roll.
– Portable finger food ideal for school lunches and picnics.
– Easily customizable to match flavors and textures.
– Minimal equipment: just a knife and a cutting board.
– Kid-friendly activity and easy to portion-control.
– Works with pantry staples you likely already have.
– Great way to use ripe fruit and reduce waste.
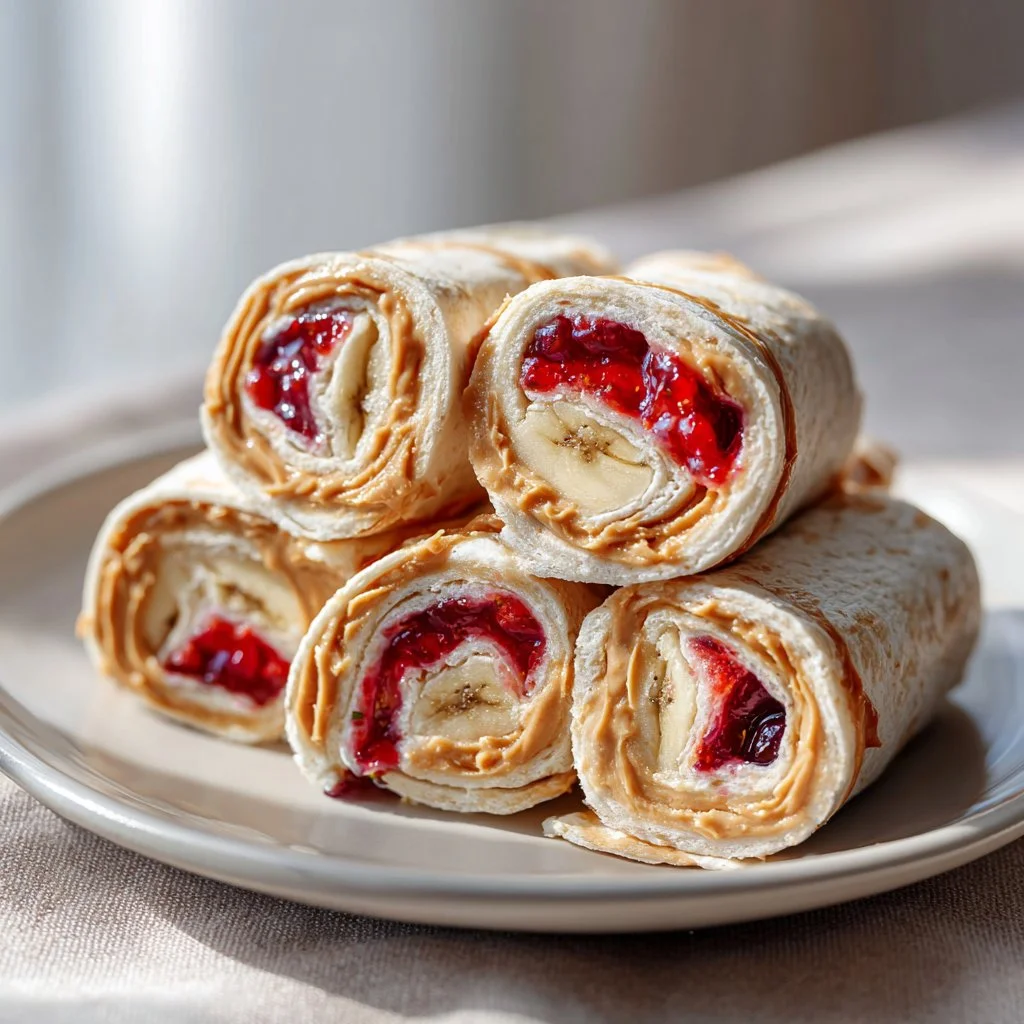
Peanut Butter & Jelly Sushi Rolls hit a sweet-salty balance with a soft, pillowy bite from the tortilla, a creamy, slightly savory mid-layer from the peanut butter, and bright, fruity bursts from the jelly. The texture contrast between smooth spread and the slightly chewy tortilla makes each bite satisfying without being heavy.
“Five stars — my kids begged for seconds, and the rolls traveled perfectly in the lunchbox. Simple, nostalgic, and a new favorite.” — Jamie L., reader
Key Ingredients for Peanut Butter & Jelly Sushi Rolls
Soft tortillas
Soft tortillas are the backbone of these sushi rolls. Choose flour tortillas labeled “soft” or “burrito” size for pliability; fresher tortillas roll without cracking and slice cleanly. If you substitute with flatbreads or crepes, expect thinner, more delicate rolls that may need gentler handling.
Creamy peanut butter
Creamy peanut butter spreads smoothly and helps the jelly adhere, preventing sliding inside the roll. Look for natural or reduced-sugar options if you want cleaner flavors; avoid crunchy for a more uniform texture. Using a nut butter alternative (almond, sunflower seed) will change flavor and sometimes spreadability, so warm thicker alternatives slightly before spreading.
Sweet jelly
Jelly provides the bright fruity counterpoint and acts as a flavor anchor in every bite. Choose a jelly or jam with good fruit flavor and not too runny; a gelled preserve prevents soggy tortillas. If you swap jelly for a thinner jam, blot excess moisture with a paper towel to protect the tortilla.
Optional sliced fruits (bananas or strawberries)
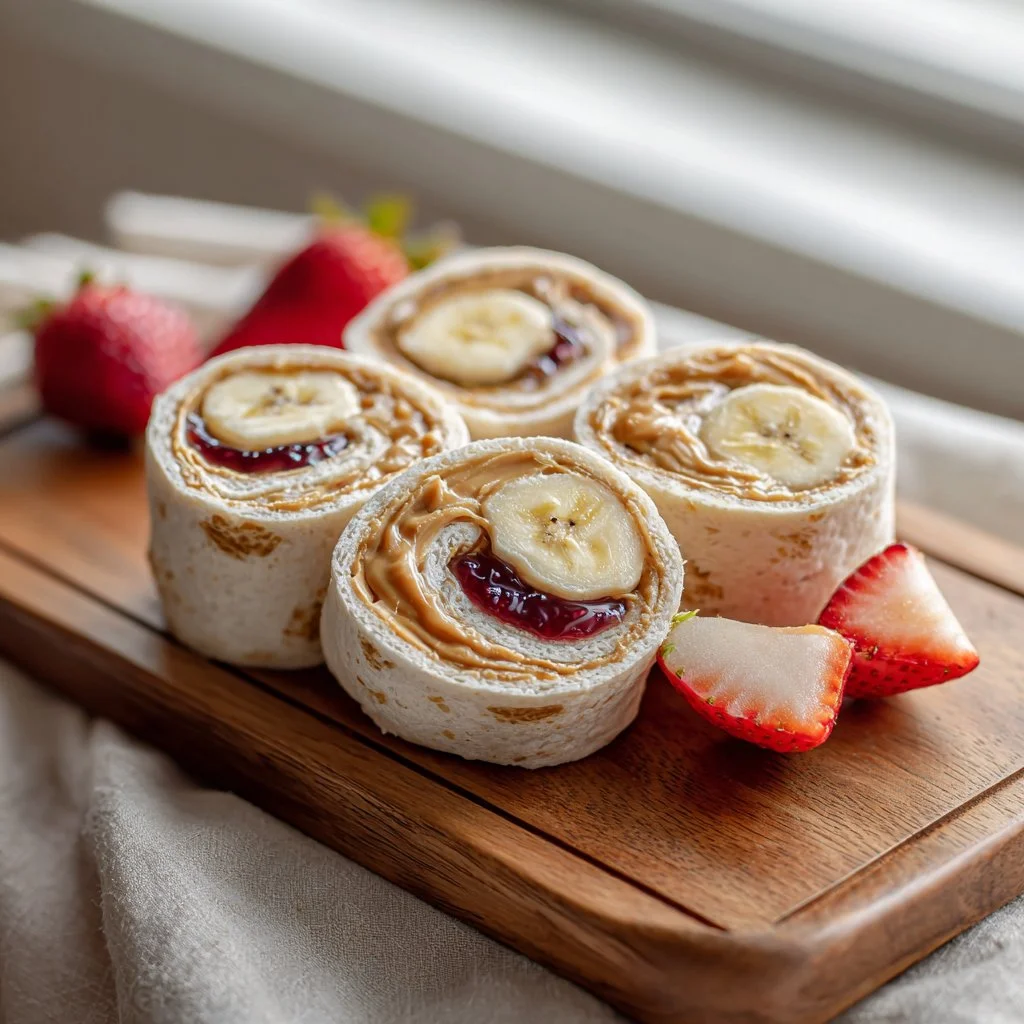
Fresh fruit adds texture and freshness, and it pairs naturally with both peanut butter and jelly. Pick firm bananas or just-ripe strawberries for clean slices that won’t turn mushy. Using canned fruit or very ripe, watery fruit will make the roll soggy more quickly and is best eaten immediately.
Full Ingredient List for Peanut Butter & Jelly Sushi Rolls
– Soft tortillas
– Creamy peanut butter
– Sweet jelly (your favorite flavor)
– Optional: sliced bananas or sliced strawberries for added flavor
Step-by-Step Instructions for Peanut Butter & Jelly Sushi Rolls
Step 1: Spread a layer of creamy peanut butter over one side of a soft tortilla.
Lay the tortilla flat and use a butter knife or offset spatula to spread an even layer of creamy peanut butter, leaving a small border at the far edge. The peanut butter layer should be thick enough to provide structure but not so thick it squeezes out when rolled.
Pro Tip: Look for a glossy, even sheen and no bare tortilla patches; it should feel tacky to the touch.
Step 2: Add a layer of sweet jelly on top of the peanut butter.
Spoon a moderate amount of jelly onto the peanut butter and spread gently to cover most of the surface. If your jelly is very runny, drop small spoonfuls and lightly spread to avoid excess moisture reaching the tortilla.
Pro Tip: The jelly should glisten and sit on top without pooling; you should still see the peanut butter texture beneath.
Step 3: Optionally, add sliced fruits if desired.
If using banana or strawberry slices, arrange them in a single row across the lower third of the tortilla so they’re enclosed when rolled. Keep slices uniform in thickness (about 1/4 inch) to ensure even rolling and even bite sizes.
Pro Tip: Fruit should look fresh and firm, not mushy; bananas should be slightly underripe to prevent browning.
Step 4: Roll the tortilla tightly from one edge to the other.
Start from the edge closest to you and roll away, pressing gently but firmly to create a compact cylinder. The tighter the roll, the neater the slices will be and the less likely the filling is to fall out when cutting.
Pro Tip: The roll should feel snug and maintain its shape when held; small cracks at the edge mean the tortilla is too dry.
Step 5: Slice the rolled tortilla into bite-sized pieces.
Use a sharp, serrated or chef’s knife and slice the roll into 1-inch to 1.5-inch pieces. Wiping the knife between cuts keeps edges clean and prevents dragging the filling.
Pro Tip: Each slice should show a clear swirl pattern of peanut butter, jelly, and optional fruit; clean edges and no smearing are signs of the right technique.
Step 6: Serve immediately or pack for your picnic.
Place slices on a plate or into a lunch container. If packing, separate layers with parchment or wax paper to prevent sticking and condensation.
Pro Tip: Rolls should look compact with visible concentric layers and smell faintly of peanut butter and the chosen fruit; any sogginess means eat now.
Expert Tips for Peanut Butter & Jelly Sushi Rolls
– Temperature tip: Bring peanut butter to room temperature for easy spreading; cold peanut butter tears the tortilla.
– Texture troubleshooting: If the tortilla tears, use a wetter spread like a runnier nut butter or warm slightly to soften it.
– Equipment tip: A serrated knife gives cleaner cuts through the roll; wipe between cuts to maintain visuals.
– Common mistake: Over-filling causes leaks — use moderate amounts and leave a 1/2-inch border.
– Fruit handling: Pat sliced fruit dry to reduce moisture transfer; coat bananas in a tiny squeeze of lemon juice to prevent browning if needed.
– Rolling technique: Use a rolling motion that tucks the filling as you move; press gently to form a tight cylinder.
– Portioning tip: Cut into uniform pieces for even portions and an attractive sushi-like appearance.
– Presentation tip: Alternate jelly colors or use layered fruit for a rainbow effect that photographs well.
For creative sandwich swaps and related comfort recipes, see this guide on garlic butter bread rolls that explores similar shaping and baking tips useful for structured fillings.
Storage & Freezing for Peanut Butter & Jelly Sushi Rolls
Fridge storage: Place the sliced rolls in an airtight container with parchment between layers and refrigerate. They keep well for 24–48 hours before the tortilla begins to soften noticeably.
Freezer storage: Flash-freeze slices on a tray for an hour then transfer to a freezer-safe bag for up to 1 month. Expect some texture change in the jelly after thawing; use freezer-safe containers to prevent freezer burn.
Thawing: Thaw frozen rolls overnight in the fridge or at room temperature for 30–60 minutes before eating. Avoid microwaving as it can make the peanut butter oily and the jelly runny.
Reheating: These are best served cold or room temperature; reheating is unnecessary. If you must warm, use a dry skillet over low heat for 15–30 seconds per side to restore softness without melting the fillings.
Use an airtight glass or BPA-free plastic container for refrigeration and heavy-duty freezer bags for long-term storage. For inspiration on pairing textures and storage-friendly desserts, check this light recipe for peanut butter cup cottage cheese mousse which uses preservation techniques that translate well.
Variations & Substitutions for Peanut Butter & Jelly Sushi Rolls
Almond butter and raspberry jam
Swap creamy peanut butter for almond butter and use raspberry jam for a more floral, slightly tangy roll. The result is smoother and lighter in flavor, and almond butter often spreads thinner so consider slightly thicker layers.
Sunflower seed butter and apple slices (nut-free)
Use sunflower seed butter with thin apple slices for a nut-free alternative that adds crunch. The apple’s crisp texture contrasts with the creamy spread, making a refreshing, allergy-friendly option.
Honey and banana with cinnamon
Replace jelly with a thin drizzle of honey and add banana slices plus a pinch of cinnamon for a warmer, dessert-style roll. It will be sweeter and more aromatic, and the honey can be slightly sticky, so pack with parchment.
Cream cheese, jam, and fresh berries
Swap peanut butter for whipped cream cheese and use a brighter jam with fresh berries for a tangy, softer roll. The cream cheese adds a silkier mouthfeel and pairs beautifully with berry acidity.
Frequently Asked Questions About Peanut Butter & Jelly Sushi Rolls
Q: How long do Peanut Butter & Jelly Sushi Rolls stay fresh in a lunchbox?
A: Kept in a well-insulated lunchbox with a small cold pack, the rolls stay safe and fresh for about 4–6 hours. The cold pack slows down any softening from fruit moisture and keeps fillings stable. For best texture, pack separated from wet fruits and eat by mid-afternoon.
Q: Can I make Peanut Butter & Jelly Sushi Rolls ahead of time for a party?
A: Yes — assemble and slice them up to 24 hours ahead, storing them in a single layer with parchment in airtight containers. Avoid adding very juicy fruits until serving time. For parties, prepare multiple varieties and arrange on platters right before guests arrive.
Q: What’s the best way to slice Peanut Butter & Jelly Sushi Rolls without squishing them?
A: Use a sharp serrated knife and a gentle sawing motion, wiping the blade between cuts. Chilling the roll for 10–15 minutes can firm it slightly and make cleaner slices without compressing the fillings.
Q: Are there grain-free or low-carb options for Peanut Butter & Jelly Sushi Rolls?
A: Yes — use coconut flour or almond flour tortillas, or large lettuce leaves for a low-carb wrap. Expect different textures: grain-free tortillas are often more delicate, while lettuce adds crispness and requires faster assembly.
Q: How can I prevent the jelly from making the tortilla soggy?
A: Use thicker jams or jellies with higher pectin and spread them over the peanut butter layer rather than directly on the tortilla. If using very juicy fruit, pat it dry and place it in the center so moisture stays contained. A thin barrier of peanut butter on the tortilla first also helps protect it.

Final Thoughts on Peanut Butter & Jelly Sushi Rolls
These Peanut Butter & Jelly Sushi Rolls are quick, adaptable, and a playful way to enjoy a classic combo. If you tried the recipe, please leave a star rating in the recipe card below and pin it to Pinterest for later.
For more inspired takes and tested versions, try the Peanut Butter and Jelly Sushi Rolls Recipe – Food.com for a classic spin, check out the Back to School Peanut Butter and Jelly Sushi Rolls idea for lunchbox-friendly tips, or compare textures with this Butter and Jelly Sushi Rolls Recipe – Food.com variation.

Peanut Butter & Jelly Sushi Rolls
Ingredients
Main ingredients
- 2 pieces Soft tortillas Choose flour tortillas labeled 'soft' or 'burrito' size.
- 1/4 cup Creamy peanut butter Natural or reduced-sugar options are preferred.
- 1/4 cup Sweet jelly Choose your favorite flavor, avoid too runny jelly.
Optional ingredients
- 1 banana Sliced bananas Pick firm bananas for clean slices.
- 1/2 cup Sliced strawberries Use just-ripe strawberries for best texture.
Instructions
Preparation
- Spread a layer of creamy peanut butter over one side of a soft tortilla, leaving a small border at the far edge.
- Add a layer of sweet jelly on top of the peanut butter, spreading gently to cover most of the surface.
- If desired, add sliced fruits (bananas or strawberries) in a single row across the lower third of the tortilla.
Rolling and Slicing
- Roll the tortilla tightly from one edge to the other, pressing gently to create a compact cylinder.
- Slice the rolled tortilla into bite-sized pieces, using a sharp knife.
- Serve immediately or pack for your picnic, ensuring layers are separated with parchment to prevent sticking.