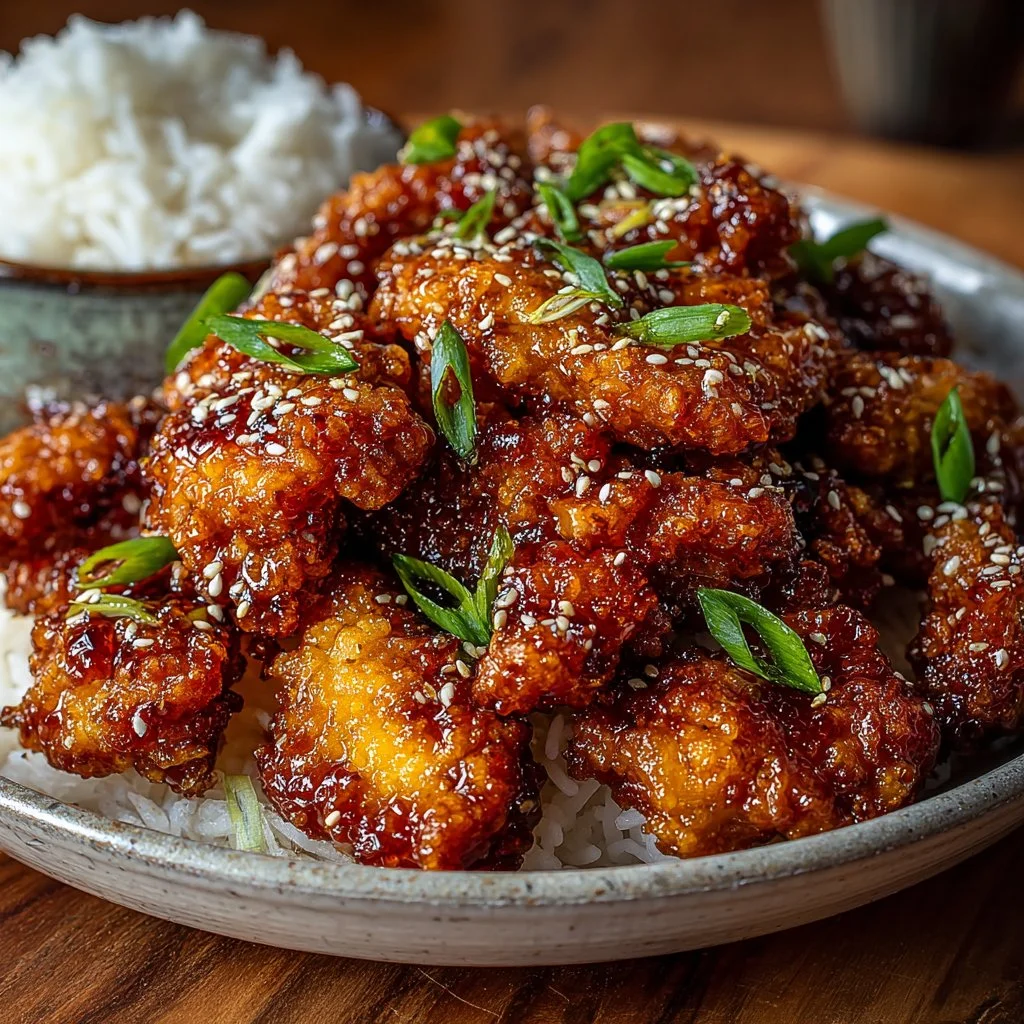
The first time I made this honey garlic chicken, I expected a good weeknight dinner and ended up with something my partner insisted was better than our usual takeout.
It hits that rare sweet-savory balance with a crisp exterior and sticky, glossy sauce that clings to every bite.
You can have it on the table in about 30 minutes, and the technique works equally well with thighs or breasts.
If you like bold weeknight Asian flavors, try this after my better-than-takeout Thai chicken soup for a full menu.
Why You’ll Love This Recipe
- Ready in about 30 minutes for real weeknight cooking.
- Crunchy, silky, and sticky — all in one bite.
- Uses pantry-friendly ingredients you likely already have.
- Flexible: swap protein, tweak heat, or double the sauce.
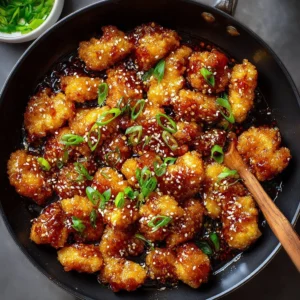
The texture is the best part: a thin, crunchy coating gives way to juicy chicken, then a glossy honey-garlic sauce coats every morsel so each bite is simultaneously crisp, sweet, and savory. The cornstarch-and-egg-white dredge crisps fast in hot oil and the simple honey-soy glaze reduces to a clingy finish that doesn’t feel syrupy. This is the contrast that makes it taste "takeout-level" but fresher and less greasy.
"Five stars — my kids declared it restaurant-quality and asked for seconds. The sauce is addictive and the skin-on texture without the skin." — reader review
Key Ingredients
Egg whites and cornstarch — Egg whites create a thin adhesive layer that crisps up beautifully without the heaviness of a batter. Cornstarch is the secret for that almost glassy, ultra-crisp crust; it fries to a light, shattering shell. Use a standard cornstarch (Argo or local brand) for best results.
Honey — Real honey gives a complex sweetness and helps the sauce thicken and shine when reduced. Light clover honey is a great neutral choice; for a deeper flavor try wildflower or orange blossom honey sparingly.
Soy sauce — Soy provides the salty, umami backbone that balances honey. Use regular or low-sodium depending on taste; if you pick a dark or aged soy, expect richer color and slightly more savory depth.
Fresh garlic — Fresh minced garlic brightens the sauce and keeps the flavor lively. Use two cloves for a mild garlic presence and three cloves if you want it assertive. Avoid pre-minced jarred garlic for best aromatics.
Full ingredient list:
- 1 lb boneless, skinless chicken thighs or breasts, cut into bite-size pieces (1–2 inches / 2.5–5 cm)
- Vegetable or canola oil, enough to fill skillet about 1 inch (2.5 cm)
- 2 egg whites
- 1 tablespoon cornstarch
- Pinch of salt
- 4 tablespoons honey
- 2 cloves garlic, minced (use 3 for stronger garlic flavor)
- 2 tablespoons soy sauce
- 1 teaspoon freshly ground black pepper (adjust to taste)
- Toasted sesame seeds
- Sliced green onions
Step-by-Step Instructions
Step 1: Prep your oven and pan
Preheat your oven to 200°F (93°C) to keep fried chicken warm while you finish batches.
Line a baking sheet with parchment or foil and place a rack on it if you have one; this keeps the chicken crisp instead of steaming on the tray.
Pro tip: The low oven warm-hold prevents sauce sogginess while you fry in batches, especially important when cooking for more than two people.
Step 2: Make the honey-garlic sauce
Add the honey, minced garlic, soy sauce, and freshly ground pepper to a small saucepan and set it aside near the stove.
When the chicken is nearly done, bring the sauce to a gentle simmer to meld the flavors and slightly thicken.
Pro tip: Simmer on low and watch closely — honey can go from glossy to dark quickly. You want it syrupy and clingy, not burnt.
Step 3: Prepare the chicken dredge
Whisk the egg whites lightly with a pinch of salt in a shallow bowl until slightly frothy.
In another shallow dish, place the cornstarch. Dip each piece of chicken into the egg white then toss in cornstarch to coat.
Pro tip: Use one hand for the wet dredge and the other for dry to reduce mess and prevent clumping.
Step 4: Heat the oil and fry
Pour oil into a skillet until it is about 1 inch (2.5 cm) deep and heat over medium-high until shimmering.
Fry the chicken in batches, making sure not to crowd the pan; aim for a light golden-brown crust, about 3–4 minutes per side depending on piece size. Transfer finished pieces to the rack-trayed oven to keep warm.
Pro tip: You’ll know the oil is ready when a tiny bird-drop of batter sizzles on contact and rises to the surface. Maintain oil temperature — too cool will make greasy chicken, too hot burns the cornstarch quickly.
Step 5: Finish in the sauce
Once all chicken is fried and resting in the oven, return the pan with the sauce to low heat. Add the hot chicken in batches or pour the sauce over and toss to coat thoroughly.
Finish with a quick simmer if the sauce needs thickening; sprinkle toasted sesame seeds and sliced green onions before serving.
Pro tip: Toss quickly and serve immediately — the sauce glues best when the chicken is hot and very slightly crisp.
Expert Tips for Success
- Temperature control is everything. Keep oil around 350–375°F (175–190°C). If you don’t have a thermometer, the surface should shimmer and a wooden chopstick dipped into the oil will bubble steadily.
- Cut chicken to even sizes. Uniform pieces (roughly 1–1½ inches) ensure consistent fry times and juicy centers.
- Dry chicken well before dredging. Patting the pieces dry with paper towels improves the egg white adhesion and yields a crisper crust.
- Don’t crowd the skillet. Overcrowding drops oil temperature and makes the crust soggy. Work in 2–3 batches for a 12-inch skillet and 1 lb chicken.
- Sauce timing: make the sauce ahead but only reduce to desired thickness once your last batch is frying. That way it’s hot and glossy when the chicken hits it.
- Use toasted sesame seeds and sliced green onions right before serving for contrast. They add texture, aroma, and a fresh finish.
- If using breasts, consider a short brine (10–20 minutes in salted water) to help keep them tender; thighs are more forgiving and remain flavorful without brining.
- For added depth, a teaspoon of rice vinegar or a splash of shaoxing wine in the sauce balances honey’s sweetness. Add it after you finish the reduction so it doesn’t evaporate away.
- If you have an air-fryer and want less oil, try my air-fryer method as a reference for crisping without deep-frying. Use a very light spray of oil and a thin cornstarch coat for best results.
- Keep a little warm oven ready to hold batches — that low oven trick is the difference between soggy and stellar when serving multiple diners.
Storage & Freezing
Fridge storage: Cool the chicken completely before storing to prevent condensation that makes the crust soggy.
Place in an airtight container with sauce separated if possible; refrigerated chicken will keep 3–4 days.
Reheating from the fridge: Reheat on a wire rack over a baking sheet at 350°F (175°C) for 8–10 minutes to crisp the exterior while warming through. If sauce was stored separately, reheat it gently on the stovetop and toss chicken briefly to recoat.
Freezing: Freeze individual portions on a tray first so pieces don’t clump together. Once frozen, transfer to a labeled freezer bag; keep sauce in a separate freezer-safe container. Freeze up to 2 months.
Reheating from frozen: Thaw overnight in the fridge for best texture. Reheat as above. If you must reheat from frozen, bake at 375°F (190°C) for 15–20 minutes, then broil 1–2 minutes to restore crispness — watch closely.
Variations & Substitutions
- Spicy honey garlic: Add 1 teaspoon gochujang or 1/2 teaspoon crushed red pepper to the sauce for a bold kick. This is great if you like heat with sweet.
- Gluten-free option: Swap soy sauce for tamari and ensure your cornstarch is certified gluten-free. The technique is the same.
- Swap protein: Use thin pork slices or tofu (pressed and well-coated) instead of chicken for a different texture and flavor. For tofu, double the cornstarch and fry a bit longer for crunch. Try my wonton taco-style ideas if you want handheld serving inspiration.
- Add veg: Toss in blanched broccoli or bok choy at the end and toss in the hot sauce for a quick one-pan meal; the steam wilts the greens but keeps crunch.
Frequently Asked Questions

Q: Can I use chicken breasts instead of thighs?
A: Yes. Breasts work fine when cut into even, bite-size pieces. They cook faster and can dry if over-fried, so watch the color and test a thicker piece for doneness. Thighs are more forgiving and remain juicier for leftovers.
Q: How do I keep the coating from falling off?
A: Start with dry chicken, use the egg white dip to create an adhesive layer, and apply cornstarch evenly. Fry at proper oil temperature and avoid flipping too often; one deliberate flip per piece helps the crust set.
Q: Can this be made ahead for a party?
A: You can fry and freeze the chicken, then finish in warmed sauce at service. For larger parties, fry earlier and hold in a 200°F oven on racks; re-crisp under broiler for a minute if needed before saucing.
Q: My sauce is too thin — how do I thicken it?
A: Simmer it a bit longer to let water evaporate and honey reduce. For a quick fix, mix 1 teaspoon cornstarch with 1 tablespoon cold water, then whisk into simmering sauce and cook until glossy.
Q: Any ideas for serving?
A: Serve over steamed rice or with stir-fried vegetables. A side of quick-pickled cucumbers or a simple cabbage slaw cuts the sweetness and adds crunch. For inspiration on complementary sides, pair with a comfort soup like the creamy garlic chicken ramen for a cozy meal.
Final Thoughts
This Crispy Chinese Honey Garlic Chicken is one of those recipes that elevates simple pantry ingredients into a dinner everyone remembers.
It’s fast, adaptable, and rewards attention to temperature and timing more than complicated technique.
If you try it, please leave a star rating in the recipe card below or pin this to Pinterest so others can find it.
Conclusion
For an alternate honey-garlic take and a similar method, see Crispy Chinese Honey Garlic Chicken from Two Kooks In the Kitchen which offers useful variations.
If you want a full “takeout at home” menu idea, check this chicken and broccoli chow mein guide for complementary mains and sides.
Honey Garlic Chicken
Ingredients
Chicken and Coating
- 1 lb boneless, skinless chicken thighs or breasts, cut into bite-size pieces (1–2 inches / 2.5–5 cm) Thighs are more forgiving and remain juicier than breasts.
- 2 egg whites egg whites Creates a thin adhesive layer that crisps up beautifully.
- 1 tablespoon cornstarch Use standard cornstarch for the best results.
- 1 pinch salt For seasoning the dredge.
- 1 inch vegetable or canola oil, enough to fill skillet about Oil should be hot for frying.
Honey Garlic Sauce
- 4 tablespoons honey Light clover honey is neutral; wildflower or orange blossom for depth.
- 2 cloves garlic, minced Use 3 cloves for a stronger flavor.
- 2 tablespoons soy sauce Use regular or low-sodium based on preference.
- 1 teaspoon freshly ground black pepper Adjust to taste.
Garnish
- to taste toasted sesame seeds For finishing touch.
- to taste sliced green onions Adds freshness and contrast.
Instructions
Preparation
- Preheat your oven to 200°F (93°C) to keep fried chicken warm while you finish batches.
- Line a baking sheet with parchment or foil and place a rack on it to prevent steaming.
Make the Sauce
- In a small saucepan, combine honey, minced garlic, soy sauce, and black pepper, stirring gently.
- Bring to a gentle simmer when the chicken is nearly done to meld the flavors and slightly thicken.
Prepare Chicken
- Whisk the egg whites lightly with a pinch of salt in a shallow bowl.
- Place cornstarch in another shallow dish. Dredge chicken pieces first in egg whites then in cornstarch.
Fry the Chicken
- Heat oil in a skillet until shimmering (about 350–375°F / 175–190°C).
- Fry the chicken in batches, about 3–4 minutes per side, until golden brown. Transfer to the rack in the oven.
Finish with Sauce
- Once all chicken is fried, return the sauce to low heat and add fried chicken in batches or pour sauce over and toss.
- Sprinkle toasted sesame seeds and green onions before serving.