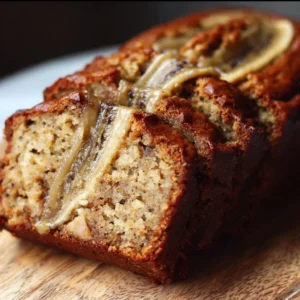
The first time I made this ensaymada I was convinced I’d never buy the store-bought version again.
Soft, buttery swirls dusted with sugar (and the optional salty bite of cheese) make this one of those recipes people ask for again and again.
It’s forgiving, home-kitchen friendly, and perfect for breakfast, snacks, or a party tray.
This particular recipe balances richness and structure so the rolls stay tender without collapsing.
Follow the steps below and you’ll get a glossy, golden top and a cloud-like crumb every time.
Why You’ll Love This Recipe
- Soft, brioche-like crumb that almost melts in your mouth.
- A buttery-sweet flavor that pairs with coffee or afternoon tea.
- Simple pantry ingredients yet bakery-quality results.
- Flexible toppings: classic sugar dusting or a savory cheese finish.
The texture is what sells this ensaymada: a light, pillowy interior with a tender, slightly chewy bite from proper kneading and proofing. The butter folded into the dough creates layered richness without weighing the rolls down. The final brush of melted butter and sprinkling of sugar (or grated cheese) gives the crust a glossy, irresistible finish.
"Absolutely the best ensaymada recipe I’ve tried at home — soft, buttery, and my kids devoured them in minutes. Five stars!" — Maria, reader
Key Ingredients
Flour (All-purpose): Use a reliable all-purpose flour with moderate protein (10–11%). It gives enough gluten for structure without the toughness of bread flour. If you prefer a slightly lighter crumb, try a 10% protein AP flour or a mix of 3 cups AP + 1 cup pastry flour.
Whole milk (warmed): The milk hydrates the dough and adds fat and flavor. Warm to about 100–110°F (warm to the touch, not hot) to wake the yeast without killing it. Full-fat milk produces a richer, softer crumb than skim or low-fat varieties.
Unsalted butter (softened + extra for brushing): Butter is key to the characteristic tenderness and flavor. Use a high-quality European-style or an unsalted butter you like the taste of; salted butters make salt control harder. Soften to room temperature for easy incorporation.
Active dry yeast: The yeast is the engine of rise. Active dry yeast benefits from blooming in warm milk first — it’s a quick check that the yeast is alive. Instant yeast can be used but reduce by about 25% and mix directly into the dry ingredients.
Full ingredients list:
- 4 cups all-purpose flour
- 1 cup granulated sugar
- 1 cup whole milk, warmed
- 1/2 cup unsalted butter, softened
- 3 large eggs
- 2 teaspoons active dry yeast
- 1 teaspoon salt
- 1/4 cup grated cheese (optional for topping)
- 1/4 cup grated Parmesan cheese (optional for topping)
- Extra butter for brushing
- Additional sugar for sprinkling
Step-by-Step Instructions
Step 1: Bloom the yeast
In a small bowl, combine the warmed milk and active dry yeast.
Let it sit for 5–10 minutes until frothy and slightly bubbly on top.
Pro Tip: You’ll know it’s ready when the milk surface forms a foamy cap and has a faint yeasty aroma.
Step 2: Mix dry ingredients
In a large bowl, whisk together the flour, granulated sugar, and salt until evenly combined.
This ensures even distribution and prevents salt or sugar pockets in the dough.
Pro Tip: Use a whisk or fork to aerate the flour slightly — it helps with a lighter dough.
Step 3: Combine wet ingredients
In a separate bowl, beat the eggs. Add the softened butter and the yeast-milk mixture and mix until uniform.
The eggs add richness and structure; mixing them well helps incorporate fat evenly.
Pro Tip: If your butter has small lumps, press it through a fork or microwave for 3–4 seconds to soften gently.
Step 4: Form the dough
Gradually pour the wet mixture into the dry ingredients while stirring. Mix until the dough begins to come together into a shaggy ball.
Once cohesive, transfer to a floured surface for kneading.
Pro Tip: If the dough feels too sticky, dust a little flour — but add no more than a tablespoon at a time to avoid a dry crumb.
Step 5: Knead until smooth
Knead the dough on a lightly floured surface for about 10 minutes. Work until the dough is smooth, elastic, and slightly tacky but not sticky.
Good gluten development yields that springy texture and fine crumb.
Pro Tip: You’ll know it’s ready when the dough stretches into a translucent "windowpane" without tearing.
Step 6: First rise
Place the dough in a greased bowl, cover with a clean cloth, and let it rise in a warm place for about 1 hour or until doubled in size.
This bulk fermentation builds flavor and structure.
Pro Tip: A warm oven with just-boiled water inside (turned off) makes a consistent proofing spot.
Step 7: Shape the dough
Punch down the risen dough and roll it out into a rectangle about 1/4 inch thick. Spread softened butter evenly over the surface.
The butter layer is essential for the tender swirls inside each roll.
Pro Tip: Keep the rectangle even so the roll thickness is uniform; use a ruler or straight edge if desired.
Step 8: Add sugar and optional cheese
Sprinkle a generous, even layer of sugar over the butter. If you like the savory contrast, add grated cheese like Edam or mild cheddar sparingly.
The sugar melts into the butter during rolling and gives a sweet, slightly caramelized interior.
Pro Tip: For classic ensaymada, use fine granulated sugar for better adhesion; coarse sugar can be used for topping texture.
Step 9: Roll and seal
Starting from one long edge, roll the dough tightly into a log. Pinch to seal the seam and ends so the roll keeps its shape.
Tight rolling ensures neat spirals and uniform slices.
Pro Tip: Roll against a clean countertop edge for tension, producing compact spirals.
Step 10: Slice and arrange
Cut the log into 1-inch thick pieces and lay them in a greased baking dish with space to expand.
Arrange them close enough to support each other but not packed tight.
Pro Tip: Use a sharp serrated knife or floss for clean cuts that keep the swirl intact.
Step 11: Second rise
Cover the baking dish and let the rolls rise for another 30 minutes until slightly puffed.
This final proof gives the rolls lift without over-expanding.
Pro Tip: Watch the dough, not the clock — it should look puffy and light, not doubled again.
Step 12: Bake and finish
Preheat your oven to 350°F (175°C). Bake the rolls for 20–25 minutes or until golden brown. Remove and immediately brush tops with melted butter. Let cool in the pan for 15–30 minutes before serving.
Pro Tip: The tops should be a deep golden color; if the edges brown too fast, tent loosely with foil.
These steps will guide you in creating this incredible bread effortlessly.

Expert Tips for Success
- Temperature matters: Aim to proof the yeast in milk around 100–110°F. Too hot kills yeast; too cold delays activity. Use a thermometer for consistency.
- Measure by weight: If possible, weigh the flour (4 cups ≈ 500–520g depending on scooping). This avoids dense loaves from over-packed cups.
- Butter technique: For the softest crumb, fold in butter at room temperature. If you overheat butter, the dough may become greasy and heavy.
- Kneading cues: Use the windowpane test to judge gluten development. A properly kneaded dough stretches thin without tearing.
- Proofing environment: A slightly warm, draft-free environment is best. In cold kitchens, use the oven with the light on and an oven-safe bowl of warm water.
- Topping timing: Brush with melted butter right after baking for a shiny finish. Add sugar or grated cheese while the butter is still tacky so it adheres well.
- Equipment: A stand mixer with a dough hook saves time, but hand-kneading gives better tactile feedback for beginners.
- Avoid overproofing: Overproofed rolls will collapse in the oven. If the dough deflates and doesn’t bounce back, it has gone too far.
- Use fresh yeast: Old or improperly stored yeast yields sluggish rises — check the expiration and store in the fridge.
Storage & Freezing
Room temperature: Store baked ensaymada in an airtight container or tightly wrapped for up to 2 days. The crust softens over time, but the interior remains tender for a short period.
Refrigerator: You can refrigerate in an airtight container for up to 4 days. Bring to room temperature and refresh in a 300°F oven for 5–7 minutes to restore softness.
Freezer (unbaked): Arrange the sliced, unbaked rolls on a tray and flash-freeze until firm (about 1–2 hours). Transfer to a freezer bag and keep up to 3 months. Thaw overnight in the fridge, then proof and bake as directed.
Freezer (baked): Cool completely, wrap individual rolls tightly in plastic, then foil, and freeze for up to 3 months. Reheat from frozen in a 300°F oven for 12–15 minutes, brushing with butter after heating.
Reheating tips: For best texture, warm rolls briefly to revive the butter and sugar exterior. Avoid microwaving for long periods — it makes them gummy. A quick oven refresh keeps the crumb light.
Variations & Substitutions
Cheese-topped ensaymada: After brushing with butter, sprinkle grated Edam or Parmesan for a salty-sweet contrast. Use sparingly to avoid overpowering the sweetness.
Chocolate-hazelnut swirl: Spread a thin layer of chocolate-hazelnut spread over the butter before adding sugar. Roll and bake—result is a rich, indulgent version kids love.
Egg-free swap: Replace the 3 eggs with 1/2 cup full-fat yogurt plus 1/4 cup extra butter for moisture and structure. Texture will be slightly different but still tender.
Whole milk alternative: Use half-and-half or a bit of heavy cream diluted with water for an even richer dough. If dairy-free, try full-fat coconut milk but expect a mild coconut flavor.
Frequently Asked Questions
Q: Can I use instant yeast instead of active dry yeast?
A: Yes. Reduce the instant yeast to about 1 1/2 teaspoons and mix it directly into the dry ingredients. Instant yeast acts faster, so watch your proofing times.
Q: Why is my ensaymada dense instead of fluffy?
A: Common causes are too much flour (weigh it), under-kneading (insufficient gluten), or old yeast. Also avoid overworking after the first rise and ensure proper proofing environment.
Q: Can I make these in advance for a party?
A: Yes. You can shape the rolls, place them in the pan, then refrigerate overnight for a slow cold proof. Bake the next morning, adding 5–10 minutes to the bake time if chilled.
Q: How do I get that signature buttery shine on top?
A: Brush with melted butter immediately after baking. For extra gloss, brush again gently after a minute or two as the first layer sets.
Q: Is ensaymada the same as brioche?
A: They’re related. Ensaymada is a Filipino adaptation of enriched pastry (similar to brioche) but typically shaped, topped with sugar, and sometimes cheese, giving it a distinct profile.
Final Thoughts
This ensaymada recipe is one of those home-baked treats that delivers bakery results with everyday kitchen tools.
It’s flexible, forgiving, and crowd-pleasing — perfect for weekend baking or teaching a friend to knead.
Please leave a star rating in the recipe card below and pin this recipe to Pinterest if you loved it.
Conclusion
If you want to compare techniques or see other takes on this classic, these resources are helpful.
For a traditional Filipino approach and beautiful photography, check out filipino ensaymada » Hummingbird High.
If you’re curious about extra-soft methods, try the tips at Super Soft Ensaymada Recipe – Riverten Kitchen.
For a personal blog perspective on Filipino-style brioche and variations, see E is for Ensaimada (Filipino-Style Brioche) | Junblog.
To expand your baking skills with preferments and use them to deepen flavor in enriched doughs, read Preferments—and How to Adapt Any Bread Recipe to Use One.

Ensaymada
Ingredients
Dough Ingredients
- 4 cups all-purpose flour Use a reliable flour with moderate protein (10–11%).
- 1 cup granulated sugar
- 1 cup whole milk, warmed Warm to about 100–110°F.
- 1/2 cup unsalted butter, softened Plus extra for brushing.
- 3 large eggs
- 2 teaspoons active dry yeast Bloom in warm milk before use.
- 1 teaspoon salt
Topping Ingredients
- 1/4 cup grated cheese (optional) For a savory topping.
- 1/4 cup grated Parmesan cheese (optional) For a savory topping.
- Extra butter for brushing
- Additional sugar for sprinkling
Instructions
Preparation
- In a small bowl, combine the warmed milk and active dry yeast. Let it sit for 5–10 minutes until frothy and slightly bubbly on top.
- In a large bowl, whisk together the flour, granulated sugar, and salt until evenly combined.
- In a separate bowl, beat the eggs. Add the softened butter and the yeast-milk mixture and mix until uniform.
- Gradually pour the wet mixture into the dry ingredients while stirring. Mix until the dough begins to come together into a shaggy ball.
- Knead the dough on a lightly floured surface for about 10 minutes until smooth and elastic.
- Place the dough in a greased bowl, cover with a clean cloth, and let it rise in a warm place for about 1 hour or until doubled in size.
Shaping and Baking
- Punch down the risen dough and roll it out into a rectangle about 1/4 inch thick. Spread softened butter evenly over the surface.
- Sprinkle a generous layer of sugar over the butter. Add grated cheese if desired.
- Starting from one long edge, roll the dough tightly into a log. Pinch to seal the seam and ends.
- Cut the log into 1-inch thick pieces and lay them in a greased baking dish.
- Cover the baking dish and let the rolls rise for another 30 minutes until slightly puffed.
- Preheat your oven to 350°F (175°C). Bake the rolls for 20–25 minutes or until golden brown.
- Remove from the oven and immediately brush the tops with melted butter. Let cool in the pan for 15–30 minutes before serving.