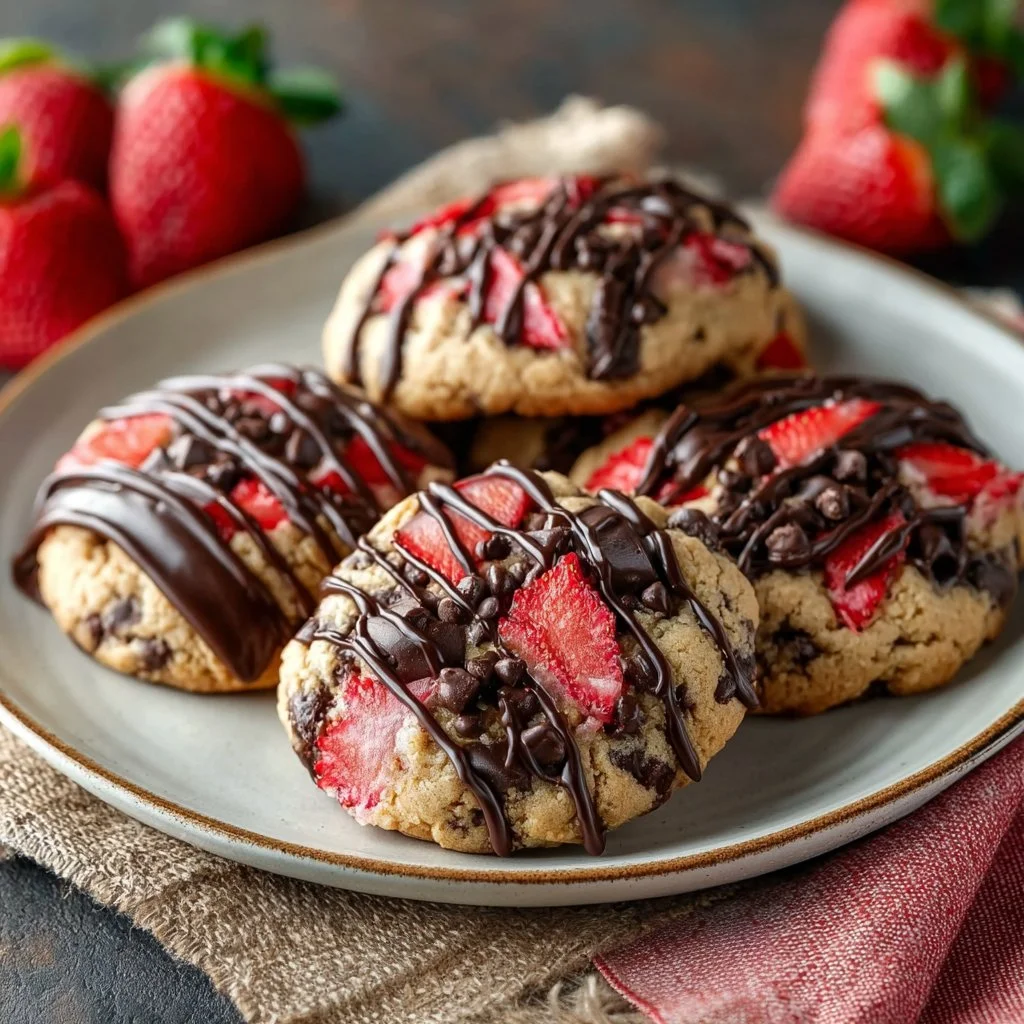
The first time I made these Chocolate Covered Strawberry Cookies, the house smelled like a bakery and fresh berries within minutes.
They hit the perfect balance between a soft chocolate chip cookie and a light fruity finish from the strawberry slice on top.
If you like classic cookies with a small, show-stopping edit, these are for you.
They’re forgiving enough for a weeknight bake but elegant enough for a potluck or a small celebration.
The recipe uses everyday pantry ingredients plus fresh strawberries for a seasonal twist.
You’ll get chocolate pockets, tender crumb, and a glossy chocolate drizzle that sets just right.
Why You’ll Love This Recipe
- Soft, tender cookies with a slightly crisp edge.
- Little bursts of fresh strawberry on top for bright acidity.
- Easy to scale for a crowd or half-batch for two.
- No special equipment required — just bowls, a mixer, and a baking sheet.
The texture is the real win here. The cookies bake up soft and tender in the middle while the edges achieve a thin, pleasant chew.
The brown sugar adds depth and moisture, keeping the crumb almost cake-like but still cookie-esque.
A thin drizzle of melted chocolate gives a glossy finish and a clean break when you bite in, while the fresh strawberry slice cuts the sweetness with a hint of acidity.
“These disappeared before I could plate them — my kids declared them the best cookies ever. Juicy strawberry on top makes them feel fancy!” — 5 stars, reader Claire
Key Ingredients
Unsalted butter, softened. Use real unsalted butter at room temperature for the best flavor and texture.
Soft butter creams with the sugars to trap air and creates the tender structure in these cookies.
Plug in a quality brand like Kerrygold or Plugrá for a richer butterfat flavor, but any unsalted stick will work.
Brown sugar (packed). Brown sugar is crucial for chew and depth.
Its molasses content keeps the cookies moist and adds a toasted caramel note that pairs beautifully with chocolate.
If your brown sugar is clumpy, break it up before measuring so the texture is consistent.
Fresh strawberries, sliced. Fresh strawberries used as a garnish are the defining twist.
They add brightness and a pop of color and should be firm but ripe to avoid turning mushy on the cookie.
Choose berries that smell fragrant; larger berries can be thinly sliced crosswise for the prettiest look.
Chocolate chips and/or melting chocolate. Chocolate chips give pockets of melted chocolate inside the cookie.
For drizzling, use melting wafers or a good-quality couverture if you want a glossy, snappy set.
Ghirardelli or Guittard chips melt reliably; for drizzling, callets or wafers from a baking supply ensure smooth melting.
Full ingredient list:
- 1 cup unsalted butter, softened
- 1 cup granulated sugar
- 1 cup brown sugar, packed
- 2 large eggs
- 2 teaspoons vanilla extract
- 3 cups all-purpose flour
- 1 teaspoon baking soda
- 1/2 teaspoon salt
- 1 cup chocolate chips
- 1 cup fresh strawberries, sliced
- 1/2 cup chocolate melting wafers or chocolate for drizzling
Step-by-Step Instructions
Step 1: Preheat and prepare
Preheat your oven to 350°F (175°C).
Line a baking sheet with parchment paper to prevent sticking and promote even browning.
Pro Tip: Line two sheets if you plan to bake multiple batches back-to-back; the second can cool while the first bakes.
Visual cue: The oven should be fully preheated for 10 minutes before the first tray goes in.
Step 2: Cream butter and sugars
In a large bowl, cream together the softened butter, granulated sugar, and packed brown sugar until smooth and slightly fluffy.
This step incorporates air and starts the structure for tender cookies.
Pro Tip: Use a stand mixer or hand mixer on medium speed for 2–3 minutes.
You’ll know it’s ready when the mixture lightens in color and looks smoother.
Step 3: Add eggs and vanilla
Beat in the eggs one at a time, mixing well after each addition.
Stir in the vanilla extract until fully incorporated.
Pro Tip: Room-temperature eggs mix more evenly.
Visual cue: The batter will look glossy and slightly loosen when the eggs are fully incorporated.
Step 4: Combine the dry ingredients
In a separate bowl, whisk together the all-purpose flour, baking soda, and salt.
Gradually add the dry mixture to the wet mixture, blending until just combined.
Pro Tip: Don’t overmix once the flour goes in; overmixing tightens gluten and makes cookies tough.
Visual cue: Stop mixing when you no longer see streaks of flour.
Step 5: Fold in chocolate chips
Gently fold in the chocolate chips so they’re evenly distributed throughout the dough.
This ensures each cookie has melty pockets of chocolate.
Pro Tip: If you like chunks, chop half the chips into larger pieces for textural contrast.
Visual cue: You should see chips dotted throughout the dough but the batter should not be overly stiff.
Step 6: Portion the dough
Drop tablespoons of dough onto the prepared baking sheet, spacing them about 2 inches apart.
Use a cookie scoop for uniformity and even baking.
Pro Tip: For larger cookies, use a 2-tablespoon scoop and increase bake time slightly.
Visual cue: Dough dollops should hold their shape and not spread before baking.
Step 7: Bake and cool
Bake for 10–12 minutes until the edges are golden but the centers still look slightly soft.
Allow cookies to cool on a wire rack to finish setting.
Pro Tip: Cookies continue to set as they cool; pulling them too late can lead to a dry texture.
Visual cue: Centers will flatten and look set while edges are lightly golden.
Step 8: Drizzle and top
Melt the chocolate melting wafers or chocolate and drizzle over cooled cookies.
Add a slice of fresh strawberry on top of each cookie while the chocolate is still tacky so it adheres.
Pro Tip: For a clean drizzle, use a small piping bag or a fork held low over the cookie.
Visual cue: Chocolate should form a glossy line that sets but does not crack immediately.
Step 9: Let the chocolate set
Let the chocolate set completely before serving to avoid smudging and to achieve a neat presentation.
This usually takes 15–30 minutes at room temperature, longer if your kitchen is warm.
Pro Tip: Chill briefly (5–10 minutes) in the refrigerator for faster setting but don’t leave the strawberries on chilled cookies for too long or they’ll sweat.
Visual cue: Chocolate will lose its sheen and become matte when fully set.

Expert Tips for Success
- Measure flour correctly: Spoon flour into your measuring cup and level it off with a knife. Too much flour leads to dense cookies.
- Room-temp ingredients: Make sure butter and eggs are at room temperature for even mixing and better emulsion. Cold butter won’t cream properly.
- Use a light hand when mixing dry into wet: Stir until just combined. Overworked dough develops gluten and results in tough cookies rather than tender ones.
- Chill dough if your kitchen is warm: If the dough is soft and spreads too much, refrigerate it for 15–30 minutes before scooping. This firms up the butter and reduces spread.
- Even portioning: Use a 1-tablespoon or 2-tablespoon cookie scoop for consistent size and bake time, which gives predictable results between batches.
- Watch bake time closely: Oven temps vary. Start checking at 8 minutes if you prefer very soft centers; 10–12 minutes is the sweet spot for a slightly set center with golden edges.
- Strawberries: Slice them thin so they sit flat and adhere to the chocolate. Thicker slices trap moisture and can make the chocolate peel off.
- Chocolate for drizzling: If you only have chocolate chips, add a teaspoon of neutral oil or shortening to help them melt smoothly. Avoid overheating — use short bursts in the microwave and stir between intervals.
- Prevent soggy cookies: Place strawberry slices on the chocolate, not directly on hot cookies. The cooled cookie prevents excess steam and moisture build-up.
- Make-ahead strategy: You can mix the dough a day ahead and refrigerate it. The rest time often improves flavor as the flour hydrates and the toffee notes from brown sugar deepen.
Storage & Freezing
Room temperature storage: Store cooled cookies in an airtight container for up to 3 days.
Place parchment between layers to prevent sticking and to protect the chocolate drizzle.
Refrigerator storage: If you’ve added fresh strawberry slices, store in the fridge in a single layer if possible.
They’ll last 3–4 days but expect the strawberry to soften; the chocolate may bloom slightly from fridge condensation.
Freezing dough: Scoop dough onto a baking sheet and freeze the scoops solid.
Transfer frozen dough balls to a zip-top bag and freeze for up to 3 months. Bake from frozen, adding a minute or two to the bake time.
Freezing baked cookies: Freeze baked cookies on a sheet until firm, then transfer to an airtight container with layers separated by parchment.
Freeze for up to 2 months. Thaw at room temperature and then reheat briefly (10–15 seconds in the microwave) for a just-baked taste.
Reheating: Warm cookies on a baking sheet at 300°F for 3–4 minutes or microwave a single cookie for 10–12 seconds to revive softness.
Avoid reheating with strawberry slices in place if you want to preserve their texture; add slices fresh after reheating.
Variations & Substitutions
White chocolate and macadamia: Swap chocolate chips for white chocolate chips and add chopped macadamia nuts for crunch.
The sweet white chocolate pairs nicely with the bright strawberry.
Vegan option: Use a dairy-free butter substitute and a flax egg (1 tbsp ground flax + 3 tbsp water per egg).
Use dairy-free chocolate chips and check labels for vegan compliance.
Gluten-free: Substitute a 1:1 gluten-free flour blend that contains xanthan gum.
Measure carefully and expect a slightly different crumb but similar flavor.
Reduced sugar/healthier swap: Replace half the granulated sugar with coconut sugar for a lower glycemic index and deeper caramel notes.
Keep brown sugar as written for moisture retention.
Frequently Asked Questions
Q: Can I use frozen strawberries instead of fresh?
A: I don’t recommend it. Frozen strawberries release a lot of moisture when thawed and can make the cookie soggy.
If you must use them, drain and pat dry thoroughly, and place them on cookies just before serving.
Q: Will the strawberries make the cookies spoil faster?
A: Yes, fresh fruit shortens shelf life.
Store cookies with strawberries in the refrigerator and consume within 3–4 days for the best texture and safety.
Q: Can I skip the chocolate drizzle and just dip the whole cookie?
A: You can, but dipping warm cookies into melted chocolate can cause strawberry slices to slip off.
For a dipped look, let cookies cool and set the chocolate fully before adding fruit.
Q: How do I prevent the chocolate from seizing when melting?
A: Melt chocolate slowly in short bursts, stirring between each burst.
If it seizes, add a small amount of neutral oil or warm cream and stir gently to smooth it.
Q: Can I make cookie bars instead of individual cookies?
A: Yes. Press the dough into a lined 9×13 pan and bake until the center is set (around 18–22 minutes depending on depth).
Cool, drizzle chocolate, then slice and top with strawberry slices just before serving.

Final Thoughts
These Chocolate Covered Strawberry Cookies are an easy recipe that feels special without a long ingredient list or fuss.
They’re perfect for spring and summer gatherings, or anytime you want a pretty cookie with a fresh bite.
If you want another take on the same idea, check my inspiration from Bakerita’s chocolate-dipped strawberry chocolate chip cookies for a similar mashup.
For a close variation and more plating ideas, see the tips at Mia’s Kitchen Counter.
If you’re curious about alternate drizzling techniques and kid-friendly versions, this guide at Baby Gizmo is helpful.
Please leave a star rating in the recipe card below and pin this to Pinterest if you loved it.

Chocolate Covered Strawberry Cookies
Ingredients
Cookie Base
- 1 cup unsalted butter, softened Use real unsalted butter at room temperature for the best flavor.
- 1 cup granulated sugar
- 1 cup brown sugar, packed Break up clumps before measuring.
- 2 large eggs Room-temperature is best for even mixing.
- 2 teaspoons vanilla extract
- 3 cups all-purpose flour Spoon and level for accuracy.
- 1 teaspoon baking soda
- 1/2 teaspoon salt
- 1 cup chocolate chips Use quality brands for best results.
Toppings
- 1 cup fresh strawberries, sliced Choose firm, ripe strawberries.
- 1/2 cup chocolate melting wafers For drizzling over cookies.
Instructions
Preparation
- Preheat your oven to 350°F (175°C) and line a baking sheet with parchment paper.
- In a large bowl, cream together the softened butter, granulated sugar, and packed brown sugar until smooth and slightly fluffy.
- Beat in the eggs one at a time, mixing well after each addition, then stir in the vanilla extract.
- In a separate bowl, whisk together the all-purpose flour, baking soda, and salt.
- Gradually add the dry mixture to the wet mixture, blending until just combined.
- Gently fold in the chocolate chips until evenly distributed throughout the dough.
- Drop tablespoons of dough onto the prepared baking sheet, spacing them about 2 inches apart.
Baking
- Bake for 10–12 minutes until the edges are golden but the centers still look slightly soft.
- Allow cookies to cool on a wire rack to finish setting.
Finishing Touches
- Melt the chocolate melting wafers and drizzle over cooled cookies.
- Add a slice of fresh strawberry on top of each cookie while the chocolate is still tacky.
- Let the chocolate set completely before serving.