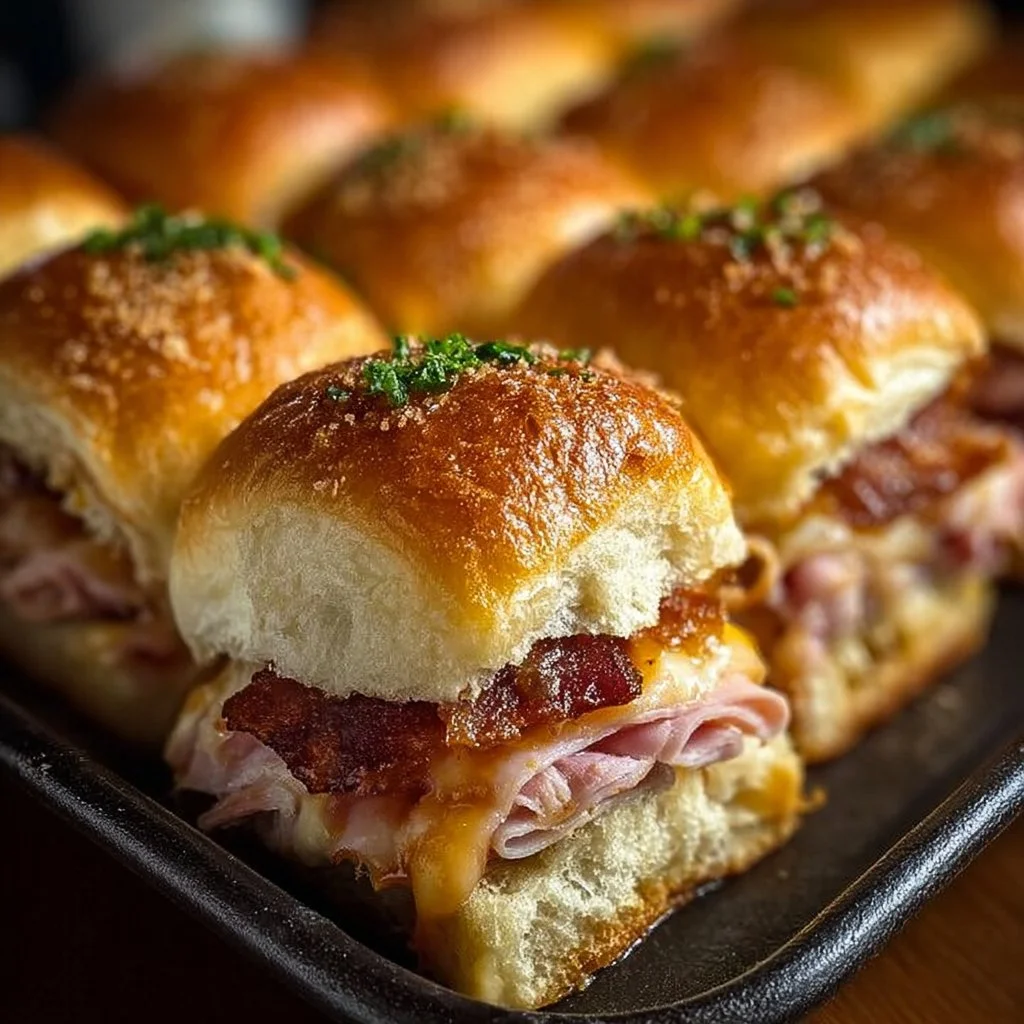
The first time I made these baked club sliders, my kitchen filled with the smell of browned butter and melted Swiss, and everyone hovered like moths around a porch light.
They’re absurdly easy, absurdly shareable, and the kind of recipe that makes people ask for second helpings before the plates are cleared.
This version keeps things classic—turkey, ham, pickles—with a browned-butter garlic top that crisps the buns into golden little crowns.
Why this specific recipe wins is simple: assembly is five minutes, bake time is short, and the result is warm, gooey, and portable.
If you want a party tray, a quick family dinner, or an upgrade to your next tailgate, these sliders deliver comfort with zero fuss.
Why You’ll Love This Recipe
- Fast assembly and short bake time make it perfect for weeknights and last-minute guests.
- Crowd-pleasing flavors — salty ham, mild turkey, tangy pickles, melty cheese — all in handheld form.
- The butter-garlic topping crisps the buns and adds a savory, bakery-fresh finish that lifts the whole sandwich.
- Easy to scale: make a tray for two or a buffet for twenty with the same technique.
These sliders land perfectly between tender and crisp. The interior is layered and moist from mayo and cheese, with bite-sized pockets of juicy turkey and ham. The top bun roasts in browned butter and aromatics until it develops little crunchy edges while the cheese melts into a creamy, stringy layer. The pickle and mustard cuts through the richness, keeping each bite bright.
“Made these for a game night and they disappeared in 10 minutes. The tops were perfectly crisp and the center stayed juicy — a new staple!” — Jenna, reader
Key Ingredients
Sliced cheese (Swiss or cheddar recommended)
Swiss gives a nutty, slightly sweet melt that plays beautifully with ham and turkey.
Sharp cheddar adds a bit more tang and depth; choose a medium-sharp for balance. Avoid pre-shredded blends if you want truly gooey, even melting.
Slider buns
The bun is front-and-center here: soft enough to yield but sturdy enough to hold fillings.
Choose a tray of Hawaiian or buttery potato slider buns for extra sweetness, or classic soft white rolls if you want a neutral background.
Butter
Butter is not just fat here — it’s flavor. Use unsalted butter so you can control the salt level, and let it brown slightly for a nutty, caramelized complexity.
Quality matters; a European-style butter will yield a richer finish.
Pickles
Pickles add essential acidity and textural contrast.
Dill chips or crunchy bread-and-butter slices work well; avoid soggy, jarred slices that collapse during baking.
Full ingredient list:
- Slider buns
- Sliced turkey
- Sliced ham
- Sliced cheese (Swiss or cheddar recommended)
- Mayonnaise
- Mustard
- Pickles
- Butter
- Garlic powder
- Onion powder
Step-by-Step Instructions
Step 1: Preheat and prep the pan
Preheat your oven to 350°F (175°C) and choose a baking dish that fits your sliders snugly.
A 9×13-inch pan works for a full dozen; smaller pans are fine for fewer sliders.
Pro Tip: Line the dish with foil for easy cleanup and gently spray or butter the bottom to prevent sticking.
Step 2: Halve the buns and layer the bottom
Slice the slider buns in half horizontally and arrange the bottom halves in the prepared dish with the cut side up.
Work in a single layer so every bun gets filled evenly.
Pro Tip: If your buns are slightly stale, give them 5 seconds in the microwave to soften before slicing — it helps them compress without tearing.
Step 3: Spread the base flavors
Spread a thin layer of mayonnaise and a little mustard across each bottom bun.
This thin shield keeps the bread from soaking up juices while adding a creamy tang under the meats.
Pro Tip: Use a light hand with mustard; too much will overshadow the cheese and butter crust.
Step 4: Layer meats, cheese, and pickles
On top of the mayo-mustard, place slices of turkey, then ham, then cheese, and finally pickles.
Stack thinly and evenly so the sliders heat at the same rate.
Pro Tip: Alternate cheese slices between layers for extra melt and flavor consistency.
Step 5: Cap the sandwiches
Place the top halves of the buns over the filled bottoms, aligning edges so the tray looks snug and tidy.
Press gently so everything nests together and won’t shift during baking.
Pro Tip: If you like pull-apart baking, press down firmly to encourage the cheese to bind to both halves.
Step 6: Garlic-butter finish
Melt butter in a small saucepan, whisk in garlic powder and onion powder until smooth, and brush this mixture over the tops of the buns.
This step is the secret to a bakery-like finish and gives you that irresistible crispy top.
Pro Tip: Brown the butter just until it smells nutty for a deeper flavor — don’t burn it.
Step 7: Cover and bake
Cover the dish tightly with foil and bake for 15 minutes at 350°F.
This initial steam phase melts the cheese and warms the meats without drying the buns.
Pro Tip: You’ll know it’s ready to uncover when you can see the cheese starting to bubble at the edges beneath the foil.
Step 8: Uncover and crisp
Remove the foil and bake for an additional 5–10 minutes until the tops are golden and slightly crispy.
Watch closely in the last few minutes so they don’t overbrown.
Pro Tip: For an even crisper top, switch to broil for the final 60–90 seconds, but stay by the oven — broiling is fast.
Step 9: Rest, slice, and serve
Let the sliders rest for 2 minutes in the pan, then use a serrated knife to slice between sandwiches and serve warm.
This brief rest keeps the cheese from sliding out and helps the layers set.
Pro Tip: Use a long serrated knife and a gentle sawing motion to get clean slices without squishing the sandwiches.

Expert Tips for Success
- Temperature control matters: Bake at 350°F for a gentle melt, then uncover to allow Maillard browning on the bun. This two-stage heat is why the centers stay moist while tops go crisp.
- Choose whole slices of cheese over shredded for the best melty texture. Shredded cheese often contains anti-caking agents that can inhibit smooth melting.
- Salt balance: Since ham and cheese contribute salt, use unsalted butter and a light hand with mayo to avoid an overly salty slider. Taste your components where possible.
- Keep assembly tight: Arrange the buns snugly in the pan so the melting cheese acts like glue between sandwiches. This prevents ingredient shifting and keeps slices intact.
- Browning the butter: If you want a deeper flavor, let the butter turn light brown and smell nutty, then immediately remove from heat. This compound flavor elevates the final dish but burns quickly, so watch it.
- Timing for big batches: If you’re making multiple trays, keep finished sliders covered with foil in a 200°F oven to stay warm and avoid drying while the rest finish.
- Equipment selection: Use a rimmed baking dish and heavy-duty foil. Thin pans heat unevenly and can cause hotspots that overbrown the edges.
- For crispier bottoms, place the dish on the middle rack with an empty sheet tray below to allow circulating heat to crisp everything evenly.
- Texture troubleshooting: If your buns turn soggy, reduce the mayo, add a thin layer of cheese directly under the top bun, or toast buns lightly before assembling.
- Make-ahead strategy: Assemble in the pan, cover tightly, and refrigerate for up to 8 hours before baking. Add 3–4 minutes to covered bake time if chilled.
Storage & Freezing
Fridge: Allow sliders to cool to room temperature, then transfer to an airtight container or cover the baking dish tightly with foil or plastic wrap.
Store in the refrigerator for up to 3 days.
Reheat from fridge: Reheat in a 350°F oven for 8–12 minutes covered, then uncover for 2–4 minutes to re-crisp the top.
Microwave reheating will warm them faster but sacrifices crispness.
Freezer: For longer storage, freeze assembled but unbaked sliders. Wrap the foil-covered pan tightly in plastic wrap, then foil, and freeze for up to 2 months.
Alternatively, freeze individual slider sandwiches in a single layer on a sheet tray, then transfer to a freezer bag to save space.
Bake from frozen: If frozen unbaked in a foil pan, bake covered at 350°F for about 25–30 minutes, then uncover and bake another 8–10 minutes until golden.
If reheating previously baked frozen sliders, thaw overnight in the refrigerator and follow the fridge reheat instructions for best texture.
Defrost tips: To avoid soggy buns, thaw in the refrigerator rather than at room temperature. Thawing slowly keeps moisture migration to a minimum and preserves texture.
Variations & Substitutions
Bacon boost: Add a layer of cooked crispy bacon between the ham and cheese for smoky crunch.
This converts them into a full “club” and pairs beautifully with Swiss.
Healthier swap: Use whole-grain slider buns and turkey breast only.
Skip or reduce butter on top and brush with a light olive oil-herb mix instead for a lighter finish.
Vegetarian twist: Replace turkey and ham with grilled portobello slices, roasted red pepper, and pesto.
Use provolone or smoked gouda for a satisfying melty texture without meat.
Spicy kick: Mix a little sriracha into the mayo or spread a thin layer of chipotle paste on the bun tops before placing the lid.
Alternatively, use pepper jack cheese for a built-in spice note.
Frequently Asked Questions
Q: Can I make these sliders ahead of time and bake them later?
A: Yes. Assemble the sliders in the baking dish, cover tightly, and refrigerate for up to 8 hours.
When ready, bake covered at 350°F for the usual 15 minutes covered, then uncover and bake 5–10 minutes until golden.
Q: What cheeses melt best for baked sliders?
A: Sliced Swiss and medium-sharp cheddar are top choices for meltability and flavor.
Provolone, American, and smoked gouda also melt well and bring distinct flavor profiles if you want to experiment.
Q: How can I keep the buns from getting soggy?
A: Use thin layers of mayo and mustard, and consider a short toast of the bun bottoms before assembly.
Assembling tightly and baking covered then uncovered helps keep moisture balanced.
Q: Can I add vegetables like lettuce or tomato?
A: Add fresh items like lettuce or tomato after baking to prevent wilting and excess moisture.
Slice and serve them on the side or let guests add their own.
Q: What’s the best way to re-crisp the tops when reheating?
A: Reheat in a 350°F oven covered until warm, then uncover for a few minutes or broil 30–60 seconds to re-crisp.
Avoid long microwaving for best texture.

Final Thoughts
These baked club sliders are a quick, crowd-pleasing meal that balances melty comfort with bright pickled bite.
They’re easy to adapt, simple to scale, and a great trick to have for gatherings or busy nights.
Please leave a star rating in the recipe card below if you tried this, and pin this recipe to Pinterest for later.
Conclusion
If you want a slightly different take or inspiration for add-ins, check this classic riff at Baked Club Sliders ⋆ Real Housemoms.
For ideas that layer bacon and turkey with extra crunch, see this flavorful version at Easy Turkey Sliders with Bacon – Yellow Bliss Road.
And if you’re exploring a bacon-forward approach, this recipe shows a tried method at Bacon Club Baked Sliders.

Baked Club Sliders
Ingredients
Slider Components
- 1 tray Slider buns Choose Hawaiian or buttery potato slider buns for extra sweetness.
- 1 lb Sliced turkey
- 1 lb Sliced ham
- 8 slices Sliced cheese (Swiss or cheddar recommended) Swiss gives a nutty sweet melt while cheddar adds tang.
- 1/2 cup Mayonnaise Spread a thin layer to keep buns moist.
- 2 tbsp Mustard Use a light hand to avoid overpowering flavors.
- 1 cup Pickles Dill chips or crunchy bread-and-butter slices work well.
- 1/2 cup Butter Use unsalted and let it brown slightly for flavor.
- 1 tbsp Garlic powder
- 1 tbsp Onion powder
Instructions
Preparation
- Preheat your oven to 350°F (175°C) and choose a baking dish that fits your sliders snugly.
- Slice the slider buns in half horizontally and arrange the bottom halves in the prepared dish with the cut side up.
- Spread a thin layer of mayonnaise and a little mustard across each bottom bun.
- On top of the mayo-mustard, place slices of turkey, then ham, then cheese, and finally pickles.
- Place the top halves of the buns over the filled bottoms, aligning edges so the tray looks snug and tidy.
- Melt butter in a small saucepan, whisk in garlic powder and onion powder until smooth, and brush this mixture over the tops of the buns.
- Cover the dish tightly with foil and bake for 15 minutes at 350°F.
- Remove the foil and bake for an additional 5–10 minutes until the tops are golden and slightly crispy.
- Let the sliders rest for 2 minutes in the pan, then slice between sandwiches and serve warm.