The first time I made these turkey and cheese sliders I served them to a picky book club crowd and they disappeared in ten minutes.
They’re that easy: three pantry items plus a little butter and a warm oven turn ordinary deli turkey into something unexpectedly cozy.
This recipe is a weeknight hero and a party staple — fast to assemble, easy to scale, and endlessly adaptable for whatever you have in the fridge.
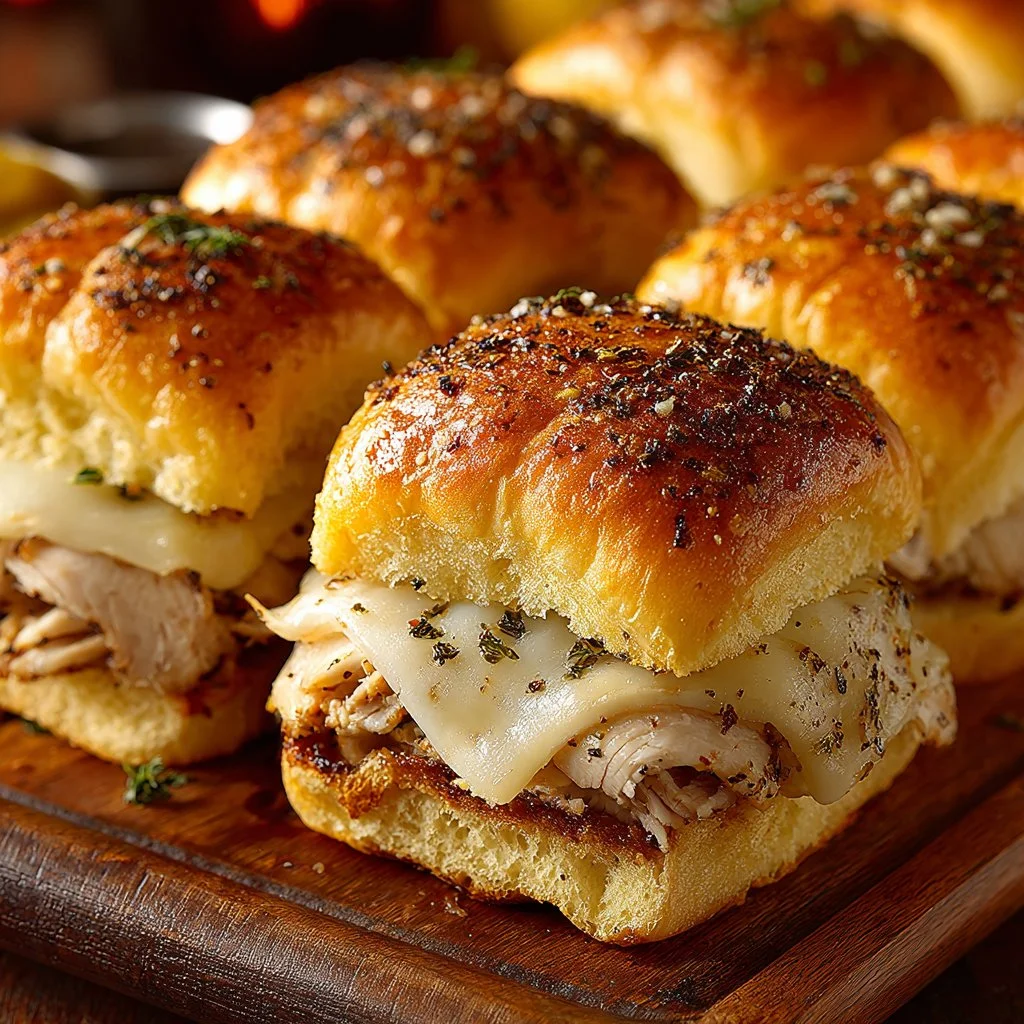
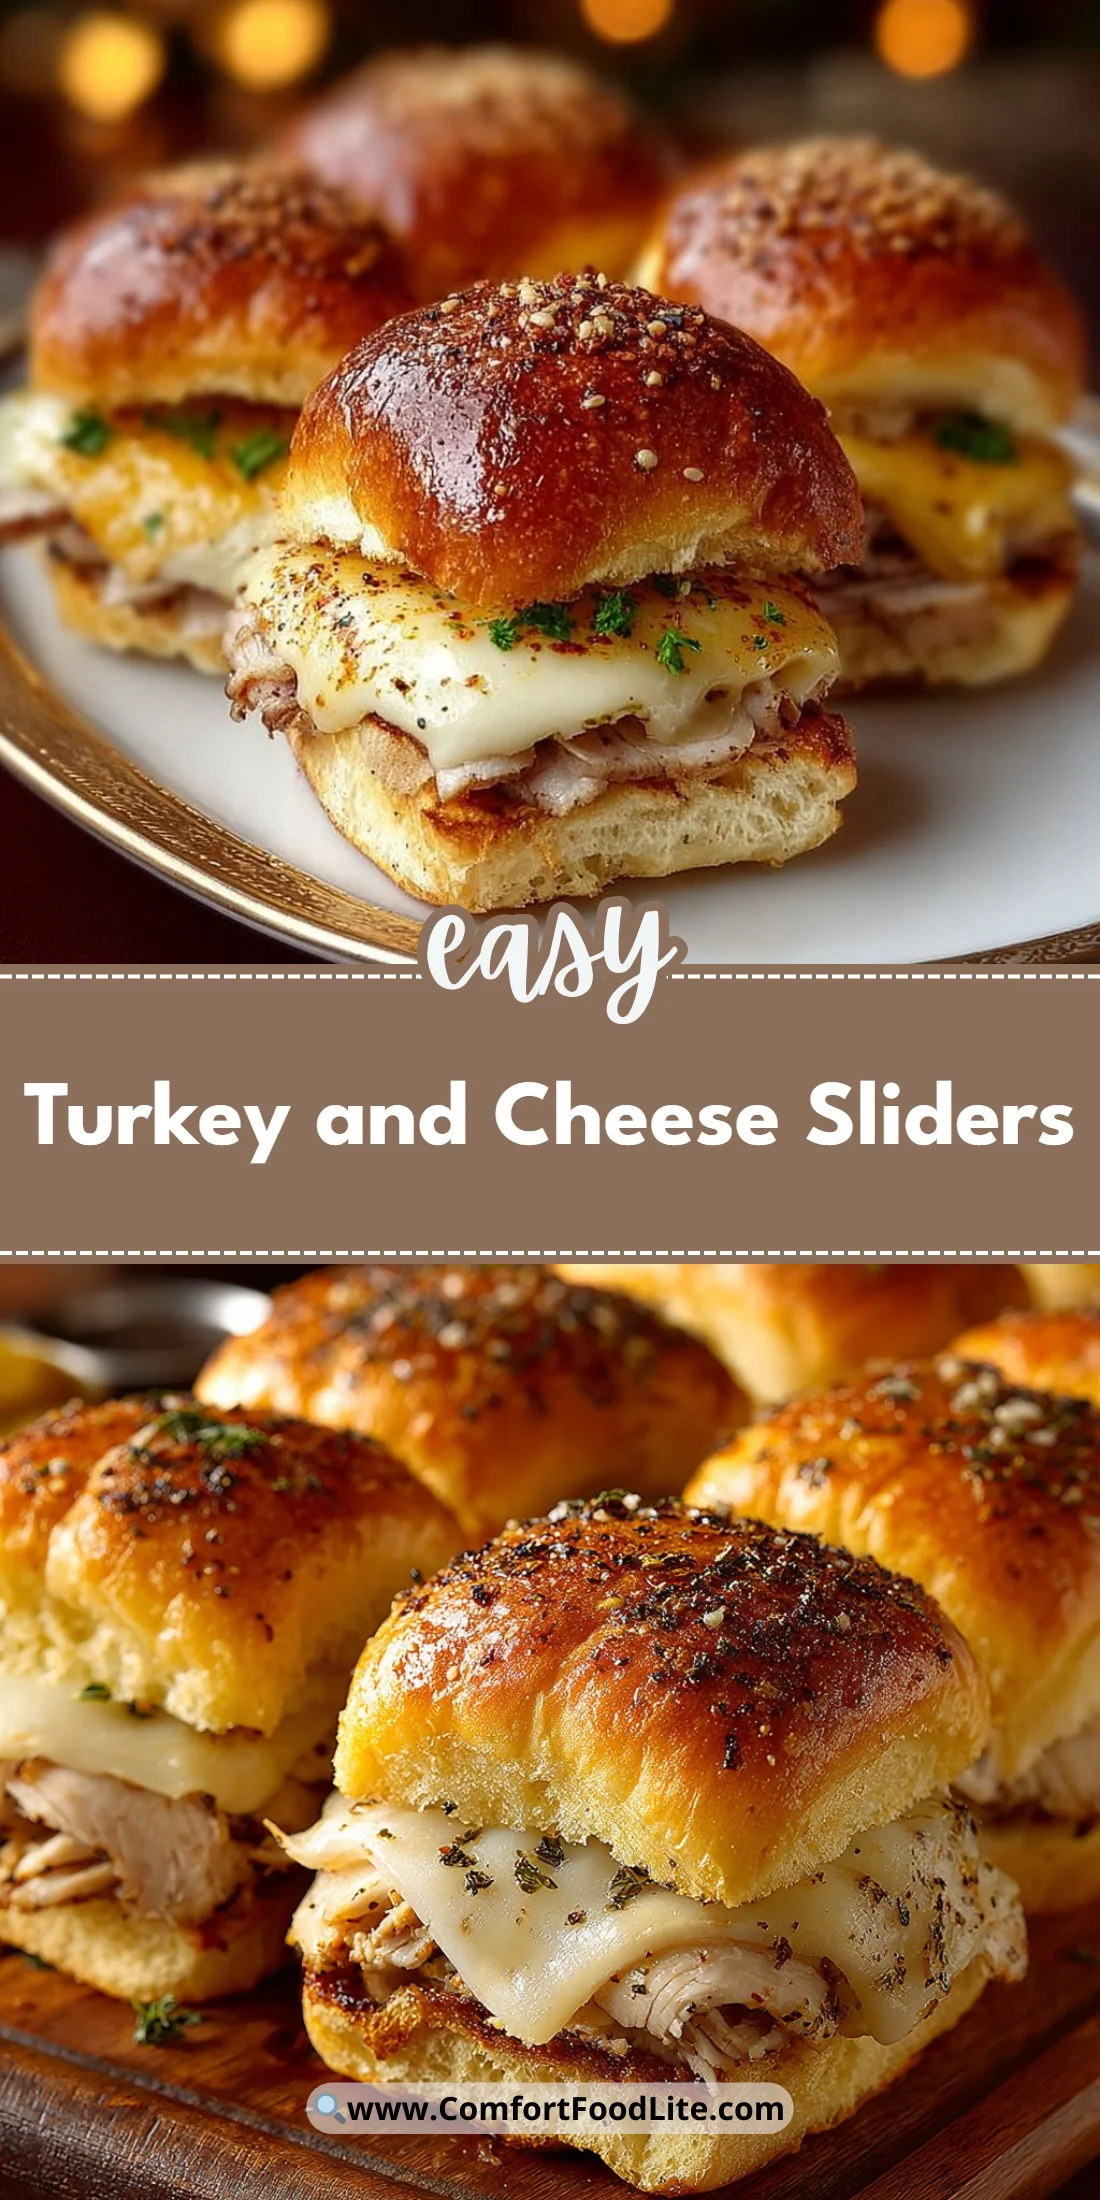
What makes them a winner is the contrast: soft, slightly sweet slider buns, salty turkey, gooey melted cheese, and a crisp buttery top.
They travel well, reheat beautifully, and are forgiving if you want to swap cheeses or add a quick spread.
Keep reading for the exact steps, smart tips, and storage tricks I use when I double the batch for gatherings.
Why You’ll Love This Recipe
- Ready in under 30 minutes from oven to table.
- Uses simple, store-bought ingredients with minimal prep.
- Perfect for feeding a crowd without standing over the stove.
- Melts together into a neat, hand-held sandwich — no knife required.
- Flexible for kid-friendly or adult flavor profiles with tiny swaps.
The texture is what sells these sliders: a tender, pillowy bun that soaks up a thin gloss of butter on top, a toothsome slice of turkey that provides meaty chew, and a blanket of warm, melted cheese that binds everything together. The light sprinkle of zesty seasoning adds a background note — a soft heat or garlicky lift — depending on what you choose. The contrast of the buttery golden top against the melty interior is exactly the kind of simple comfort food that works any time of day.
“Made these for a birthday potluck and everyone asked for the recipe. Simple, fast, and always a crowd-pleaser.” — Jenna, reader
Key Ingredients
Sliced turkey
Sliced turkey is the protein backbone here. Choose thin, even slices for easy stacking and comfortable chewing. For best flavor, pick a smoky or oven-roasted turkey from your deli counter; they’re slightly more flavorful than plain turkey breast from a package.
Sliced cheese (cheddar or Swiss)
Cheddar gives sharpness and color while Swiss provides nuttiness and a great melt. Use medium-sharp cheddar or an aged Swiss for depth. Avoid super-hard artisan cheeses that won’t fully melt in the short bake time.
Slider buns
Fresh slider buns (Hawaiian rolls or classic soft-dinner rolls) determine the final bite — sweet rolls give a party vibe while regular soft rolls keep things savory. Look for a pack with a soft interior and thin crust so the butter browns beautifully.
Butter (for brushing)
Butter creates the glossy, golden top and adds richness. Use real salted butter for immediate seasoning; if using unsalted, add a tiny pinch of salt to the melted butter. Clarified butter will brown less and keep the top softer if you prefer.
Full ingredients list:
- Slider buns (12 count is typical)
- Sliced turkey (about 12 slices, one per slider)
- Sliced cheese (cheddar or Swiss; 12 slices)
- Zesty seasoning (paprika, garlic powder, or a blend)
- Butter (2–3 tablespoons, melted)
- Optional toppings: pickles, mustard, thinly sliced onions, or a quick slaw
Step-by-Step Instructions
Step 1: Preheat and prep your pan
Preheat your oven to 350°F (175°C) and line a baking sheet with foil for easy cleanup.
Using foil makes transferring and cleaning a breeze and prevents bottoms from over-browning if you like a softer base.
Pro Tip: If you want cleaner edges and a neater presentation, use a rimmed baking sheet so the sliders stay in place and the butter doesn’t drip onto your oven.
Step 2: Arrange the buns
Place the slider buns on the lined baking sheet with the bottom halves facing up, leaving a little gap between each for even heat circulation.
Arrange them in a single layer so they heat evenly and the cheese melts consistently across all sliders.
Pro Tip: If your buns are connected in a pack, keep them attached while assembling to make cutting and serving easier after baking.
Step 3: Layer turkey and cheese
On each bottom bun, place a slice of turkey folded if needed to fit, then top with a slice of your chosen cheese.
Folding turkey keeps the meat in place and produces a pleasantly layered bite once melted.
Pro Tip: Slightly overlap the cheese over the edges of the bun to encourage melt-and-seal action — it helps hold the sandwich together.
Step 4: Add zesty seasoning
Lightly sprinkle each assembled bottom with your zesty seasoning of choice — a pinch of smoked paprika or a dusting of garlic powder adds lift.
Season sparingly; the goal is to complement the turkey and cheese without overwhelming the simplicity.
Pro Tip: If you like a bolder flavor, mix the seasoning into the melted butter and brush that onto the tops for deeper flavor throughout.
Step 5: Top and butter
Place the top halves of the buns over the layered bottoms, then brush the tops generously with melted butter to encourage browning.
Be thorough with the butter so the tops develop a beautiful golden sheen and a toasty edge.
Pro Tip: For a little extra texture, brush with butter and then sprinkle a tiny pinch of flaky sea salt or dried herbs before baking.
Step 6: Bake until melty and golden
Bake the assembled sliders at 350°F (175°C) for 15–20 minutes, or until the cheese is fully melted and the bun tops are golden brown.
Check at 12 minutes if your oven runs hot; ovens vary and you want melty cheese without drying out the turkey.
Pro Tip: You’ll know they’re done when the cheese is gooey at the edges and the tops have a deep golden color — no longer pale or soft.
Step 7: Serve warm with optional toppings
Remove the sliders from the oven and let rest 1–2 minutes before serving. Offer pickles, mustard, or a quick slaw on the side for guests to add.
Serving warm ensures the cheese stays gooey and the butter taste is at its peak.
Pro Tip: Use a wide spatula to transfer a row of sliders to a cutting board; cutting across the seams gives neat individual portions.
Expert Tips for Success
- Use even slices: Buy deli-sliced turkey that’s uniform in thickness. Uneven slices create hotspots that can overcook or leave cold pockets. If your slices are thick, briefly lay them flat on the counter and press with your palm to distribute thickness.
- Cheese selection matters: Cheddar and Swiss melt reliably, but if you want extra creaminess, add a mild American or Havarti slice under the cheese — it melts faster and bonds layers together. Grate a bit of extra sharp cheddar on top beneath the butter for an extra flavor boost.
- Room temperature assembly: Let butter sit out briefly to melt more smoothly and let cold slices of turkey come closer to room temperature for more even heating. Cold ingredients lower oven efficiency and lengthen bake time.
- Don’t overload the bun: One slice of turkey and one slice of cheese per bun is the sweet spot for balanced bites. Overfilling leads to messy sliders and uneven toasting during the short bake.
- Control the browning: If your tops are browning too fast but cheese isn’t melted, tent the sliders loosely with foil for the final minutes. This traps heat and melts the cheese without burning the tops.
- Use a rimmed sheet and wire rack for crisper bottoms: If you prefer a drier bottom instead of soft, place a wire rack inside the rimmed sheet and bake sliders on the rack so air circulates under the buns.
- Scale-up strategy: For parties, assemble on multiple baking sheets and keep unbaked trays chilled; bake in back-to-back batches and hold finished sliders briefly at 200°F on a sheet tray if needed.
- Timing for extras: If adding pickles or mustard, place them on the side rather than inside before baking — acidic condiments can make the buns soggy if applied too early.
Storage & Freezing
Fridge storage: Cool any leftover sliders to room temperature for no more than 2 hours before refrigerating. Place in an airtight container or wrap tightly in foil; they will keep for 3–4 days. Reheat covered in a 325°F oven for about 10–12 minutes until warmed through, or microwave individual sliders for 30–60 seconds on medium power for a quick fix.
Freezer storage: To freeze, assemble sliders but do not bake. Wrap the entire baking sheet tightly in plastic wrap and then foil, or place sliders in a freezer-safe container with parchment between layers. Freeze up to 2 months. When ready to eat, bake from frozen at 350°F for 20–25 minutes, then check for melted cheese and golden tops; add a few extra minutes if needed.
Reheating tips: For the best texture, reheat in the oven on a baking sheet covered loosely with foil to prevent over-browning, then remove foil for the last 2–3 minutes to crisp the tops. Avoid high-power microwave reheats for large batches — they’ll steam the buns and make them chewy rather than soft and buttery.
Variations & Substitutions
- Italian twist: Swap turkey for thinly sliced salami or prosciutto, use provolone instead of cheddar, and add a smear of pesto under the cheese for herbaceous complexity. Top with pepperoncini for a briny pop.
- BBQ turkey sliders: Toss turkey in a spoonful of BBQ sauce before layering. Use a sharp cheddar and add a small spoon of coleslaw on the side or on top post-bake for tang. The sauce caramelizes slightly and adds sticky-sweet depth.
- Vegetarian swap: Replace turkey with grilled portobello slices or a thick marinated tofu slab. Opt for smoked gouda to mimic the savory bite of deli meat.
- Low-carb option: Use large lettuce cups or keto slider buns and place ingredients the same way; heat briefly in a skillet to melt the cheese rather than baking to protect the lettuce.
- Spicy mustard variation: Mix Dijon with a touch of sriracha and spread a thin layer under the cheese to give the sliders a controlled kick that complements the buttered top.
Frequently Asked Questions
Q: Can I use leftover Thanksgiving turkey for these sliders?
A: Absolutely. Leftover roasted turkey is actually ideal because it has more flavor than deli-sliced turkey. Warm the slices briefly in a skillet with a splash of broth if they’re very dry, then proceed with layering and baking as directed.
Q: How do I prevent soggy bottoms?
A: Use fresh buns with a slightly firmer crumb and avoid piling on wet toppings before baking. If you must add condiments, serve them on the side. For crisper bottoms, bake on a wire rack over the sheet pan or toast the bottom buns for 2 minutes before assembling.
Q: Can I assemble ahead of time and bake later?
A: Yes. Assemble sliders without brushing the tops with butter, cover tightly, and refrigerate for up to 12 hours. When you’re ready to bake, brush with melted butter and follow the bake time, adding a couple of minutes if baking straight from chilled.
Q: Is there a dairy-free version?
A: Use a dairy-free butter substitute for brushing and a plant-based melting cheese. Be aware that not all vegan cheeses melt similarly, so test a brand that’s known for good meltability (look for ones labeled “melts well” or “slices for melting”).
Q: What’s the best way to reheat a large batch for a party?
A: Reheat in a 325–350°F oven covered with foil for 10–15 minutes to bring internal temperature up, then remove foil for 2–3 minutes to refresh the top. Keep them on low oven heat (about 200°F) if you need to hold them briefly without drying.
Final Thoughts
These turkey and cheese sliders are the kind of recipe I make on repeat because they’re fast, flexible, and reliably delicious.
They work for busy weeknights, halftime snacks, or last-minute gatherings and reward small upgrades like a better cheese or a flavored butter.
Please leave a star rating in the recipe card below if you try them, and pin this recipe to Pinterest so you can find it the next time you need a fast, crowd-pleasing meal.
Conclusion
If you want another baked slider method with slightly different seasonings and tips, check this baked version for additional inspiration: Turkey Sliders in the Oven – Fresh April Flours.
For a version that leans into bold pickles and party-friendly assembly techniques, this recipe is a practical reference I consult sometimes: Turkey Sliders Recipe – The Cookie Rookie®.
And if you’re curious about the Hawaiian roll approach with notes on roll choice and timing, this guide has useful photos and small adjustments: Easy Turkey and Cheese Sliders Recipe (Hawaiian Roll Sliders).

Turkey and Cheese Sliders
Ingredients
Main Ingredients
- 12 count slider buns Hawaiian rolls or classic soft-dinner rolls
- 12 slices sliced turkey Choose smoky or oven-roasted for better flavor
- 12 slices sliced cheese (cheddar or Swiss) Medium-sharp cheddar or aged Swiss recommended
- 2-3 tablespoons butter, melted Use real salted butter for best results
- to taste zesty seasoning (paprika, garlic powder, or a blend) Season sparingly to complement flavors
Optional Toppings
- pickles For serving
- mustard For serving
- thinly sliced onions For serving
- quick slaw For serving
Instructions
Preparation
- Preheat your oven to 350°F (175°C) and line a baking sheet with foil for easy cleanup.
- Place the slider buns on the lined baking sheet with the bottom halves facing up, leaving a little gap between each.
- On each bottom bun, place a slice of turkey folded if needed, then top with a slice of your chosen cheese.
- Lightly sprinkle each assembled bottom with your zesty seasoning of choice.
- Place the top halves of the buns over the layered bottoms, then brush the tops generously with melted butter.
Baking
- Bake the assembled sliders at 350°F (175°C) for 15–20 minutes, or until the cheese is fully melted and the bun tops are golden brown.
Serving
- Remove the sliders from the oven and let rest 1–2 minutes before serving. Offer optional toppings on the side.