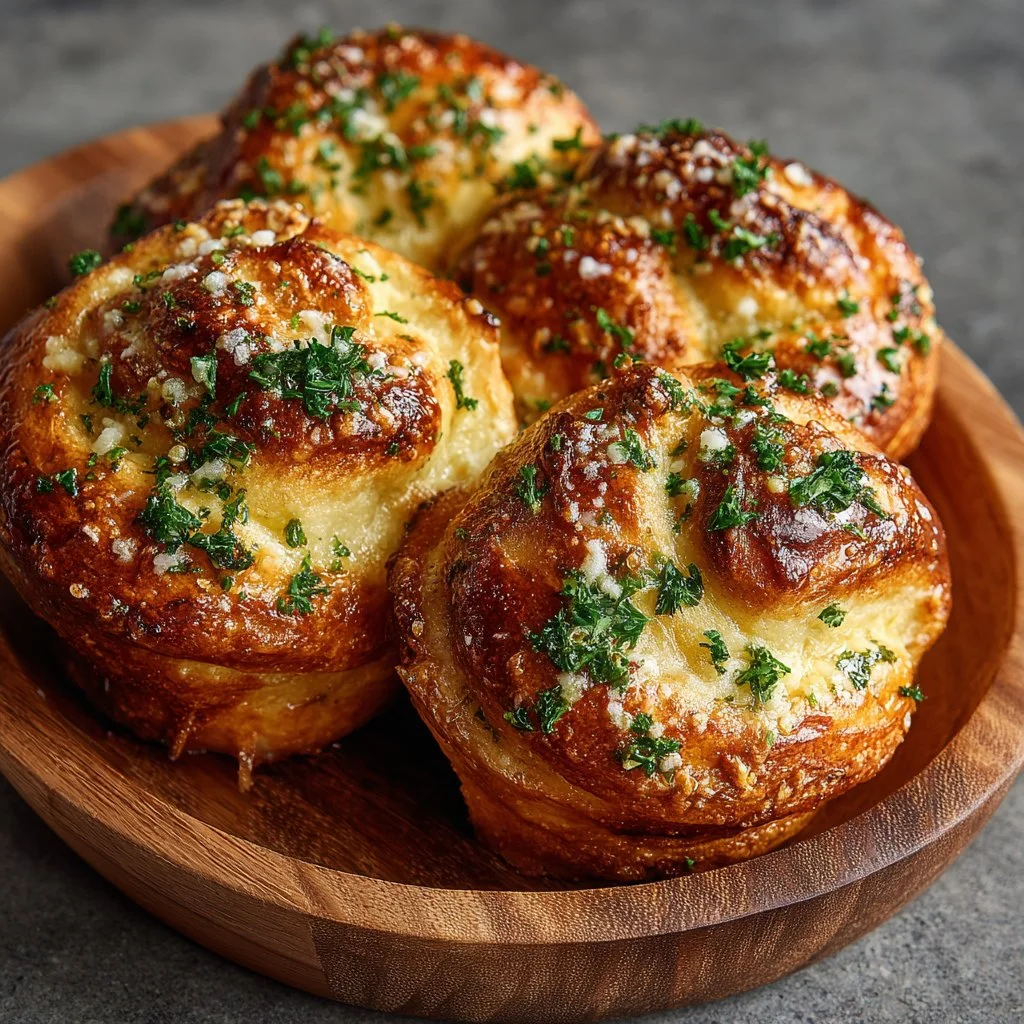
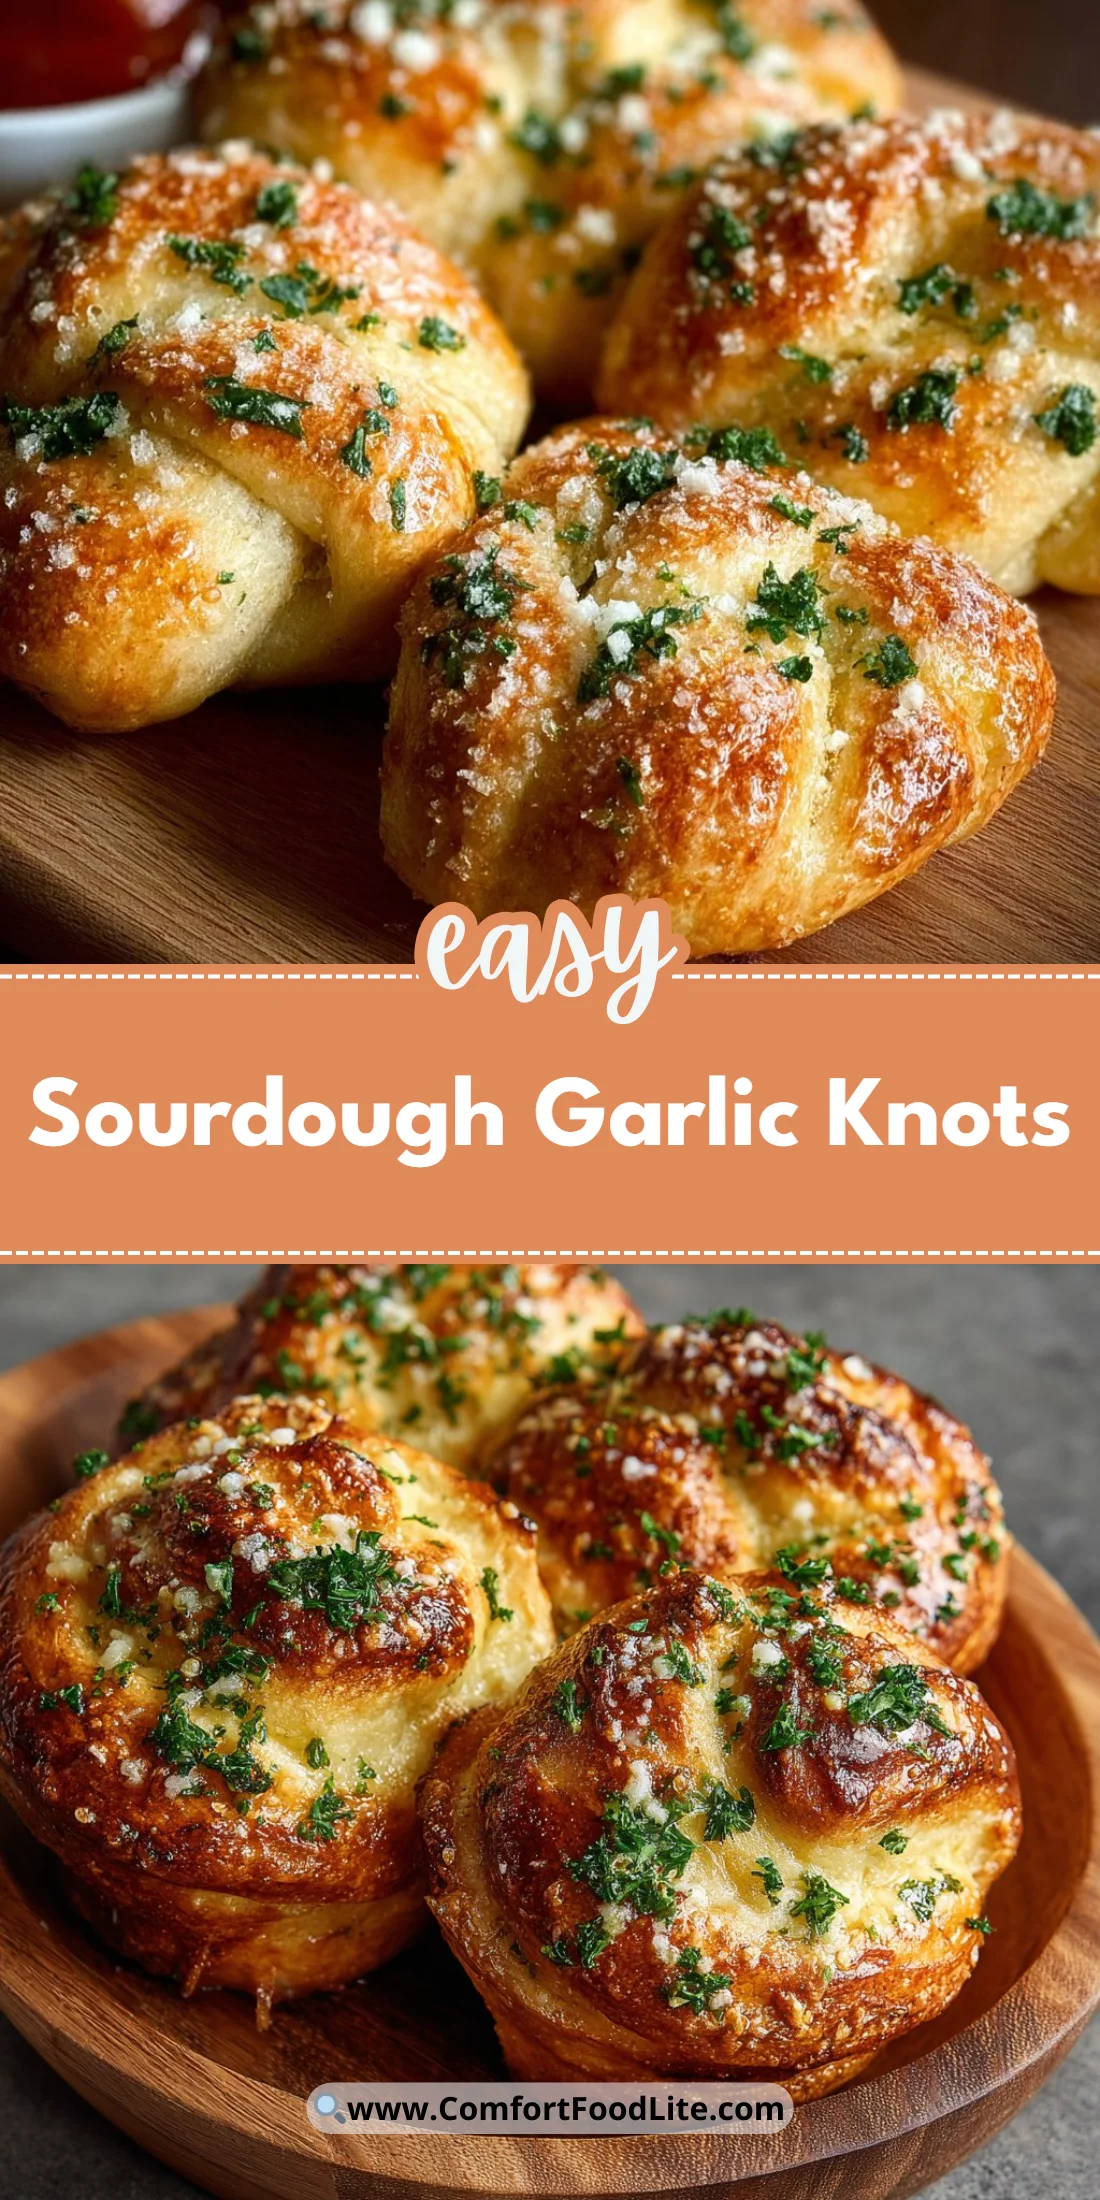
The first time I made these sourdough garlic knots, my kitchen smelled like a pizza place and my kids disappeared into a buttery, garlicky trance.
They are chewy on the inside, crisp at the edges, and carry that tang only a live sourdough starter can give.
This recipe is a great way to use an active starter, and it’s forgiving for home bakers who want bakery results without complicated equipment.
If you want a quicker discard version, I’ve adapted ideas from other cookbooks and tried shortcuts that keep flavor intact.
Why You’ll Love This Recipe
- Uses a live sourdough starter for real tang and improved texture.
- Produces an open, chewy crumb with crisp, golden edges.
- Easy shaping into individual knots makes portioning simple for guests.
- Uses pantry staples and can be adapted for dairy-free or herb variations.
The texture is the star: a slightly chewy interior with a soft crumb that pulls apart easily, contrasted by a golden, slightly crisp exterior from the butter brush. The tang from the sourdough starter brightens the garlic butter and cuts the richness so the knots never feel heavy. This balance gives you a bread that works as a snack, a side for soup, or the vessel for a late-night sandwich.
“Best garlic knots I’ve ever made at home — tangy, buttery, and perfectly chewy. My partner refuses to buy store-bought now!” — Jenna, reader
Key Ingredients
- Sourdough starter (100 g, at its peak): Your starter is the engine here. A lively starter gives flavor, lift, and a more complex crumb than commercial yeast alone. Use a starter that doubles predictably; if yours is sluggish, feed it once and wait until it peaks before measuring.
- Bread flour (325 g): Bread flour’s higher protein strengthens the dough and creates that desirable chew. Brands with 12–14% protein give reliable gluten development; King Arthur and reputable local mill flours are good choices.
- Butter (50 g melted + 5 tbsp unsalted): Butter adds richness, helps with tenderness, and is crucial for the finishing glaze that gives flavor and shine. Use unsalted for the finishing butter so you can control salt levels; European-style butter brings a slightly deeper flavor.
- Garlic (4–6 cloves, minced): Fresh garlic lends brightness that powders can’t match. If you want a milder, roasted flavor, substitute with roasted garlic or use garlic confit for a sweet, spreadable finish.
Full ingredient list:
- 125 g filtered water
- 100 g sourdough starter, at its peak
- 325 g bread flour
- 10 g sea salt
- 50 g butter, melted
- 2 tbs olive oil
- 4–6 cloves garlic, minced (see notes for substitution)
- 5 tbs butter, unsalted, for brushing
- 1/4 tsp salt, for finishing butter
- 2 tbs parsley, chopped (optional)
Step-by-Step Instructions
Step 1: Make the Dough
Mix the filtered water and the peak sourdough starter in a bowl until combined. Add the bread flour and sea salt, then pour in the melted butter and olive oil.
Stir until a shaggy dough forms; it will look rough and slightly sticky.
Cover and rest for 30 minutes to allow the flour to hydrate.
Pro Tip: You’ll know it’s ready for the next step when the dough has absorbed most of the flour and feels cohesive but still tacky.
Step 2: Strengthen the Dough
After the autolyse/rest, use a series of gentle stretch-and-folds every 20 minutes for about an hour (3–4 folds total).
To perform a stretch-and-fold, wet your hand, lift one edge of the dough, stretch it upward, and fold it over itself. Rotate the bowl and repeat.
These folds build gluten without intensive kneading.
Pro Tip: The dough will feel smoother and more elastic after the folds; a windowpane test (stretch a small piece until translucent) should pass lightly by the end.
Step 3: Bulk Ferment
Cover the dough and let it bulk ferment at room temperature until it increases by about 30–50% and shows bubbles on the surface; timing depends on starter strength and room temperature.
This usually takes 3–6 hours with an active starter at ~72°F (22°C). Cooler rooms slow fermentation, while warmer conditions speed it up.
Gently degas the dough before shaping by tipping it onto a lightly floured surface.
Pro Tip: You’ll know the dough is ready when it slowly jigs back when poked; if it springs back fast, it needs more time.
Step 4: Shape and Second Rise
Divide the dough into 10–12 equal pieces. Roll each piece into a rope about 8–10 inches long. Tie each rope into a knot and tuck the ends under.
Place knots on a parchment-lined baking sheet, leaving space for expansion. Cover loosely and let rise until puffy but not overproofed—about 45–90 minutes depending on temperature.
While they proof, combine the minced garlic with the 5 tbsp softened unsalted butter and 1/4 tsp salt for the finishing brush.
Pro Tip: A gentle poke should leave a slight indentation that fills slowly; if it collapses, they overproofed.
Step 5: Bake and Brush
Preheat the oven to 425°F (220°C). Bake the knots for 12–15 minutes until golden brown and crisp at the edges.
Remove from the oven and brush liberally with the garlic butter. Sprinkle chopped parsley if using. Serve warm.
Let cool slightly before storing; they are best the day they’re made but keep well with care.
Pro Tip: A high initial oven temperature helps set the crust and encourages a good oven spring. If you like a more caramelized finish, broil for 30–60 seconds while watching closely.
Expert Tips for Success
- Monitor starter strength: Feed your starter 4–12 hours before baking so it’s at its most active. A starter that doubles within 4–8 hours is ideal.
- Use a scale: Weighing ingredients delivers consistent results. Grams are precise and eliminate the guesswork of cups.
- Control temperature: Dough temperature matters. Aim for a final dough temperature around 75–78°F (24–26°C) for predictable fermentation. Use cooler water in hot weather and warmer water in cold weather.
- Hydration handling: This recipe is moderately hydrated. If your dough feels excessively sticky, wet your hands for handling rather than adding more flour; extra flour tightens the crumb.
- Folding technique: Stretch-and-folds are gentler than kneading and preserve the gas structure while building strength. Four folds spaced over an hour are usually sufficient.
- Proofing cues: Learn visual signs. Look for surface bubbles, a pillowy rise, and a dough that slowly springs back when poked. These cues are more reliable than clock time.
- Garlic butter finish: Make the garlic butter just before baking to keep garlic vibrant. If you prefer milder garlic, sauté the minced garlic lightly in olive oil first.
- Baking surface: A preheated baking stone or steel helps the bottom crust develop. If you don’t have one, a heavy oven tray turned upside down works well.
- Salt balance: Because there’s butter in the dough and on top, be conservative with added finishing salt. Taste your finishing butter before brushing.
- Make-ahead options: You can shape the knots and refrigerate them overnight for a slow cold proof; bake straight from the fridge, adding a few minutes to bake time.
Storage & Freezing
Refrigerator storage:
Place cooled knots in an airtight container or zip-top bag for up to 3 days.
To refresh, reheat in a 350°F (175°C) oven for 8–10 minutes, covered loosely with foil to prevent over-browning.
If the finish butter has separated, rebrush with warm melted butter before serving.
Freezer storage:
Freeze cooled knots on a tray until solid, then transfer to freezer bags for up to 3 months.
To reheat from frozen, thaw overnight in the fridge, then reheat in a 350°F oven for 10–15 minutes.
For best texture, finish with the fresh garlic butter after reheating rather than freezing with the knots.
Variations & Substitutions
- Dairy-free/Vegan: Replace butter with vegan butter for both dough and brushing. Use olive oil in the dough and a high-quality plant-based spread for finishing.
- Herb & Cheese: Add 1–2 tsp chopped rosemary or thyme to the finishing butter. For cheesy knots, sprinkle grated Parmesan on top after baking.
- Spicy Garlic: Mix 1/2 tsp crushed red pepper into the finishing butter for a kick. Alternatively, fold in finely chopped roasted jalapeños into the dough for subtle heat.
- Garlic substitute: If fresh garlic is too strong, use roasted garlic paste for a sweeter, mellow profile. For an easier shortcut, garlic powder can be mixed into the dough but will lack the fresh bite.
For a sweet spin, try using the same dough approach to make cinnamon knots.
If you want a pull-apart style, this method adapts well to layered assembly; see my notes on the technique in another variation: pull-apart version.
Frequently Asked Questions
Q: Can I make these with sourdough discard instead of an active starter?
A: Yes. If using discard, you’ll need to add a small amount of commercial yeast or extend bulk fermentation to compensate for reduced leavening power. A common approach is 1/4 tsp active dry yeast with discard to maintain rise while keeping the sour flavor.
Q: How long will the dough keep in the fridge if I cold-proof overnight?
A: Shaped knots can cold-proof for up to 24 hours in the refrigerator. Some bakers extend to 48 hours, but flavor will deepen and proof risk increases. Bake directly from the fridge, adding a few extra minutes as needed.
Q: Can I bake these on the same tray as pizza or other breads?
A: Yes, but allow space for air circulation. If you bake multiple items, rotate trays mid-bake for even color. Knots bake relatively quickly, so keep an eye on them to prevent over-browning.
Q: Why did my knots come out dense?
A: Density often comes from underproofing, a weak starter, or too much flour during shaping. Ensure the starter is active, watch visual proofing cues, and handle dough gently.
Q: Can I use all-purpose flour instead of bread flour?
A: You can, but expect a slightly softer, less chewy crumb. If all you have is AP flour, consider adding 1–2 tbsp vital wheat gluten per 325 g flour to mimic bread flour protein levels.
Final Thoughts
These sourdough garlic knots are a comforting, crowd-pleasing bake that reward a little patience with big flavor.
If you enjoyed this recipe, please leave a star rating in the recipe card below or pin this to Pinterest for later.
For another take using discard and a step-by-step guide, check out this flavorful version on Sourdough Discard Garlic Knots – Easy | Garlic Butter and a vegan approach at Sourdough Discard Garlic Knots – Vegan Yack Attack.

Sourdough Garlic Knots
Ingredients
Dough Ingredients
- 125 g filtered water
- 100 g sourdough starter, at its peak A lively starter is recommended for best flavor.
- 325 g bread flour Use flour with 12-14% protein for best results.
- 10 g sea salt
- 50 g butter, melted Use unsalted for better control over salt levels.
- 2 tbs olive oil
Finishing Ingredients
- 4-6 cloves garlic, minced Fresh garlic gives the best flavor.
- 5 tbs butter, unsalted, for brushing
- 1/4 tsp salt, for finishing butter
- 2 tbs parsley, chopped (optional)
Instructions
Make the Dough
- Mix the filtered water and the peak sourdough starter in a bowl until combined. Add the bread flour and sea salt, then pour in the melted butter and olive oil.
- Stir until a shaggy dough forms; it will look rough and slightly sticky.
- Cover and rest for 30 minutes to allow the flour to hydrate.
Strengthen the Dough
- After the autolyse/rest, use gentle stretch-and-folds every 20 minutes for about an hour (3–4 folds total).
- To perform a stretch-and-fold, wet your hand, lift one edge of the dough, stretch it upward, and fold it over itself. Rotate the bowl and repeat.
Bulk Ferment
- Cover the dough and let it bulk ferment at room temperature until it increases by about 30-50% and shows bubbles on the surface (usually takes 3-6 hours).
- Gently degas the dough before shaping by tipping it onto a lightly floured surface.
Shape and Second Rise
- Divide the dough into 10–12 equal pieces. Roll each piece into a rope about 8–10 inches long. Tie each rope into a knot and tuck the ends under.
- Place knots on a parchment-lined baking sheet, cover loosely, and let rise until puffy (about 45-90 minutes depending on temperature).
- Combine the minced garlic with the 5 tbsp softened unsalted butter and 1/4 tsp salt for the finishing brush.
Bake and Brush
- Preheat the oven to 425°F (220°C).
- Bake the knots for 12-15 minutes until golden brown and crisp at the edges.
- Remove from the oven and brush liberally with the garlic butter. Serve warm.