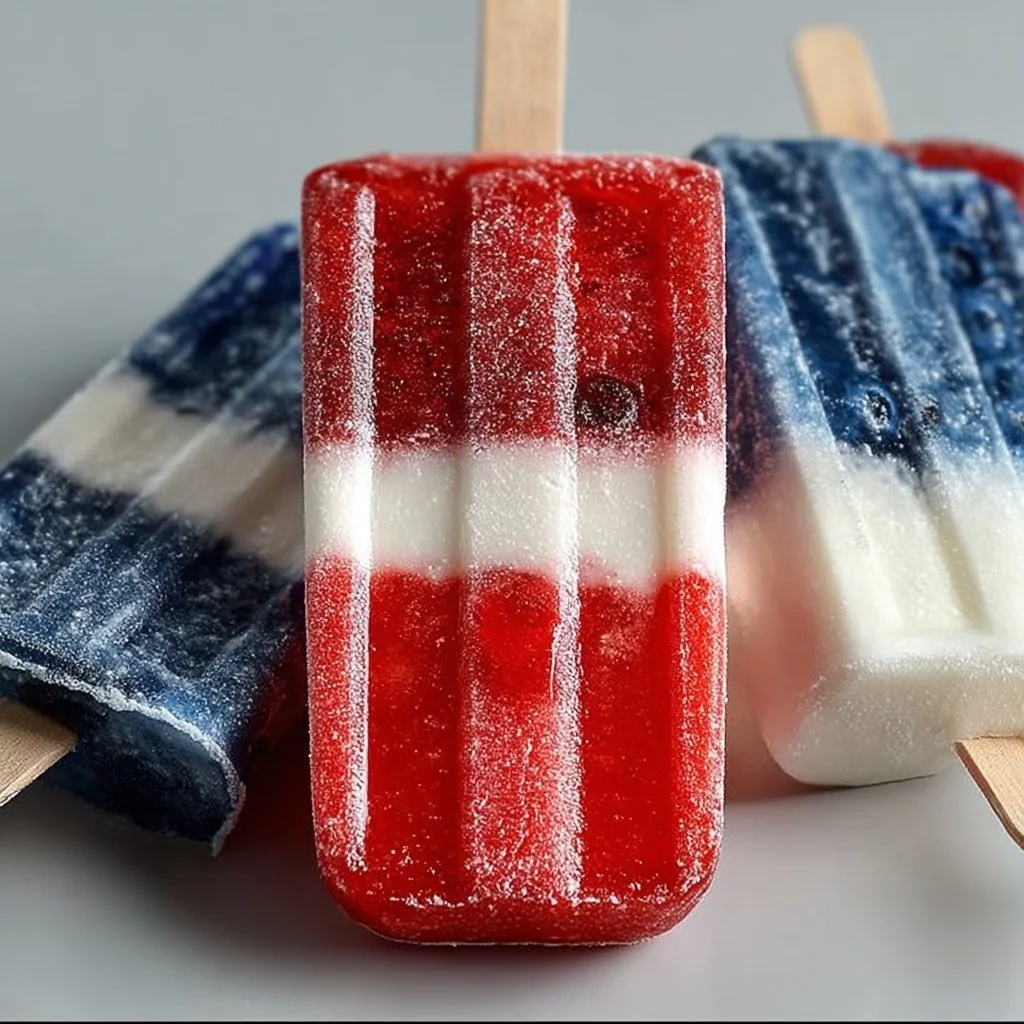
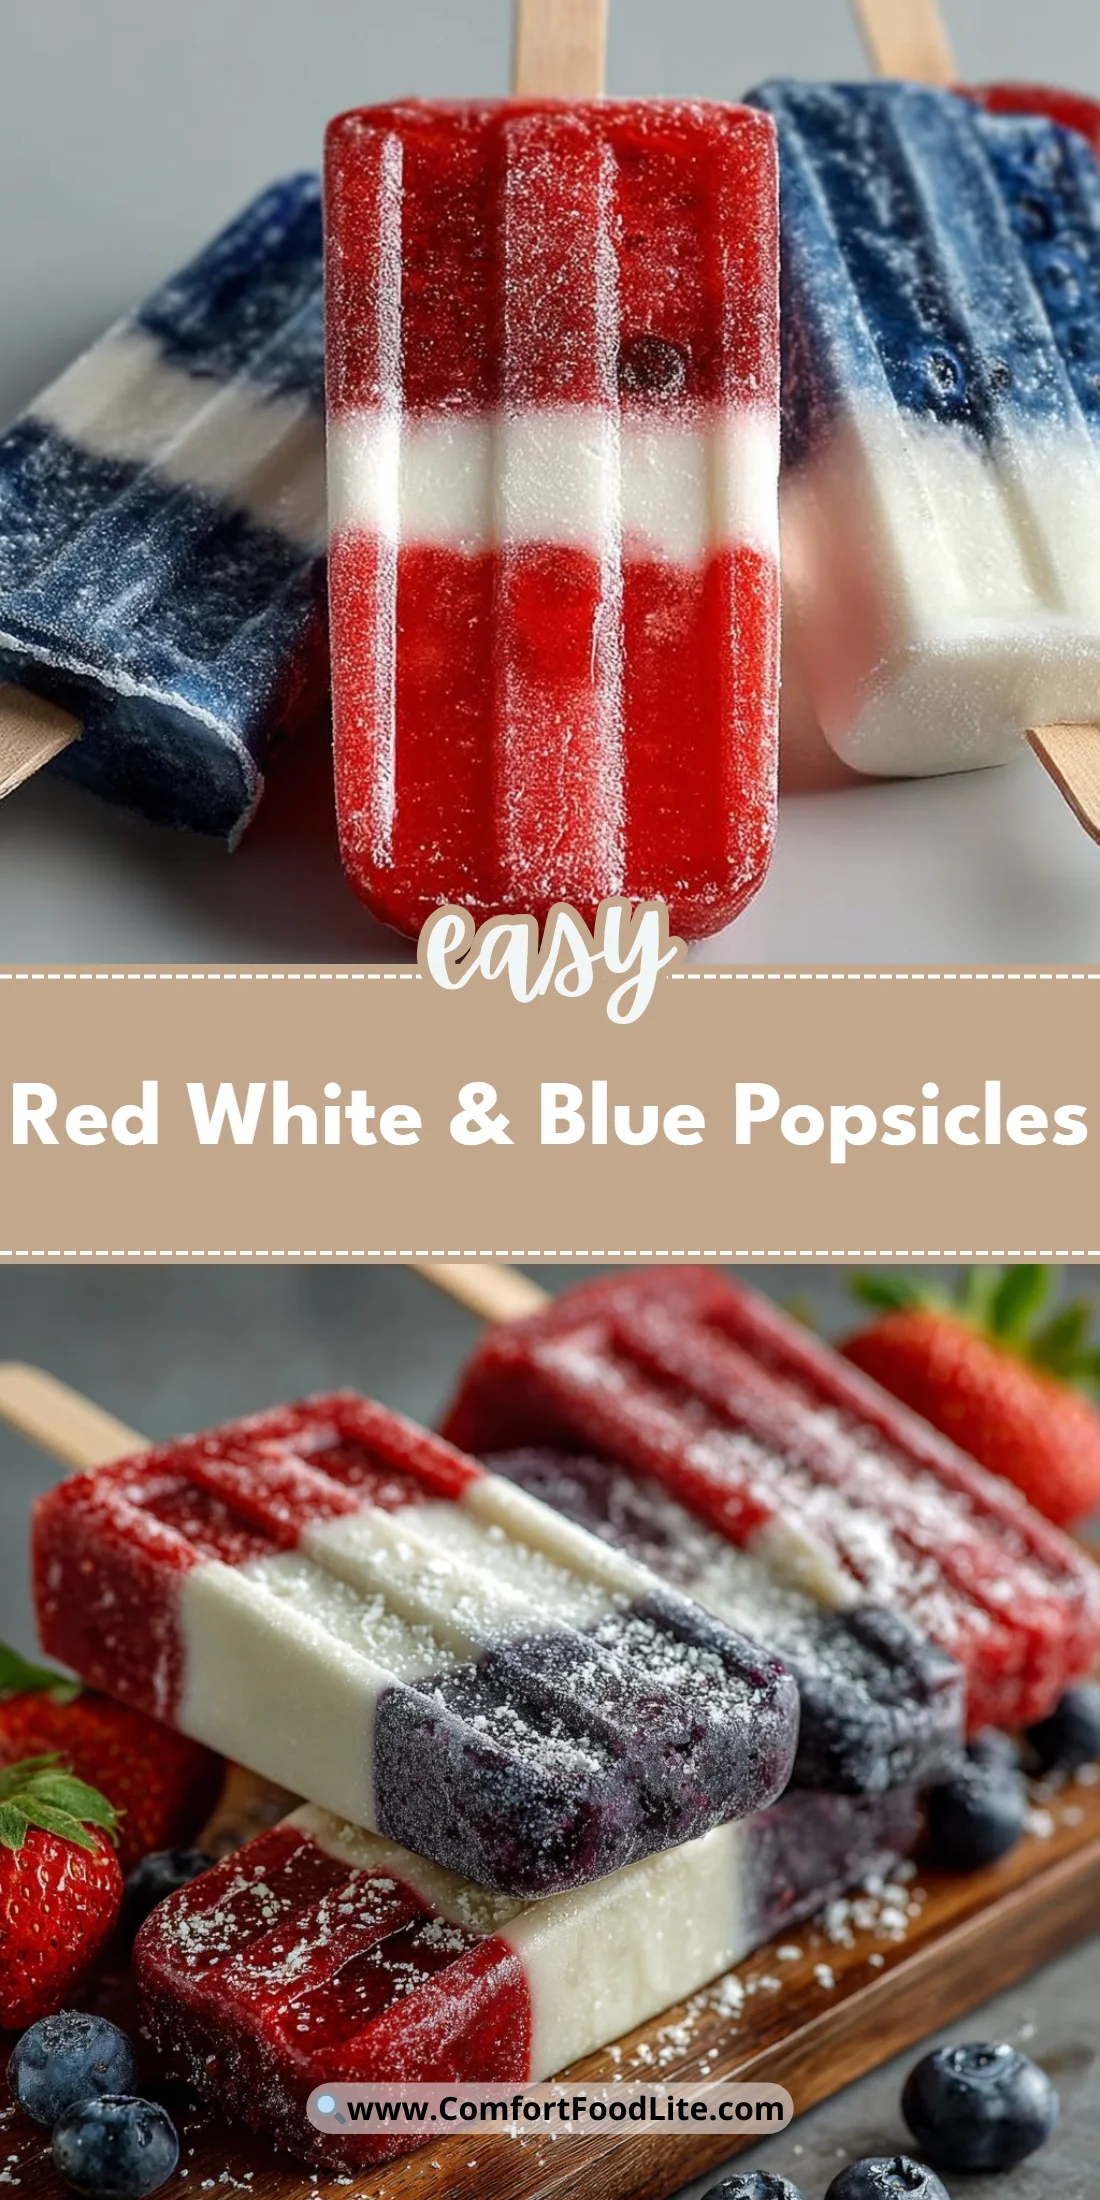
The first time I made these Red White & Blue Popsicles I was chasing a nostalgic summer feeling and landed on something even better — bright fruit, creamy middle, and a perfect balance of tart and sweet.
They’re wildly simple, instantly festive, and actually taste like real fruit instead of a sugar bomb.
This recipe wins because the layers freeze at different textures and the coconut or vanilla yogurt ties the fruit together.
You can make them with fresh or frozen berries, and they’re forgiving if you need to thin or sweeten as you go.
Why You’ll Love This Recipe
- Fast prep: only three purees and a blender.
- Kid-friendly: no artificial colors or preservatives.
- Customizable: swap yogurts, sweeteners, or add boozy twists.
- Crowd-pleasing presentation: patriotic stripes that hold up in the mold.
- Healthy-ish dessert: real fruit and optional natural sweetener.
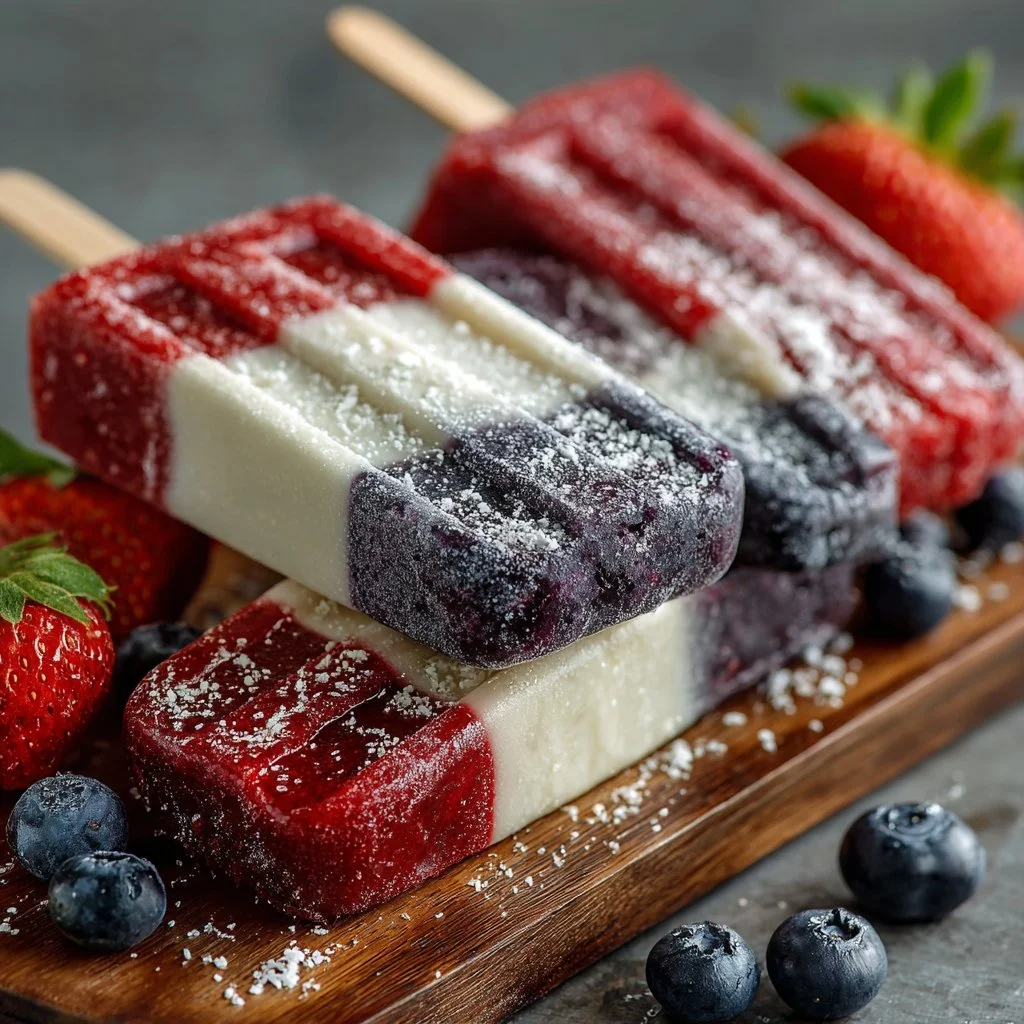
The texture is what sells these. The strawberry layer is bright and slightly icy when pureed, the yogurt layer gives a soft, creamy buffer that mellows the fruit’s acidity, and the blueberry end is dense and deeply flavored. Together they create popsicles that are both refreshing and satisfying — not too icy, not too soft, and with real berry mouthfeel rather than a slushy slurry.
"5 stars — Made these for the 4th and my whole family loved them. Fresh, not too sweet, and they unmolded perfectly." — Emma, reader
Key Ingredients
Strawberries (2 cups, pureed)
Fresh or high-quality frozen strawberries matter because they set the tone for the whole pop. Ripe berries give natural sweetness and bright acid that contrasts the yogurt. If using frozen, thaw briefly so they blend smoothly; if very watery, drain a touch before pureeing.
Yogurt (2 cups coconut yogurt or vanilla yogurt)
The yogurt layer is the structural heart. Coconut yogurt adds a subtle tropical sweetness and dairy-free option, while plain or vanilla yogurt gives creaminess and a neutral backdrop. Look for a thicker yogurt (Greek-style or strained) to avoid a runny middle; thin just enough with water to pour.
Blueberries (2 cups, pureed)
Blueberries provide a deep, dark fruity cap that freezes firmer than strawberries. They have pectin and natural sugars that help the layer hold together. If your berries are tart, a touch of honey or sugar brightens them without overpowering.
Optional sweetener (Honey or sugar to taste)
Sweetener is optional because ripe fruit may be enough. Use honey for floral sweetness and a more complex flavor, or fine sugar that dissolves easily when blended. Add sparingly and taste each puree before freezing.
Full ingredient list:
- 2 cups strawberries, pureed
- 2 cups coconut yogurt or vanilla yogurt
- 2 cups blueberries, pureed
- Honey or sugar to taste (optional)
- Water (if needed for blending)
Step-by-Step Instructions
Step 1: Make the strawberry layer
Wash and hull the strawberries and add them to the blender. Puree until completely smooth, scraping down the sides once or twice. Taste and sweeten with a teaspoon of honey or sugar if the berries aren’t sweet enough.
Pour the strawberry puree into the bottom third of your popsicle molds. Tap the mold gently on the counter to level the puree and remove large air bubbles. Freeze until the strawberry layer is firm, about 1–2 hours.
Pro Tip: You’ll know it’s ready when the surface loses shine and feels solid to a gentle press. If the puree looks wet on top it needs more time.
Step 2: Prepare the yogurt layer
Spoon the yogurt into the blender and add 1–2 tablespoons of water only if you need to thin it to a pourable consistency. Blend briefly to smooth and taste; if using plain yogurt and you want sweetness, a small drizzle of honey blends in well.
Pour the yogurt over the frozen strawberry layer until the mold is about two-thirds full. Insert sticks if your mold requires them now, or after a short chill if your sticks don’t stand on their own. Freeze until set, another 1–2 hours.
Pro Tip: The yogurt should be pourable but not watery. Aim for a thick cream-like ribbon when it falls off your spoon — that makes a clean white stripe.
Step 3: Finish with the blueberry layer
Puree the blueberries until smooth. Because blueberries can be thicker, add a tablespoon of water only if the blender struggles. Taste and add sweetener if the berries are very tart; mix thoroughly.
Pour the blueberry puree over the yogurt layer, filling the molds. Smooth the tops with the back of a spoon and freeze until fully solid, about 4–6 hours or overnight for best results.
Pro Tip: If your blueberry layer separates from the yogurt, it usually means the yogurt was still too soft. Give the middle a little more time to firm next time.
Step 4: Unmold your popsicles
When the popsicles are solid, run warm water over the outside of the mold for 15–30 seconds, just enough to loosen edges. Gently wiggle and pull each popsicle out, avoiding twisting hard which can snap the stick.
Serve immediately or wrap each pop in parchment or plastic and store in an airtight container in the freezer.
Pro Tip: If the popsicle resists, dunk the mold in warm (not hot) water for a few seconds more. Too much heat will melt the edges and drip.
Expert Tips for Success
- Chill timing matters: Freeze the first strawberry layer until firm to the touch before adding yogurt. A semi-firm base prevents the layers from blending together and keeps the stripes crisp.
- Use the right molds: Silicone molds are forgiving and make unmolding easy. Rigid plastic sometimes needs longer warm-water dips to release.
- Control thickness: If your yogurt is very thick (e.g., Greek or strained), thin only with a tablespoon of water at a time. Too much water makes the yogurt layer icy and reduces creaminess.
- Sweeten in stages: Taste each fruit puree separately and add sweetener sparingly. Different batches of berries vary widely; a tablespoon of honey can be enough for 2 cups of berries.
- Prevent air pockets: Tap the mold after pouring each layer to settle the mixture and eject trapped air. Use a toothpick to coax puree into narrow corners.
- Stick placement: If your mold needs the sticks to be supported, freeze the yogurt layer until it’s tacky but not fully hard, then set sticks. This keeps sticks centered.
- Work with frozen berries for off-season: If using frozen strawberries or blueberries, let them thaw slightly on a sieve so excess juice drains; too much liquid dilutes the flavor and changes freezing texture.
- Flavor boosters: A teaspoon of lemon zest in the strawberry layer brightens the whole pop. A pinch of vanilla in the yogurt layer deepens sweetness without sugar.
- Batch-freezing strategy: If making many popsicles, freeze on a sheet tray first, then store popsicles in a single layer in an airtight container to avoid freezer burn and preserve shape.
- Avoid freezer burn: Wrap popsicles individually in parchment or plastic wrap before putting them in a container. This reduces icy edges and keeps flavors fresh longer.
Storage & Freezing
Freezer storage: Keep popsicles in an airtight container or a freezer bag to prevent odor pickup. If you must stack them, separate layers with parchment. Properly stored, they keep their best texture for 2–3 months.
Preventing freezer burn: Remove as much air as possible from storage bags and press popsicles together in a snug container. For long-term storage, wrap each pop in plastic wrap, then place in a sealed bag.
Fridge storage: Popsicles do not store in the fridge long-term; they will melt within minutes. Avoid leaving them out longer than you plan to serve.
Thawing & serving: A quick 30–60 second warm-water rinse releases popsicles cleanly. If you want a softer, spoonable dessert, thaw for 5–10 minutes at room temperature until edges soften.
Re-freezing: Do not repeatedly thaw and refreeze popsicles. Each thaw cycle degrades texture, causing ice crystals and graininess. If a pop has softened slightly, eat it that day rather than refreezing.
Variations & Substitutions
Coconut-berry swap: Use coconut yogurt for the middle layer and add a tablespoon of shredded coconut to the yogurt for texture. This makes the pops taste tropical and rich.
Vegan & dairy-free: Use full-fat coconut yogurt for creaminess. Make sure your sweetener (like honey) is swapped for maple syrup to keep it vegan.
Boozy adult pops: Add 1–2 tablespoons of your favorite spirit (vodka or rum) per batch of fruit puree. Keep alcohol low or popsicles won’t freeze solid; 1–2 tablespoons per 2 cups of puree keeps texture intact while adding a grown-up flavor.
Superfood boost: Stir 1 teaspoon of chia seeds into the blueberry layer and let it sit 10 minutes before pouring; the seeds add texture and nutrients while helping thicken.
Frequently Asked Questions
Q: Can I make these popsicles with frozen berries?
A: Yes. Use frozen berries when fresh aren’t available. Thaw them slightly and drain excess liquid so the puree isn’t watery. If the mixture seems too thin, reduce any added water and consider blending less to keep some pulp for body.
Q: How long do these popsicles take to freeze completely?
A: Generally 6–8 hours total is a safe window: 1–2 hours for the strawberry base, 1–2 hours for the yogurt middle, and 4–6 hours for the blueberry top. Overnight freezing is ideal for a fully solid pop.
Q: My yogurt layer separated from the fruit—what went wrong?
A: Most likely the yogurt wasn’t firm enough when you poured the next layer. Chill the yogurt until it’s at least tacky to the touch before pouring and make sure the fruit layer is fully set.
Q: Can I add chunks of fruit in the layers?
A: You can, but large pieces may shift or create air gaps. Chop fruit finely and press gently into each layer before freezing to avoid big voids that cause dripping or uneven freezing.
Q: Are these popsicles suitable for kids?
A: Absolutely. The ingredients are simple and natural. For very young children, avoid honey under one year old and ensure sticks are secure to prevent choking hazards.
Final Thoughts
These Red White & Blue Popsicles are one of those recipes that look like effort but are mostly patience and a blender.
They’re flexible, delicious, and a great way to use berries at peak season.
Please leave a star rating in the recipe card below if you make them, and pin this post to your summer board.
Conclusion
For inspiration and similar patriotic popsicle ideas, check out Red, White & Blue Popsicles! – The Little Kitchen for a playful take.
If you want a coconut-forward variation, this Red, White and Blue Popsicles – Coconut Berry Ice Pops shows another great approach.
For a classic, well-tested recipe with clear technique notes, see Best Red, White, and Blue Popsicles Recipe – How to Make Red ….

Red White & Blue Popsicles
Ingredients
Fruit Layers
- 2 cups strawberries, pureed Use fresh or high-quality frozen strawberries for best results.
- 2 cups blueberries, pureed Ripe blueberries provide depth and flavor.
Yogurt Layer
- 2 cups coconut yogurt or vanilla yogurt Choose a thicker yogurt to avoid a runny texture.
Optional Ingredients
- honey or sugar to taste Sweeten as needed depending on the tartness of the fruit.
- water (if needed for blending) Add water sparingly to achieve desired consistency.
Instructions
Make the Strawberry Layer
- Wash and hull the strawberries and add them to the blender. Puree until completely smooth, scraping down the sides as needed.
- Taste and sweeten with honey or sugar if necessary. Pour into the bottom third of popsicle molds and freeze until firm, about 1-2 hours.
Prepare the Yogurt Layer
- Spoon yogurt into the blender, adding water only if needed for a pourable consistency. Blend until smooth, and sweeten if using plain yogurt.
- Pour over the frozen strawberry layer, filling molds two-thirds full. Freeze until set, another 1-2 hours.
Finish with the Blueberry Layer
- Puree the blueberries until smooth, adding water if necessary to blend. Adjust sweetness if needed.
- Pour blueberry puree over the yogurt layer, filling to the top. Smooth and freeze until fully solid, about 4-6 hours, or overnight.
Unmold the Popsicles
- Run warm water over the outside of the molds for 15-30 seconds to loosen. Carefully pull out the popsicles and serve immediately, or store wrapped in parchment or plastic.