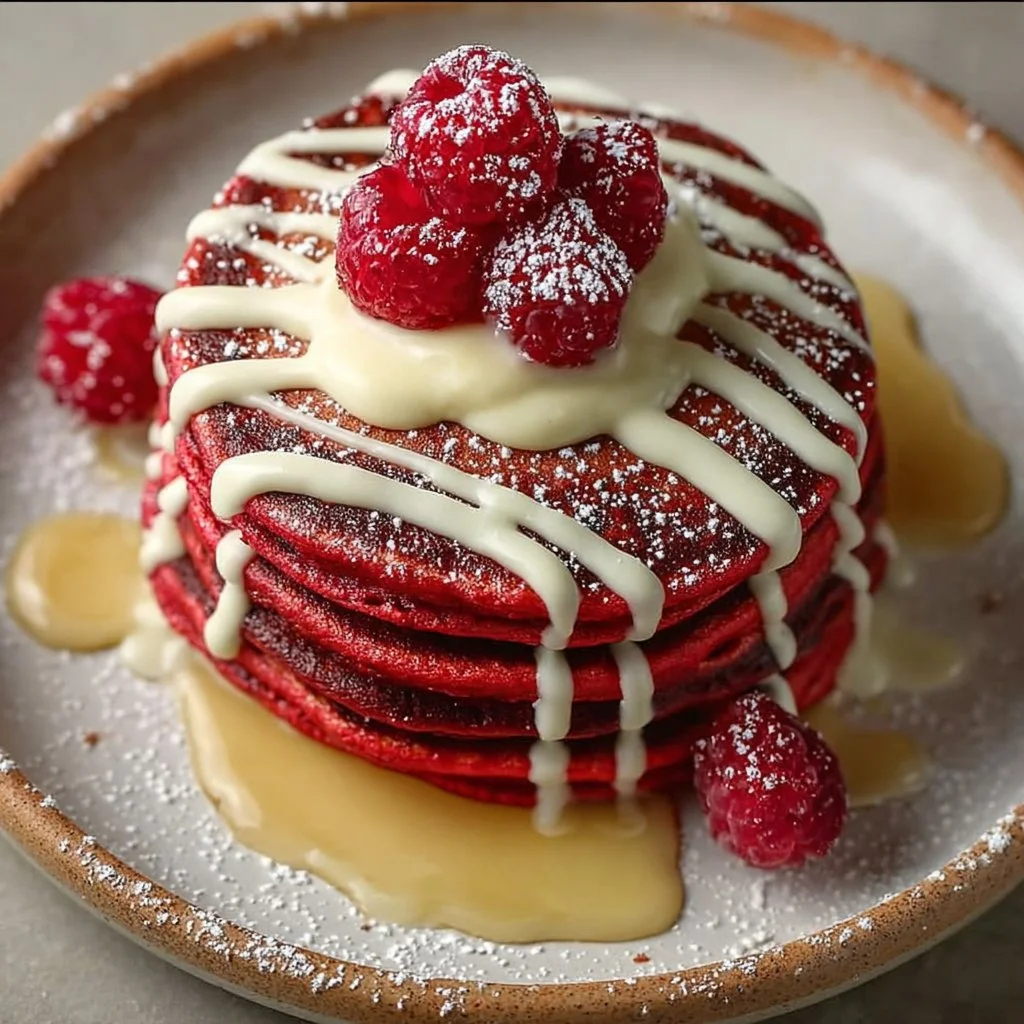
The first time I made these red velvet pancakes I thought they were only for special occasions.
Turns out they’re ridiculously easy and brighten an ordinary morning like nothing else.
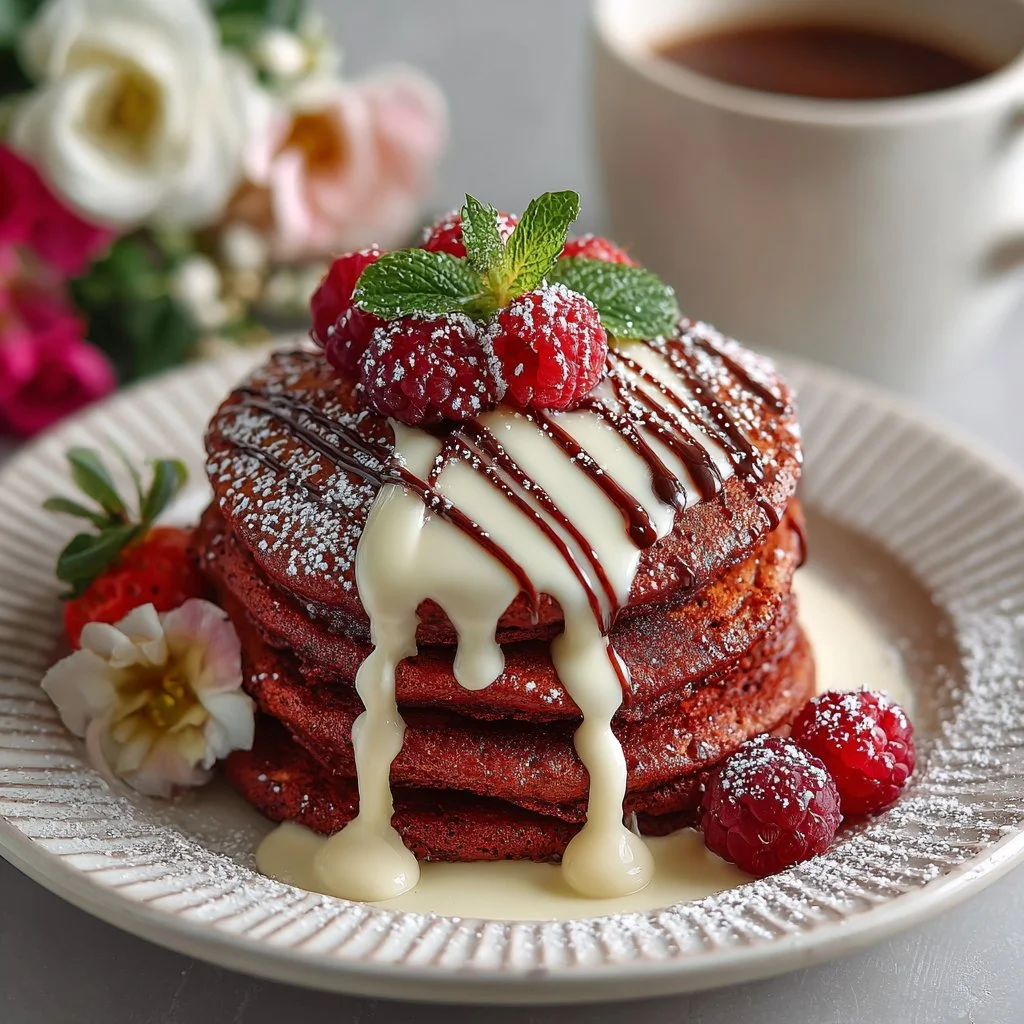
They balance cake-like richness with tender, fluffy pancake structure — and that cream cheese glaze ties it together.
If you love red-velvet treats, these pancakes are a shortcut to dessert-for-breakfast bliss.
They’re quick, forgiving, and scale up well for a weekend crowd.
If you want more red-velvet ideas, I often turn to my tried-and-true red velvet brownies for inspiration: red velvet brownies recipe.
Why You’ll Love This Recipe
- Vibrant presentation that feels celebratory without extra fuss.
- Moist, tender crumb with a faint chocolate whisper thanks to cocoa.
- Simple pantry ingredients and a short cook time.
- Versatile: stack them, top them, or fold berries into the batter.
These pancakes are soft and pillowy with a slightly denser crumb than your thin crepe-style pancakes. The buttermilk reacts with the baking powder to give lift while keeping the interior tender, and the small amount of cocoa adds that subtle cocoa/vanilla backbone that defines red velvet. Finish with a cream cheese glaze and you get a tangy-sweet contrast that cuts through the richness and makes every bite feel indulgent.
"Five stars — my kids declared these ‘breakfast cake’ and demanded them every weekend. Perfect color and soft texture!" — Reader S.
Key Ingredients
Buttermilk: Buttermilk is the unsung hero here. Its acidity tenderizes the gluten in the flour and reacts with the baking powder to create lift and lightness. If you don’t have cultured buttermilk, make a quick substitute by stirring 1 tablespoon of white vinegar or lemon juice into 1 cup of milk and letting it sit 5 minutes.
All-purpose flour: Use a dependable, medium-protein all-purpose flour for the balance of structure and tenderness. Brands with consistent milling — like King Arthur or Bob’s Red Mill — give predictable results; sift or whisk it to remove lumps and aerate the mixture for lighter pancakes.
Cocoa powder: A tablespoon of unsweetened cocoa powder gives that faint cocoa note without overpowering the cake-like red velvet profile. Use natural unsweetened cocoa for a brighter red hue; Dutch-process will darken the batter and can impact leavening slightly.
Cream cheese glaze: This is what turns pancakes into a red velvet experience. Full-fat cream cheese yields the creamiest, most stable glaze. Soften the cheese to room temperature and whisk with powdered sugar and a splash of milk for a glossy finish.
Full ingredient list:
- 1 cup all-purpose flour
- 1 tablespoon cocoa powder
- 1 tablespoon baking powder
- 1/4 teaspoon salt
- 1 tablespoon sugar
- 1 cup buttermilk
- 1 large egg
- 2 tablespoons vegetable oil
- 1 teaspoon vanilla extract
- Red food coloring (a few drops, adjust to desired color)
- Cream cheese glaze (for serving)
Step-by-Step Instructions
Step 1: Combine the dry ingredients
In a mixing bowl, whisk together the flour, cocoa powder, baking powder, salt, and sugar.
Whisking breaks up clumps and distributes the baking powder evenly, which helps all pancakes rise at the same rate.
Pro Tip: Measure flour by spooning it into the cup and leveling with a knife for accuracy. You’ll know it’s ready when the dry mix looks homogenous and free of lumps.
Step 2: Whisk the wet ingredients
In another bowl, combine the buttermilk, egg, vegetable oil, vanilla extract, and a few drops of red food coloring.
Start with one or two drops and add more to reach the color you want; a little color often goes a long way.
Pro Tip: If your food coloring is gel-based, stir vigorously to avoid streaks. A whisk works better than a fork for even distribution.
Step 3: Mix wet into dry until just combined
Pour the wet ingredients into the dry ingredients and fold them together gently until just combined.
A few small lumps are fine — over-mixing develops gluten and makes pancakes tough.
Pro Tip: Use a rubber spatula and stop when the flour streaks mostly disappear. The batter should be pourable but slightly thick.
Step 4: Heat and prepare the skillet
Heat a non-stick skillet or griddle over medium heat and lightly grease it with a neutral oil or butter.
A properly heated surface cooks the pancake evenly and creates the golden edges you want.
Pro Tip: Test the heat by sprinkling a few drops of water onto the pan — they should bead and evaporate slowly. If they sizzle violently, lower the heat.
Step 5: Cook the pancakes
Pour about 1/4 cup of batter for each pancake onto the skillet. Cook until bubbles form on the surface and the edges look set, then flip and cook until the other side is golden brown.
Repeat with the remaining batter, keeping finished pancakes warm in a low oven if needed.
Pro Tip: The first pancake is your test pancake. Adjust the heat if it browns too quickly or takes too long to cook through.
Step 6: Serve with cream cheese glaze
Stack and serve warm with a generous drizzle of cream cheese glaze on top.
The glaze should be pourable but thick enough to cling to the stack — whisk in a teaspoon of milk at a time to adjust consistency.
Pro Tip: Warm the glaze slightly if it firms in the fridge; do not microwave hot — stir gently and test.
Expert Tips for Success
- Temperature control matters: Medium heat is the sweet spot. If your pan is too hot the exterior will char before the center cooks, and too low a heat prevents browning. I aim for a surface temperature around 350°F (use an infrared thermometer if you have one).
- Batter consistency: Aim for a batter that flows slowly when ladled. If it’s too thick, thin with a splash of milk; too thin and the pancakes will spread thin and cook too fast.
- Avoid overmixing: Mix until the dry streaks are mostly gone. Small lumps are fine. Overworked batter produces chewy pancakes.
- Oil vs. butter for the pan: Vegetable oil prevents sticking and browning more evenly, while butter adds flavor. I use a light coating of oil and finish with a pat of butter on the stack for flavor.
- Portion control: A 1/4-cup measure creates uniform pancakes that cook evenly. For dinner-plate stacks, use 1/3-cup scoops and increase cook time slightly.
- Make-ahead tip: You can mix the dry ingredients the night before and combine wet ingredients in the morning for a faster assembly. Keep the wet mix refrigerated and bring to room temperature before cooking.
- Flipping technique: Only flip once. Wait until bubbles form across the surface and edges look set; then flip confidently. Multiple flips reduce lift and can make pancakes dense.
- Food coloring: High-quality gel food coloring gives vivid color with fewer drops and no added liquid. If you prefer natural coloring, beet powder works but can add a subtle earthy note.
- Cream cheese glaze stability: For a smoother glaze, sift powdered sugar before whisking and make sure the cream cheese is fully softened. A splash of lemon juice brightens the glaze and helps keep it pourable.
- Scaling the recipe: This batch makes about 6-8 pancakes depending on size. Double the recipe for a crowd and cook in batches, holding warm in a 200°F oven on a baking sheet.
Inspiration note: If you want to serve something spooky alongside these pancakes for a seasonal brunch, try pairing with a fun red-velvet popcorn twist from one of my favorite ideas: red velvet popcorn.
Storage & Freezing
Fridge: Cool pancakes completely before storing to avoid condensation that makes them soggy. Place in an airtight container layered with parchment paper and refrigerate up to 3 days. Reheat in a toaster oven or on a skillet to revive the edges.
Freezer: Flash-freeze single pancakes on a baking sheet for 30–60 minutes, then stack with parchment and transfer to a freezer bag. They keep well for up to 2 months. Thaw in the refrigerator overnight or reheat from frozen.
Reheating: For best texture, reheat in a 350°F oven for 8–10 minutes, or crisp them gently in a non-stick skillet over medium-low heat for 1–2 minutes per side. Microwaving is fastest but can make pancakes soft; if you must microwave, do short bursts and finish in a skillet.
Variations & Substitutions
- Chocolate-Heavy Red Velvet: Add 1 teaspoon more cocoa and a tablespoon of melted chocolate to the wet mix for a deeper chocolate flavor. This creates a richer pancake that leans closer to dessert. For cookie-competition seasoning ideas, I use tips from my chocolate-cookie experiments like this recipe inspiration: red velvet cookie ideas.
- Gluten-Free Option: Swap the all-purpose flour for a 1:1 gluten-free blend that contains xanthan gum. Expect a slightly different crumb; add a tablespoon of yogurt or an extra tablespoon of buttermilk to boost moisture.
- Dairy-Free/ Vegan Swap: Use a plant-based buttermilk (1 cup almond milk + 1 tablespoon vinegar), replace the egg with a flax egg (1 tablespoon ground flax + 3 tablespoons water), and use coconut oil in place of vegetable oil. The profile will be a touch different but still very tasty.
- Fruit or Nut Add-ins: Fold a half-cup of fresh raspberries or chopped toasted pecans into the batter for texture and a complementary flavor. Toasted nuts add a walnutty crunch against the soft crumb.
- Browned Butter Glaze: For a deeper, nutty finish, brown the butter before combining with cream cheese and powdered sugar — it adds toasty complexity that pairs well with cocoa.
For more red-velvet baking swaps and indulgences I often reference ideas similar to these fudgy classics: fudgy red velvet brownies inspiration.
Frequently Asked Questions
Can I make the batter ahead of time?
Yes — you can mix the wet and dry ingredients separately and combine them up to 30 minutes before cooking. The baking powder is freshest when activated soon after mixing, so I recommend cooking within an hour for the best lift.
How much red food coloring should I use?
Start with 2–3 drops of liquid red food coloring or a pea-sized amount of gel color for a subtle tint. Add more in small increments to reach the shade you want. Keep in mind the color deepens slightly after cooking.
Why didn’t my pancakes rise?
Common causes are expired baking powder, overmixing the batter, or cooking at too low a temperature. Check your leavening agent’s freshness and avoid blending out the air — gentle folding is key.
Can I use milk instead of buttermilk?
You can, but you’ll lose some tenderness and tang. If you only have regular milk, acidify it: add 1 tablespoon lemon juice or white vinegar to the milk and let it rest 5 minutes to mimic buttermilk.
How do I make the cream cheese glaze not too sweet?
Balance sweetness by using full-fat cream cheese, reducing powdered sugar, and adding a small squeeze of lemon juice. Start with 1 cup powdered sugar and 4 ounces of cream cheese, then adjust to taste.
Final Thoughts
These red velvet pancakes are an easy way to turn a morning into something memorable.
They’re forgiving, festive, and pair perfectly with a tangy cream cheese glaze.
Please leave a star rating in the recipe card below and pin this to your breakfast board for later.
Conclusion
For a tested cream cheese glaze technique and another reliable red velvet pancake version, I like the clear method shown at Red Velvet Pancakes with Cream Cheese Glaze – Cooking Classy.
If you want a classic community-tested recipe to compare notes with, the Allrecipes version is a helpful guide: Red Velvet Pancakes with Cream Cheese Glaze Recipe.

Red Velvet Pancakes
Ingredients
Dry Ingredients
- 1 cup all-purpose flour Sifted or whisked to remove lumps
- 1 tbsp cocoa powder Unsweetened; use natural for a brighter red hue
- 1 tbsp baking powder Ensure freshness for maximum lift
- 1/4 tsp salt
- 1 tbsp sugar
Wet Ingredients
- 1 cup buttermilk Cultured preferred; a substitute can be made with milk and vinegar
- 1 large egg
- 2 tbsp vegetable oil For cooking and moisture
- 1 tsp vanilla extract
- a few drops red food coloring Adjust to desired color
For Serving
- 1 batch cream cheese glaze Whisk together softened cream cheese, powdered sugar, and milk
Instructions
Preparation
- In a mixing bowl, whisk together the flour, cocoa powder, baking powder, salt, and sugar.
- In another bowl, combine the buttermilk, egg, vegetable oil, vanilla extract, and red food coloring.
- Pour the wet ingredients into the dry ingredients and gently fold until just combined.
Cooking
- Heat a non-stick skillet or griddle over medium heat, lightly greased with oil.
- Pour about 1/4 cup of batter for each pancake. Cook until bubbles form and edges set, then flip and cook until golden brown.
- Keep finished pancakes warm in a low oven if needed.
Serving
- Stack and serve warm with a generous drizzle of cream cheese glaze on top.