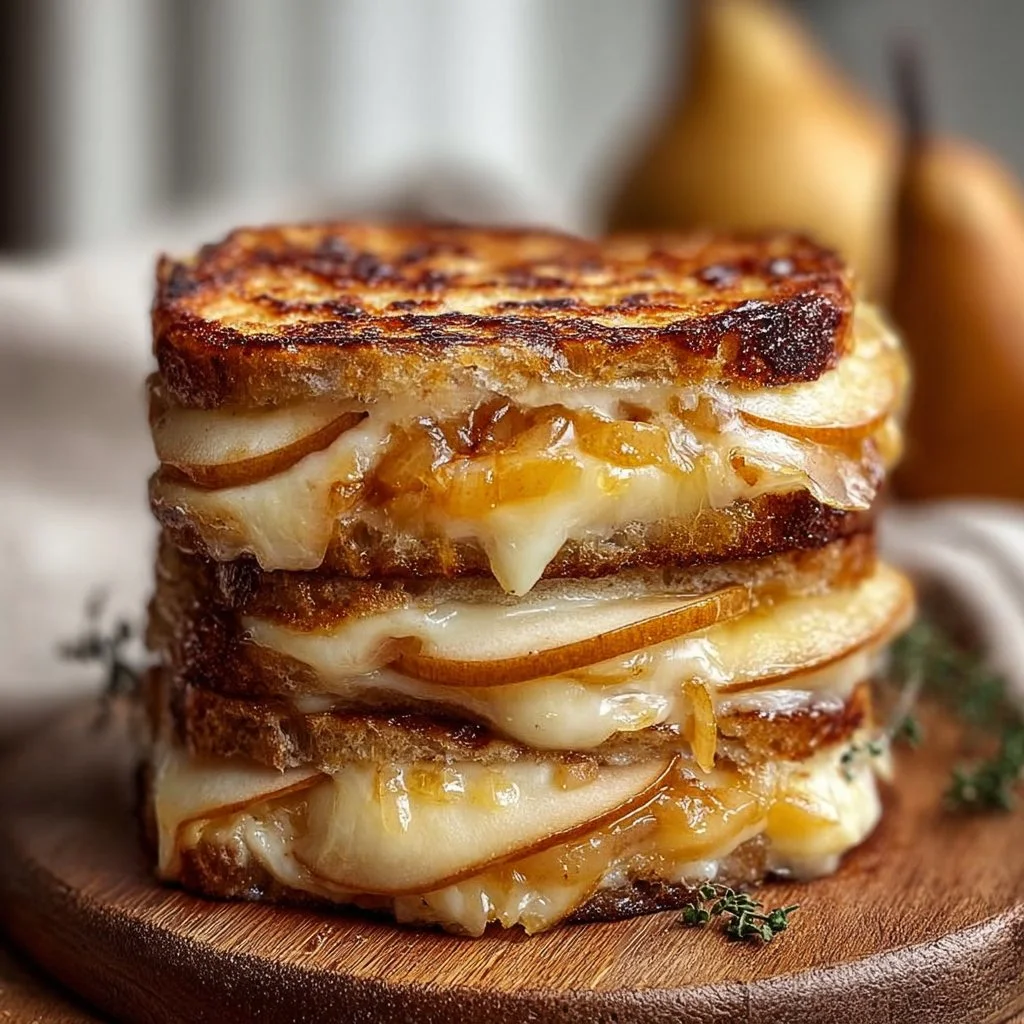
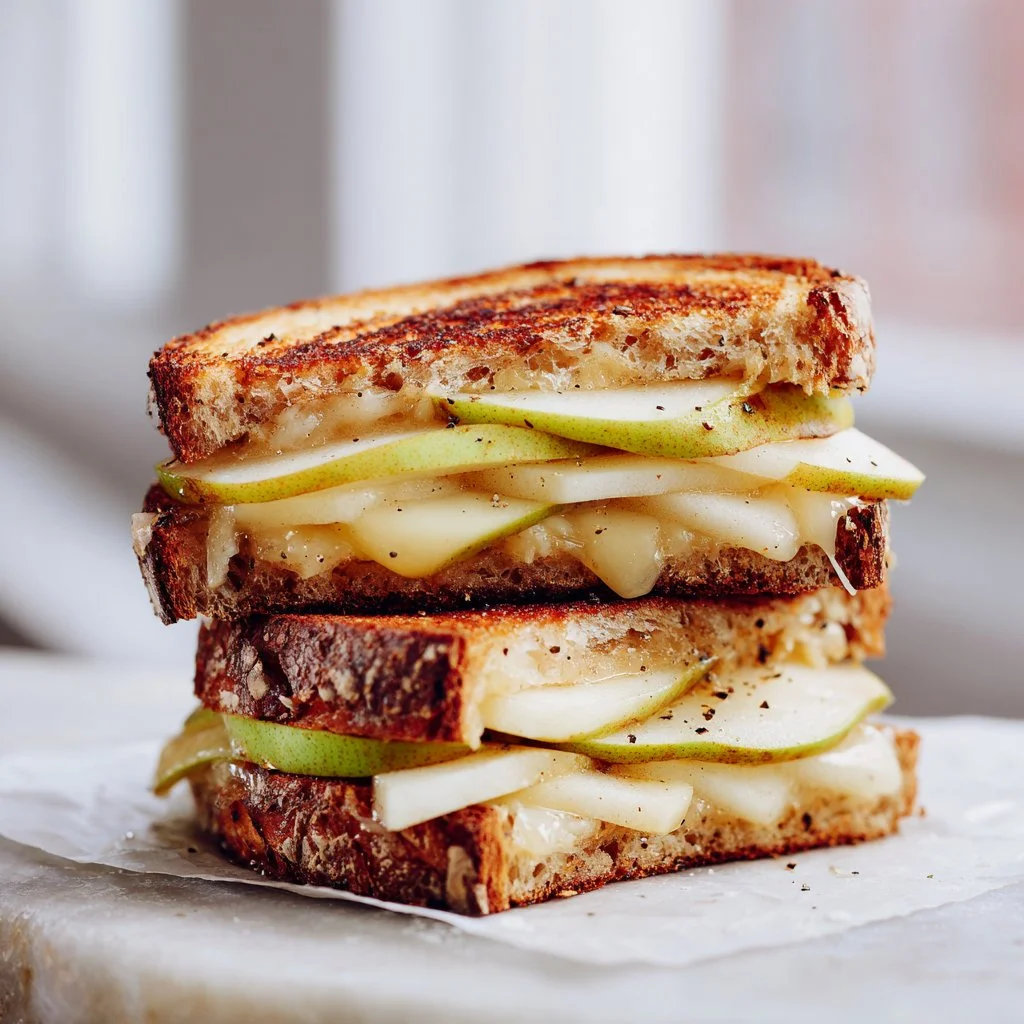
The first time I made this pear and apple grilled cheese I was skeptical about fruit on toast.
A few bites later I understood: the sweet-tart fruit, nutty cheese, and caramelized onion sing together.
It’s quick, pantry-friendly, and feels special without fuss.
If you like sweet-savory comfort, you might also enjoy a dessert counterpoint like Apple Crumble Cheesecake for after-dinner indulgence.
Why You’ll Love This Recipe
- Sweet and savory in every forkful without being cloying.
- Uses simple ingredients you probably already have.
- Fast to prepare but tastes like you spent an hour on it.
- Balanced textures: crisp bread, gooey cheese, tender fruit, silky onions.
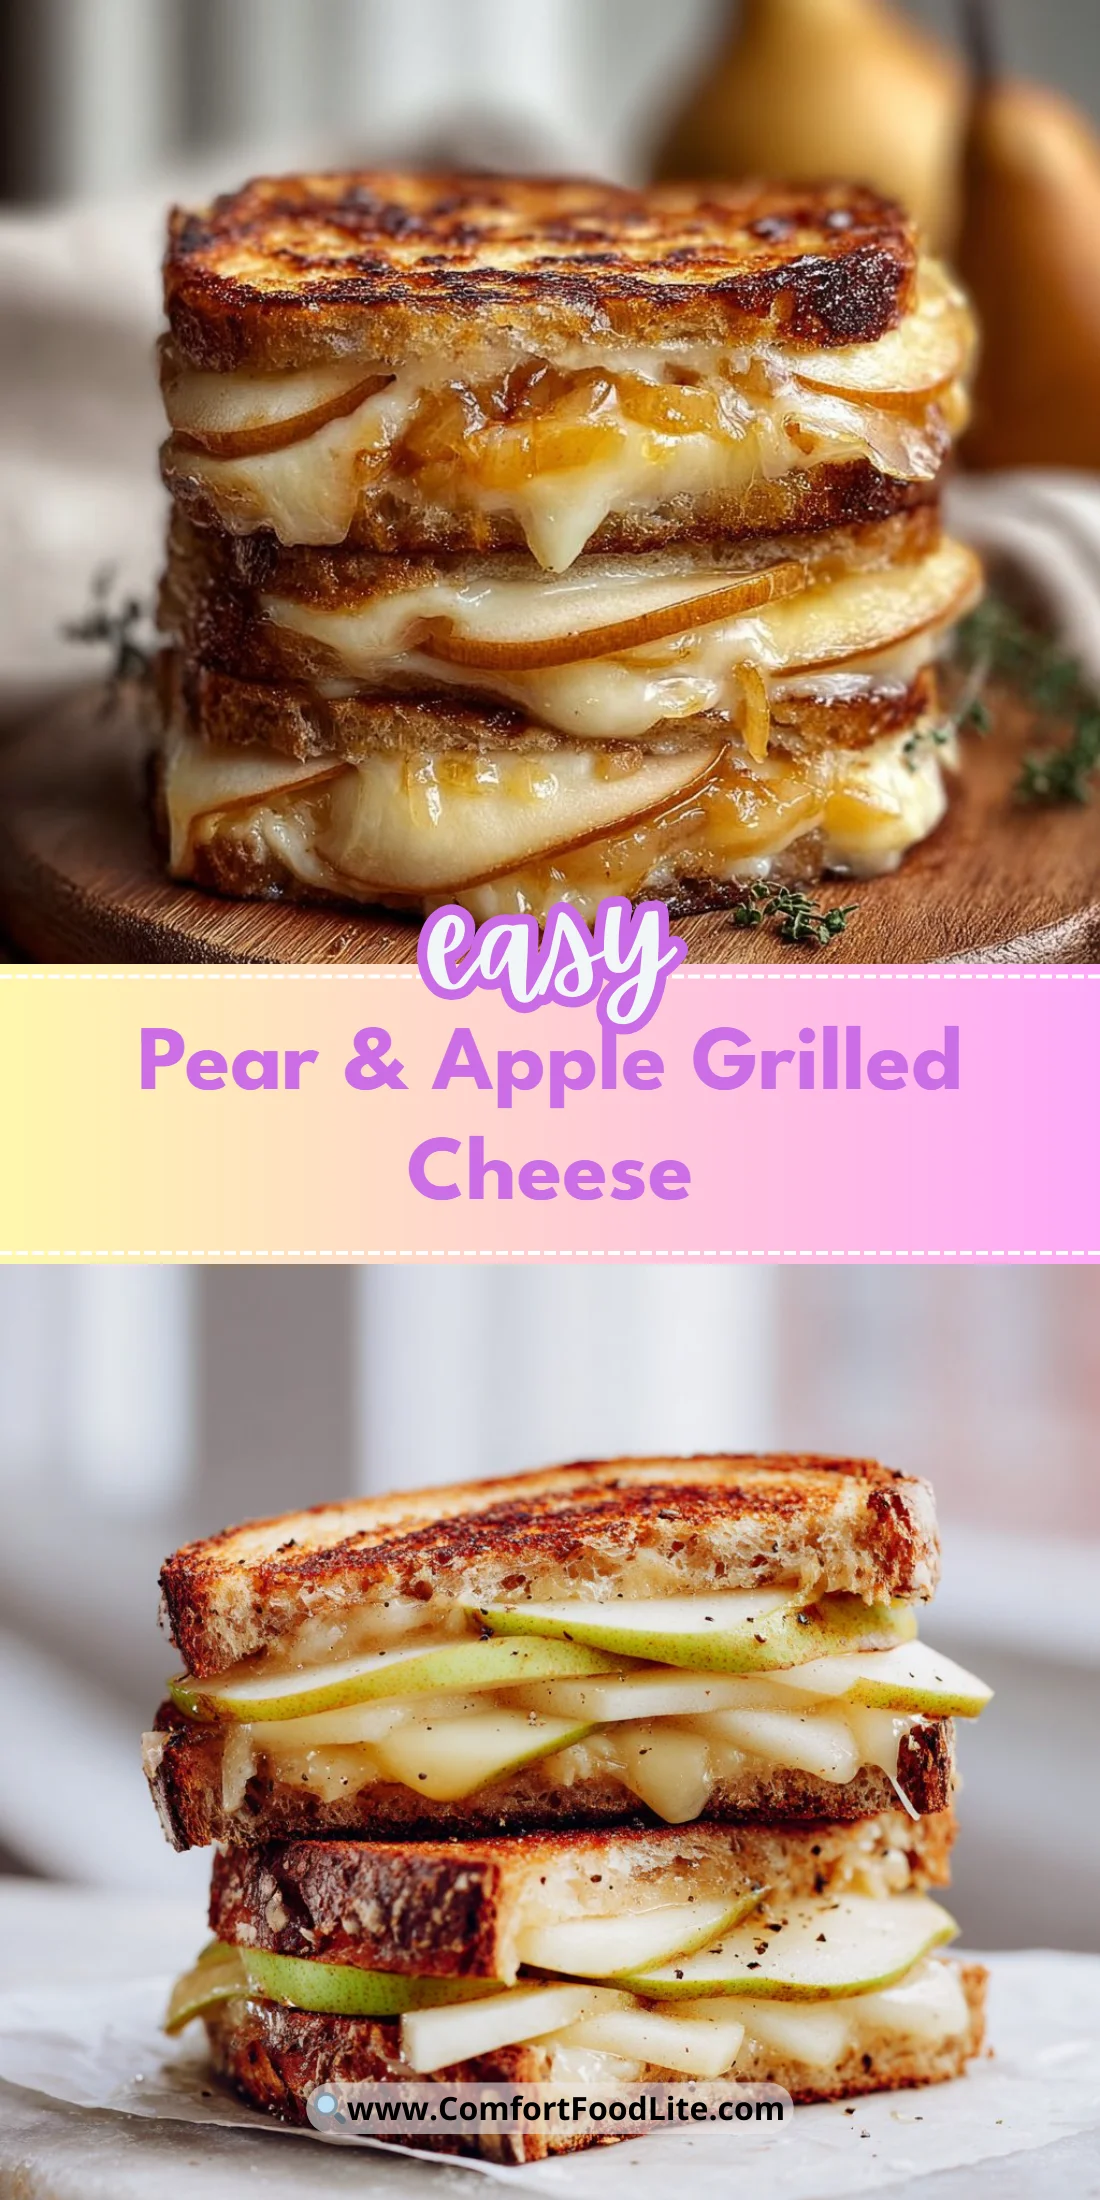
The texture is my favorite part: the bread crisps to a golden shell while the cheese melts into pockets that bind the pear and apple slices.
Caramelized onion adds a silky, savory counterpoint that keeps the fruit from tasting one-note.
Every bite is layered — bright acidity from the apple, mellow sweetness from the pear, and the savory tooth of melted Gruyère or Cheddar.
“Five stars — unexpected, cozy, and addictive. My go-to for a quick dinner now.” — Sarah, reader
Key Ingredients
Gruyère or Cheddar (1/2 cup)
Gruyère brings a nutty, slightly sweet flavor and melts beautifully into a creamy ribbon between the fruit.
If you prefer sharper contrast, aged Cheddar gives a tangy bite that plays well with the sweet slices.
Use freshly shredded cheese rather than pre-shredded for better melt and texture.
Pear (thinly sliced)
A ripe, firm pear (Bosc or Bartlett) offers sweetness without falling apart when heated.
Bosc holds up better to the heat and keeps a slight crunch, while Bartlett is juicier and more aromatic.
Slice thin to get even layers that meld with the melted cheese.
Apple (thinly sliced)
Choose a crisp, tart apple like Honeycrisp, Granny Smith, or Pink Lady for balance.
The apple’s acidity brightens the sandwich and prevents it from becoming cloying.
Keep slices thin and uniform so they heat through quickly without softening too much.
Onion (1/2, thinly sliced)
Caramelized onion is the savory backbone of this sandwich; it brings umami and depth that make the fruit sing.
Take time to caramelize slowly — the payoff is worth a longer few minutes on the stove.
Use yellow onion for a sweet result or red for a slightly sharper finish.
Full ingredient list:
- 2 slices of bread
- 1/2 cup of cheese (Gruyère or Cheddar recommended)
- 1 pear, thinly sliced
- 1 apple, thinly sliced
- 1/2 onion, thinly sliced
- 1 tablespoon of butter
- Salt and pepper to taste
Step-by-Step Instructions
Step 1: Caramelize the onions
Melt 1 tablespoon of butter in a skillet over medium heat.
Add the thinly sliced onion, spread it out, and let it sit for a minute to start softening.
Stir every few minutes and allow the onion to slowly turn golden and sweet, which should take about 10–15 minutes.
Season lightly with salt and pepper toward the end to draw out moisture and deepen flavor.
Pro Tip: You’ll know the onions are ready when they are jammy, deeply golden, and smell sweet. Avoid high heat — that causes burning instead of caramelization.
Step 2: Build the sandwich
Lay one slice of bread flat and pile a generous layer of cheese on it.
Add the caramelized onions over the cheese so they rest against the hot cheese and will help it melt.
Arrange thin apple slices, then pear slices in an even layer.
Top with another thin layer of cheese and close the sandwich with the second piece of bread.
Pro Tip: Place cheese on both the bottom and top slices; this creates a molten barrier that helps hold the fruit in place and melts more evenly.
Step 3: Grill the sandwich
Heat a clean skillet over medium heat and add a little butter or oil if your bread is very lean.
Place the sandwich in the skillet and press gently with a spatula. Cook until the first side is golden brown, about 3–4 minutes.
Flip and cook the other side until golden and the cheese is fully melted.
Pro Tip: If the bread is browning too fast before the cheese melts, lower the heat and cover the skillet for a minute to trap heat and encourage melting.
Step 4: Slice and serve warm
Transfer the grilled sandwich to a cutting board and let it rest 1 minute.
Slice in half diagonally to show the molten cheese and layers of fruit.
Serve immediately for best texture.
Pro Tip: A short rest keeps the cheese gooey but prevents it from spilling out the moment you cut.
Expert Tips for Success
- Temperature control matters. Use medium to medium-low heat for both caramelizing and grilling. High heat scorches the onions and burns the bread before the cheese melts.
- Use fresh, high-quality cheese. Blocks shredded at home melt more smoothly than pre-shredded varieties with anti-caking agents. For best flavor, grate the cheese yourself.
- Slice fruit uniformly. Thin, even slices of apple and pear heat at the same rate. Use a mandoline if you want perfectly consistent layers without fuss.
- Dry fruit surfaces slightly. If your pear or apple is very juicy, pat slices lightly with a paper towel so they don’t make the sandwich soggy.
- Butter the bread generously but evenly. A thin, even layer of butter across the outer surface promotes crispness and golden color. Unsalted butter lets you control seasoning.
- Press lightly while grilling. A gentle press with a spatula helps contact with the pan and promotes even browning, but don’t compress the sandwich so much that the cheese is squeezed out.
- Consider a lid for finishing. If the bread is toasted but the cheese needs more time, cover the pan for 30–60 seconds to trap heat and finish melting without burning.
- Use sturdy bread. Thick-sliced sourdough or country loaf withstands the moisture from fruit and holds up under the press. Thin, soft bread can become limp.
- Season thoughtfully. A pinch of flaky sea salt on the finished sandwich brightens the flavor and complements the sweetness of the pear and apple.
- Add texture with nuts. A light sprinkle of toasted walnuts or pecans inside the sandwich adds crunch and a nutty contrast to the fruit and cheese.
Storage & Freezing
Fridge storage: Wrap leftovers tightly in parchment and then foil, or store in an airtight container.
Refrigerate for up to 2 days for best texture. Reheated sandwiches will be slightly softer but still tasty.
Freezer storage: Assemble the sandwich but do not grill. Wrap very tightly in plastic wrap and foil to prevent freezer burn.
Freeze for up to 1 month. Thaw in the fridge overnight before grilling.
Reheating: Reheat on a skillet over medium-low heat with a lid to encourage even melting.
Avoid microwaving if possible; it makes the bread soggy and the cheese gummy.
For a crisp finish after microwave, pop the sandwich into a hot skillet or toaster oven for 1–2 minutes per side.
Variations & Substitutions
- Nutty crunch: Add a thin layer of toasted walnuts or pecans between the fruit and cheese for extra texture and flavor.
- Vegan swap: Use a vegan butter for cooking and a melting plant-based cheese. Choose a firmer bread and add a smear of almond or cashew cheese for creaminess.
- Add herbs: A few fresh thyme leaves or a light smear of grainy mustard on the bread adds herbal or tangy complexity that pairs well with the fruit.
- Bacon or prosciutto: For a meaty counterpoint, add a strip of crispy bacon or thin prosciutto inside the sandwich; the saltiness heightens the sweet fruit.
Frequently Asked Questions
Q: Can I use other fruits instead of pear and apple?
A: Yes. Firm fruits that hold their shape work best — think thin slices of quince, firm peaches, or even firm figs in season.
Choose fruits with a balance of sweet and tart so they don’t overpower the cheese.
Q: What bread is best for this grilled cheese?
A: A sturdy, slightly open-crumb loaf like sourdough or pain de campagne is ideal.
The bread should be thick enough to support the fillings but not so dense that it dominates the sandwich.
Q: How do I keep the sandwich from getting soggy?
A: Pat fruit dry, don’t overfill, and use cheese as a moisture barrier on both bread surfaces.
Cook on medium heat and use a quick rest before slicing to let juices redistribute.
Q: Can I make this ahead for a party?
A: You can caramelize the onions a day ahead and slice fruit early.
Assemble and grill right before serving for the best texture. Alternatively, assemble sandwiches and keep chilled briefly, then grill when guests arrive.
Q: Is there a low-fat version that still tastes good?
A: Use a reduced-fat cheese and a light smear of olive oil instead of butter.
Keep the fruit and caramelized onions for flavor; they carry a lot of the profile so you can trim fat elsewhere.
Conclusion
This pear and apple grilled cheese is a quick, elegant twist on a weeknight classic that showcases how fruit, cheese, and a little patience with onions can change everything.
If you want inspiration for similar seasonal sandwiches, check out this Autumn Grilled Cheese with Apple and Pear for another sweet-savory take.
For a health-conscious pear and cheese variation, see the Best Ever Grilled Cheese with Pear – Joyous Health.
If you’d like a bagel-sandwich approach with similar flavors, this Pear Apple Cheddar Caramelized Onion Grilled Cheese Bagel shows how to adapt the idea.
If you made this recipe, please leave a star rating in the recipe card below and pin it to Pinterest so other people can find this sweet-savory winner.

Pear and Apple Grilled Cheese
Ingredients
Main Ingredients
- 2 slices slices of bread Sturdy bread like sourdough or country loaf is recommended.
- 0.5 cup of cheese (Gruyère or Cheddar recommended) Use freshly shredded cheese for better melt and texture.
- 1 pear, thinly sliced Bosc or Bartlett pears work best.
- 1 apple, thinly sliced Choose a crisp, tart apple like Honeycrisp or Granny Smith.
- 0.5 onion, thinly sliced Caramelized onion adds umami and depth.
- 1 tablespoon of butter Unsalted butter is best for controlling seasoning.
- Salt and pepper to taste
Instructions
Caramelize the onions
- Melt 1 tablespoon of butter in a skillet over medium heat.
- Add the thinly sliced onion, spread it out, and let it sit for a minute to start softening.
- Stir every few minutes and allow the onion to slowly turn golden and sweet, which should take about 10–15 minutes.
- Season lightly with salt and pepper toward the end.
Build the sandwich
- Lay one slice of bread flat and pile a generous layer of cheese on it.
- Add the caramelized onions over the cheese.
- Arrange thin apple and pear slices in an even layer.
- Top with another thin layer of cheese and close the sandwich.
Grill the sandwich
- Heat a clean skillet over medium heat and add a little butter or oil.
- Place the sandwich in the skillet and press gently with a spatula. Cook until the first side is golden brown, about 3–4 minutes.
- Flip and cook the other side until golden and the cheese is fully melted.
Slice and serve warm
- Transfer the grilled sandwich to a cutting board and let it rest for 1 minute.
- Slice in half diagonally and serve immediately.