The first time I made this Peanut Butter Cup Dump Cake I underestimated how fast it would disappear from the pan.
It’s the kind of recipe that feels indulgent but is shockingly simple to pull together on a weeknight.
If you like molten chocolate, pockets of peanut butter, and a crisp cake-like top, this is a keeper.
This recipe is a shortcut hack that still tastes homemade, and it plays to two strengths: convenience and crowd-pleasing flavor.
Why You’ll Love This Recipe
- Ready in under an hour with almost no prep.
- Uses pantry-friendly ingredients most home cooks already have.
- Crowd-pleasing hybrid of brownie, molten pudding, and candy bar.
- Minimal mixing: it’s more assembly than baking.
- Flexible for add-ins or simpler substitutions.
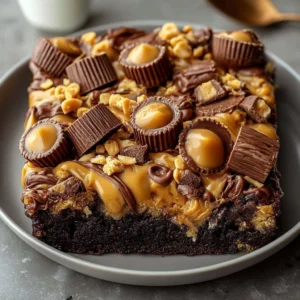
The texture is the real winner: a soft, almost saucy chocolate base from the instant pudding and milk, pockets of gooey peanut butter and chopped peanut butter cups in the middle, and a browned, slightly crisp cake layer on top from the dry cake mix and butter. Each bite mixes creamy, salty, and chocolatey elements — one spoonful can feel like a peanut butter cup split open inside a warm brownie.
"Absolutely addictive — my kids called it ‘magic cake.’ I saved time and everyone loved it. Five stars!" — Reader C. Hernandez
Key Ingredients
Mini peanut butter cups
Mini peanut butter cups are the surprise gems here. They melt into little pockets of peanut-buttery richness as the cake bakes. Look for fresh candy with intact wrappers removed; Reese’s minis are the classic choice, but store brands work fine and often save money.
Instant chocolate pudding mix + milk
The dry instant pudding mix combined with milk creates a loose, ganache-like base when layered and baked. It keeps the interior moist and slightly fudgy; don’t swap for cook-and-serve pudding, which needs heat and will change bake chemistry. Use cold milk straight from the fridge for the best texture.
Dry chocolate cake mix
The dry cake mix acts as the structural and browning agent. When sprinkled over the wet pudding layer and dotted with butter, it bakes into a crusty top that resembles a shallow cake rather than a layered trifle. A mid-range boxed mix (not the ultra-premium bakery-style) gives predictable, balanced sweetness and reliable rise.
Creamy peanut butter (melted)
Melted creamy peanut butter dispersed over the pudding adds a salty, savory counterpoint and helps ripple peanut butter flavor throughout. Natural peanut butter with oil separation will work if you melt it gently and stir until smooth, but classic creamy peanut butter gives a more stable, glossy finish.
Full Ingredients List:
- 1 box chocolate cake mix
- 1 box (3.9 oz) instant chocolate pudding mix (dry)
- 2 cups milk
- 1 bag (about 12 oz) mini peanut butter cups, unwrapped
- ½ cup creamy peanut butter, melted
- 1 stick (½ cup) unsalted butter, sliced
- Optional: chocolate chips or chopped peanuts for topping
Step-by-Step Instructions
Step 1: Preheat and prepare the pan
Preheat your oven to 350°F (175°C).
Lightly grease a 9×13-inch baking dish with nonstick spray or a thin layer of butter.
Pro Tip: Use a glass or metal 9×13 pan you’re comfortable baking in; glass pans may brown the top slightly faster. Look for shimmering butter slices across the top — that’s what promotes a crisp crust.
Step 2: Build the pudding base in the dish
Pour the dry instant chocolate pudding mix into the greased baking dish.
Add the 2 cups of milk and whisk or stir right in the dish until the powder dissolves and the mixture is smooth.
Visual cue: The pudding base should look glossy and slightly thickened but still pourable — not lumpy or grainy. If you see dry pockets, give it another quick stir.
Pro Tip: A small whisk or fork works fine; avoid adding more milk than called for. If you like a looser interior, add up to 2 tablespoons extra milk, but no more.
Step 3: Scatter the mini peanut butter cups
Evenly scatter the unwrapped mini peanut butter cups across the pudding layer.
Pressing them slightly into the surface helps keep them from simply floating to the top as it bakes.
Visual cue: The candies should be visible but mostly nestled under the surface; you’ll still see ripples of candy across the layer.
Pro Tip: For variety, toss half the minis in chopped peanuts before placing to add texture inside the cake.
Step 4: Add melted peanut butter and the cake mix
Drizzle the melted creamy peanut butter over the top in several long streams.
Then sprinkle the dry chocolate cake mix evenly across the entire dish — do not stir everything together.
Visual cue: The cake mix will look like a dusty blanket; the peanut butter will create darker glossy streaks on top.
Pro Tip: Use a spoon to dollop the peanut butter and then a sieve or gently shake the cake mix from its box to get an even layer. This keeps the top from developing big clumps.
Step 5: Top with butter slices
Place the slices of unsalted butter evenly over the top of the cake mix.
Aim for coverage but don’t overlap the slices; small gaps let the mix crisp up evenly.
Visual cue: The butter will melt into the dry mix during baking and create golden pockets across the surface.
Pro Tip: If you prefer a richer top, dot a few extra tablespoons of butter in the very center. For a lighter option, swap half the butter for a neutral oil, but expect less crispness.
Step 6: Bake until bubbly and set
Bake the assembled dish for 40–45 minutes.
Watch for the top to be set and bubbly around the edges; a toothpick inserted into the cake mix may not come out dry because of the pudding layer — that’s okay.
Visual cue: Look for bubbling at the sides and a golden-brown crust on top. The middle will still be moist but not runny.
Pro Tip: If the top browns too quickly, tent loosely with foil for the last 10–15 minutes. Let it cool 10–15 minutes before serving to let the pudding set slightly.

Expert Tips for Success
- Use full-fat milk for the pudding base. The fat contributes to a creamier, richer mouthfeel and prevents the interior from setting too firmly. Low-fat milk makes the filling firmer and less indulgent.
- Remove wrappers from peanut butter cups before baking. Foil or paper left on candy will melt and can char; unwrapped candies melt evenly into pockets.
- Slice the butter thin and distribute evenly. Thin slices melt faster and more uniformly than chunks; they create that desirable crust-on-top effect.
- Don’t mix after adding the cake mix. This is the dump-cake trick: keeping the cake mix dry on top allows it to form a crust while the pudding beneath stays soft. Stirring ruins the contrast.
- Use fresh, not stale, boxed mixes and pudding packets. Old dry mixes can clump or underperform, changing texture and rise. Check best-by dates for consistent results.
- Tent with foil if edges darken early. Glass pans brown faster; if your top is too dark before the center bubbles, cover gently with foil to finish baking without burning.
- For evenly distributed candy, fold small clusters into the pudding base before sprinkling the cake mix. This ensures more pockets of peanut butter throughout instead of just on the surface.
- If you prefer chunkier bites, coarsely chop half of the mini cups and scatter them, leaving the rest whole. Chopped pieces melt differently and give varied texture in each spoonful.
Storage & Freezing
Fridge storage: Cool completely, cover the dish tightly with foil or transfer portions to an airtight container.
Store in the refrigerator for up to 4 days. The pudding layer will firm up when chilled; reheat individual portions to restore gooeyness.
To reheat from chilled: Place individual portions on a microwave-safe plate and microwave for 20–45 seconds, depending on your microwave strength, until warmed through and the pudding softens. For oven reheating, cover with foil and bake at 325°F (160°C) for 10–15 minutes.
Freezer storage: For longer storage, freeze in an airtight container for up to 3 months. Cool completely, then cut into portions and wrap each tightly with plastic wrap before placing in a freezer-safe bag to prevent freezer burn.
To reheat from frozen: Thaw overnight in the refrigerator. Reheat in a 350°F (175°C) oven for 15–20 minutes, covered for the first 10 minutes to prevent over-browning, then uncover to crisp the top if desired. Microwaving from frozen is possible but less even; thawing first yields best texture.
Variations & Substitutions
Peanut butter swirl cheesecake dump cake: Dollop softened cream cheese and swirl it gently into the pudding layer before adding peanut butter cups for a tangy contrast. The richer profile cuts the sweetness and adds a creamy density.
Nut-free version: Replace peanut butter cups with caramel-filled chocolates and swap the melted peanut butter for a dairy-free chocolate spread if peanut allergies are a concern. Use chopped pretzels for a salty crunch instead of peanuts.
Extra-chocolate overload: Sprinkle a handful of semi-sweet chocolate chips on top of the cake mix before adding butter for molten chocolate pockets and a shinier top.
Healthier swaps: Use reduced-sugar chocolate cake mix and a sugar-free instant pudding mix; substitute natural peanut butter made smoother with a touch of honey for sweetness. Expect a difference in sweetness and texture but still satisfying results.
Frequently Asked Questions
Q: Can I make this ahead of time for a party?
A: Yes. Bake it and let it cool, then refrigerate covered. Reheat in the oven at 325°F for 10–15 minutes before serving, or microwave individual portions. Making it a few hours ahead maintains freshness and reduces last-minute work.
Q: Will the center be undercooked because of the pudding?
A: No. The pudding layer intentionally stays moist and somewhat saucy; the top cake mix bakes into a crust. If you prefer a firmer center, bake an extra 5–10 minutes, but know it will become less gooey.
Q: Can I use full-size peanut butter cups instead of minis?
A: You can, but chopping full-size cups into bite-sized pieces is best. Whole full-size cups will sink unevenly and create large molten pockets rather than distributed bites.
Q: Is this recipe freezer-friendly?
A: Yes, both whole and portioned pieces freeze well for up to 3 months. Thaw overnight in the fridge and reheat in the oven to refresh texture. Individual microwave reheats are fine but may be less uniform.
Q: Can I make this dairy-free or vegan?
A: Yes with swaps: use a dairy-free boxed chocolate cake mix (check ingredients), plant-based milk (unsweetened almond or oat), dairy-free chocolate pudding mix (or a tapioca-based instant mix), vegan butter, and dairy-free peanut butter cups. Results will vary but remain tasty.
Final Thoughts
This Peanut Butter Cup Dump Cake is one of those joyfully messy desserts that feels special but requires almost no time.
It’s perfect for potlucks, casual family dinners, or whenever you need a fast showstopper.
Please leave a star rating in the recipe card below and pin this to Pinterest if you loved it.
Conclusion
If you want another home-cook version for inspiration, check out Peanut Butter Cup Dump Cake for a similar take with slightly different measurements.
For a baker’s variation with extra tips and photos, read Chocolate Peanut Butter Dump Cake – Mom Loves Baking.
Peanut Butter Cup Dump Cake
Ingredients
Base Ingredients
- 1 box chocolate cake mix Dry chocolate cake mix acts as the structural agent.
- 1 box (3.9 oz) instant chocolate pudding mix (dry) Creates a loose, ganache-like base.
- 2 cups milk Use cold milk for the best texture.
- 1 bag (about 12 oz) mini peanut butter cups, unwrapped Look for fresh candy with intact wrappers removed.
- ½ cup creamy peanut butter, melted Natural peanut butter with oil separation can work too.
- 1 stick (½ cup) unsalted butter, sliced Helps create a crispy top.
- optional chocolate chips or chopped peanuts for topping For added texture.
Instructions
Preparation
- Preheat your oven to 350°F (175°C) and lightly grease a 9×13-inch baking dish.
- Pour the dry instant chocolate pudding mix into the greased baking dish and stir in the milk until smooth.
- Evenly scatter the unwrapped mini peanut butter cups across the pudding layer.
- Drizzle the melted peanut butter over the top, then sprinkle the dry chocolate cake mix evenly across the dish.
- Place slices of unsalted butter evenly over the top of the cake mix.
- Bake for 40–45 minutes until bubbly and set.
- Let cool for 10–15 minutes before serving.