The first time I made these oven-baked cheesy tacos I thought I’d ruined dinner — and then everyone went back for seconds.
This recipe takes the familiar comfort of a taco night and gives it a crisp, melty lift that’s hard to beat.
It’s quick, forgiving, and perfect for weeknights when you want tacos without the taco-shop mess.
Why You’ll Love This Recipe
- Weeknight-friendly: ready in about 30 minutes with minimal hands-on time.
- Crowd-pleasing: melty cheese and crispy shells make picky eaters happy.
- Make-ahead friendly: you can prep the beef ahead and bake when guests arrive.
- Flexible: easy to swap proteins or toppings to suit diets.
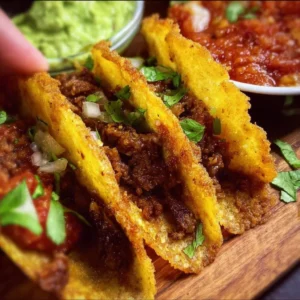
The texture is the star: browned, seasoned beef provides a juicy, savory base while the oven crisps the shells and transforms shredded cheese into gooey, slightly browned pillows that stretch with every bite.
Fresh diced peppers and onions add a crunchy, sweet contrast that prevents the tacos from feeling heavy.
The end result balances crunch, melt, and freshness in a way that feels indulgent but still fast.
"Five stars — my family declared taco night upgraded. The shells stayed crispy and the cheese browned perfectly. Will make every week!" — Sarah, reader
Key Ingredients
Ground beef
Ground beef is the backbone of this recipe. Choose 80/20 for flavor and juiciness; the extra fat helps the beef stay moist when baked. For a leaner version, 90/10 works, but expect a drier texture unless you add a splash of broth or a little oil during cooking.
Taco seasoning
A good taco seasoning delivers the dish’s personality. Use a blend with cumin, chili powder, garlic, and smoked paprika for depth. Store-bought brands like McCormick or homemade blends with a pinch of sugar and smoked paprika will feel more restaurant-like.
Shredded cheese
Use a melting blend such as cheddar and Monterey Jack, or a pre-shredded Mexican blend for convenience. Block cheese shredded at home melts more smoothly because it lacks anti-caking agents; it also browns more attractively under the oven.
Taco shells
Sturdy, slightly thicker taco shells or hard corn shells hold up to baking and filling better than ultra-thin varieties. Warm them briefly before filling if they’re brittle, and choose shells labeled oven-safe or simply test with one to ensure they don’t crack.
Full ingredient list
- 1 lb ground beef
- 1–2 tablespoons taco seasoning (to taste)
- 8–10 taco shells (hard shells)
- 1.5–2 cups shredded cheese (cheddar, Monterey Jack, or Mexican blend)
- 1 cup diced bell peppers
- 1/2 cup chopped onions
- Lettuce, shredded, for serving
- Sour cream, for serving
- Salsa, for serving
Step-by-Step Instructions
Step 1: Heat the oven
Preheat the oven to 375°F (190°C).
Using the correct temperature is important for melting cheese without burning the shells.
Pro Tip: Place a rack in the middle position so taco tops brown evenly.
Step 2: Brown the beef
Heat a skillet over medium-high heat and add the ground beef.
Cook, breaking it up with a spoon, until no pink remains.
Stir in taco seasoning according to package directions or to taste and allow the spices to bloom in the hot pan for about a minute.
Pro Tip: You’ll know the beef is ready when the juices have mostly evaporated and the meat has a little browned crisp edges.
Step 3: Prep the shells and fillings
Arrange taco shells upright in a shallow baking dish so they won’t tip while baking.
Fill each shell with a spoonful of the seasoned beef, adding diced bell peppers and chopped onions on top of the meat.
Pro Tip: Fill shells just shy of the top — overflow can make a mess as ingredients bubble while baking.
Step 4: Add cheese and bake
Generously sprinkle shredded cheese over each filled shell, covering meat and veggies.
Place the baking dish in the preheated oven and bake for 10–15 minutes until the cheese melts and begins to brown, and shells become crisp.
Pro Tip: You’ll know they’re done when the cheese is fully melted, slightly bubbly, and the edges of the shells look toasted.
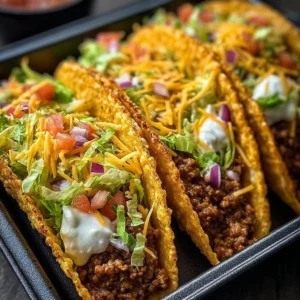
Step 5: Serve with fresh toppings
Remove the dish from the oven and let tacos rest for a minute to settle.
Top with shredded lettuce, a dollop of sour cream, and salsa or other desired toppings.
Pro Tip: Serve immediately — the contrast of hot, melty cheese and cold toppings is part of the appeal.

Expert Tips for Success
- Use the right fat content in the beef. An 80/20 blend gives the richest flavor and juiciness. If you use very lean beef, add a teaspoon of oil or a tablespoon of beef broth when cooking to retain moisture.
- Season intentionally. If using a store-bought taco seasoning, start with half the recommended amount and taste; you can always add more. Homemade blends let you control sodium and adjust heat with cayenne.
- Shred cheese from a block. Pre-shredded cheese often contains anti-caking agents that hinder melt and browning. Shred at home for smoother, more attractive cheese that bubbles and browns.
- Choose oven-safe shells. Some ultra-thin taco shells can shatter when filled and baked. Test one shell first or buy ones labeled “oven” or “baking” friendly. Thick corn shells or small soft corn tortillas folded in a rack work well.
- Don’t overfill. Resist the urge to pile on fillings. Overfilled shells can spill and become soggy. Leave room for cheese to blanket the filling and help everything stick together.
- Watch the oven closely. Ovens vary; check at 10 minutes to prevent over-browning. If the cheese is bubbling but the shell isn’t crisping, move the pan down a rack for a minute or two.
- Use a shallow baking dish. A shallow pan keeps shells upright and exposes more cheese for browning. A very deep pan can trap steam and soften the shells.
- Toast shells beforehand for extra crunch. If you like an extra-crispy texture, briefly warm shells in the oven 3–4 minutes before filling to remove moisture.
- Add a splash of lime to finish. Toss diced peppers and onions in a little lime juice before filling if you want a brighter, fresher bite that balances the richness.
- Make ahead strategically. Cook and cool the beef mixture, then refrigerate for up to 2 days. Assemble and bake when ready to serve for practically no-effort dinner.
Storage & Freezing
Fridge storage: Place leftover baked tacos in an airtight container and refrigerate for up to 3 days.
To preserve crunch, store fillings separately from shells when possible. Keep shredded lettuce and sour cream in separate containers and add fresh when serving.
Freezer storage: For best results freeze the cooked beef mixture rather than fully assembled tacos.
Cool the meat completely, portion into freezer-safe bags or containers, and freeze for up to 3 months. Thaw overnight in the fridge before using.
Freezing assembled tacos: If you must freeze assembled tacos, wrap each one tightly in foil and place in a rigid freezer container. Freeze for up to 1 month. Expect a loss of crispness; re-crisp in the oven after thawing.
Reheating: Reheat refrigerated tacos in a 350°F (175°C) oven for 8–10 minutes to revive crispness and remelt cheese.
If reheating from frozen, thaw overnight then bake at 375°F (190°C) for 10–15 minutes until hot. Avoid microwaving assembled tacos — the shells will go soggy quickly.
Pro Tip: To refresh frozen-crisp texture, place tacos on a wire rack set over a baking sheet so air circulates while reheating.
Variations & Substitutions
Chicken or turkey swap: Use ground turkey or shredded rotisserie chicken with the same seasoning for a lighter version. Add a teaspoon of oil to turkey while cooking to mimic beef’s mouthfeel.
Vegetarian option: Replace beef with seasoned cooked lentils, crumbled firm tofu, or a mix of sautéed mushrooms and black beans. Season aggressively to build savory depth.
Spice & flavor add-ins: Stir a tablespoon of tomato paste into the beef while cooking for richer umami. Add chipotle in adobo for smokiness and heat.
Cheese and shell switches: Try pepper jack for spicy melt or queso fresco crumbled on top after baking for a tangy finish. Use soft corn tortillas folded and baked in a muffin tin for taco cups.
Frequently Asked Questions
Can I use soft tortillas instead of hard shells?
Yes. Use slightly thicker soft corn tortillas and shape them upright in a muffin tin or small oven-safe cups so they hold the filling. Bake until the edges are crisp and cheese melts. Expect a softer, chewier texture compared with hard shells.
How long can I keep cooked beef in the fridge?
Cooked seasoned beef will keep in the refrigerator for 3 to 4 days in an airtight container. For longer storage, freeze in portions and thaw in the refrigerator before reheating.
Will the shells get soggy in the oven?
They can if overfilled or baked in a very deep dish that traps steam. Use a shallow baking dish, avoid liquid-heavy toppings, and bake long enough to crisp the shells. Toasting shells briefly before filling reduces sogginess risk.
Can I make these ahead for a party?
Yes. Cook the beef and prep toppings a day ahead. Arrange shells and fillings in the baking dish, cover, and refrigerate. When guests arrive, top with cheese and bake 10–15 minutes. Alternatively, assemble and freeze for longer make-ahead plans.
What’s the best way to reheat leftovers without losing crispness?
Reheat in a 350–375°F oven on a wire rack over a sheet pan. This allows hot air to circulate and crisps shells while melting cheese. Avoid microwaving unless you plan to crisp the shell afterward in a toaster oven.
Final Thoughts
These oven-baked cheesy tacos are one of those simple upgrades that instantly improves taco night without adding hassle.
They bridge the comfort of melty cheese and the satisfying crunch of baked shells, making them a dependable family favorite.
Please leave a star rating in the recipe card below and pin this recipe to Pinterest if you loved it — your feedback helps me know what to cook next.
Conclusion
For a quick reference on similar methods and inspiration, see this Cheesy Baked Tacos Recipe (20 Minutes) which highlights a speedy approach to oven-baked tacos.
If you want a slightly different flavor profile and assembly ideas, check out Cheesy Baked Tacos | Olive & Mango for more variations and plating notes.
Oven-Baked Cheesy Tacos
Ingredients
Meat and Seasoning
- 1 lb ground beef Use an 80/20 blend for flavor and juiciness.
- 1–2 tablespoons taco seasoning Adjust to taste.
Shells and Filling
- 8–10 pieces taco shells Choose sturdy, oven-safe shells.
- 1.5–2 cups shredded cheese Cheddar, Monterey Jack, or Mexican blend.
- 1 cup diced bell peppers For added freshness.
- 0.5 cup chopped onions For added flavor.
Serving Options
- to taste shredded lettuce For topping.
- to taste sour cream For topping.
- to taste salsa For topping.
Instructions
Preparation
- Preheat the oven to 375°F (190°C). Place a rack in the middle position.
- Heat a skillet over medium-high heat and add the ground beef. Cook until no pink remains.
- Stir in taco seasoning and allow the spices to bloom for about a minute.
- Arrange taco shells upright in a shallow baking dish.
- Fill each shell with seasoned beef, followed by diced bell peppers and chopped onions.
- Generously sprinkle shredded cheese over each filled shell.
- Bake for 10–15 minutes until the cheese melts and shells are crisp.
- Remove from the oven and let tacos rest briefly. Top with shredded lettuce, sour cream, and salsa.