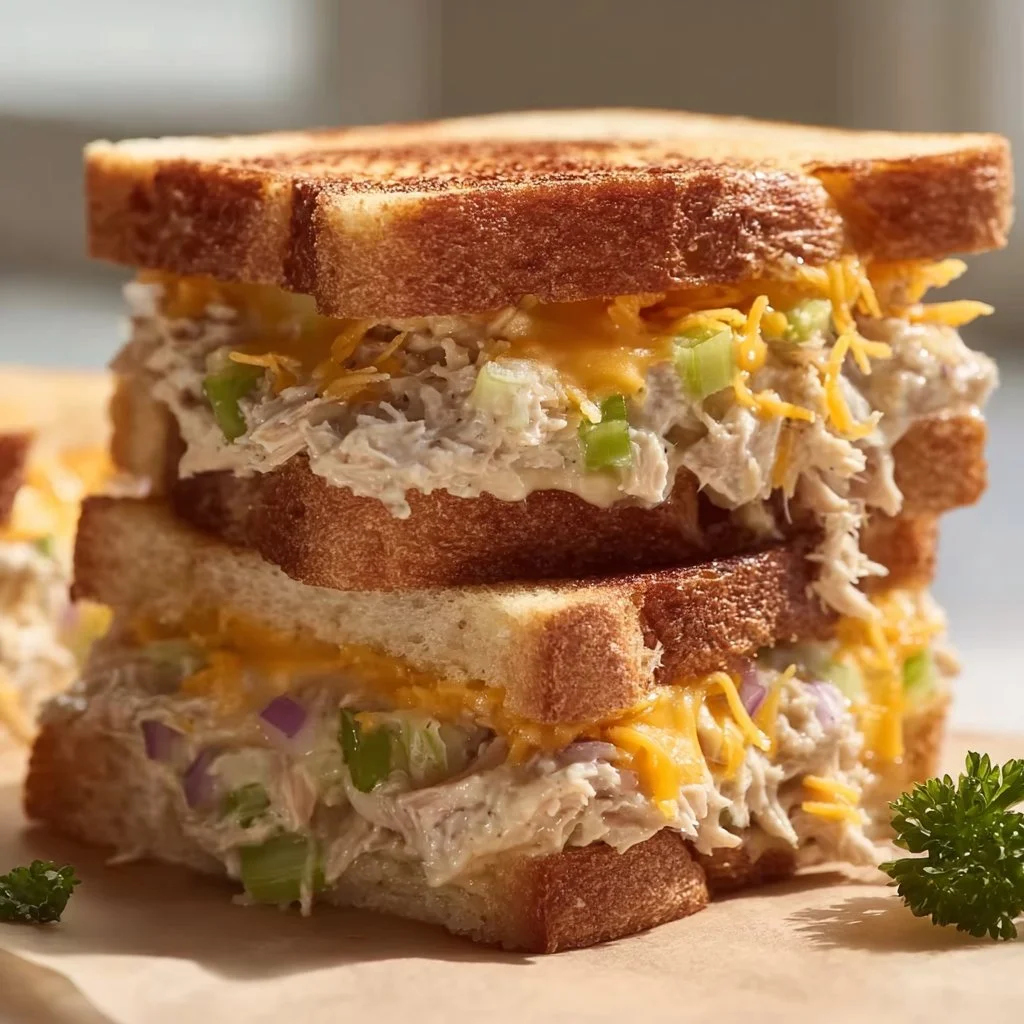
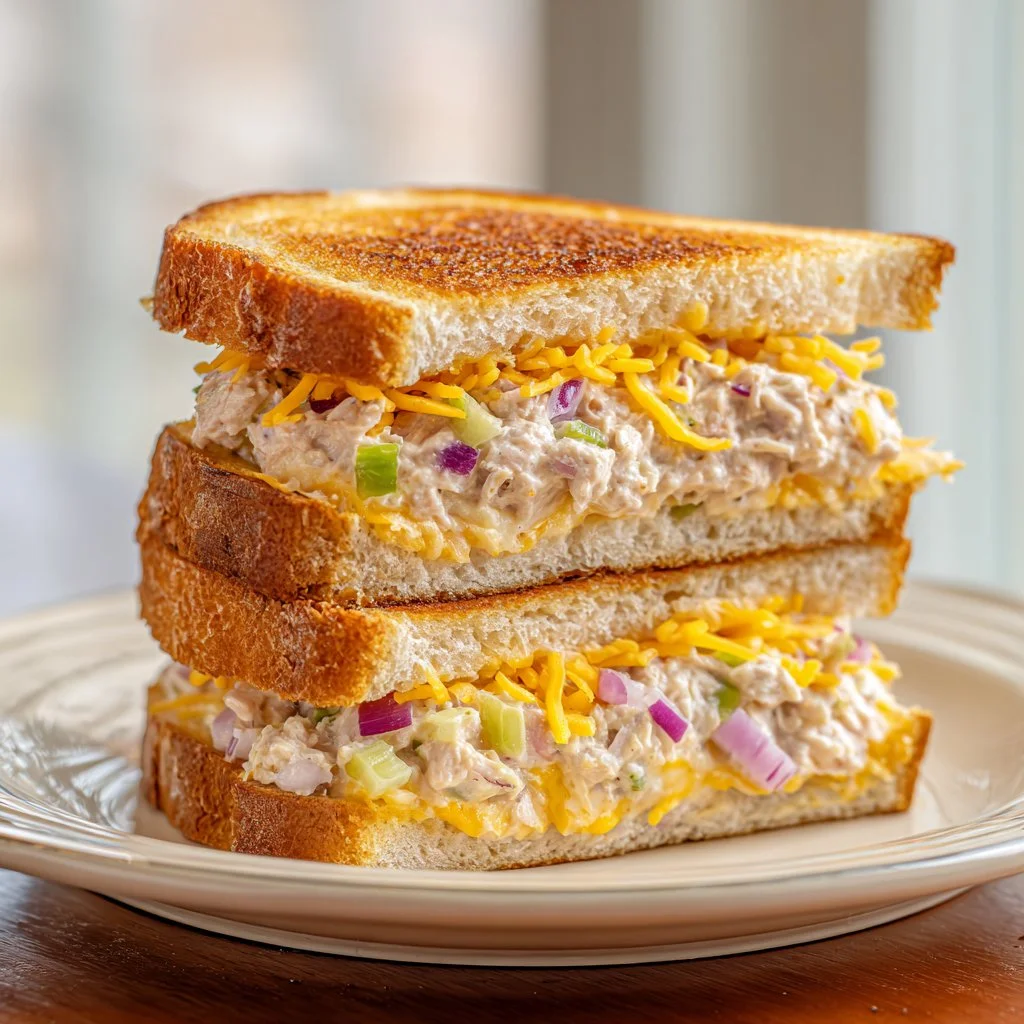
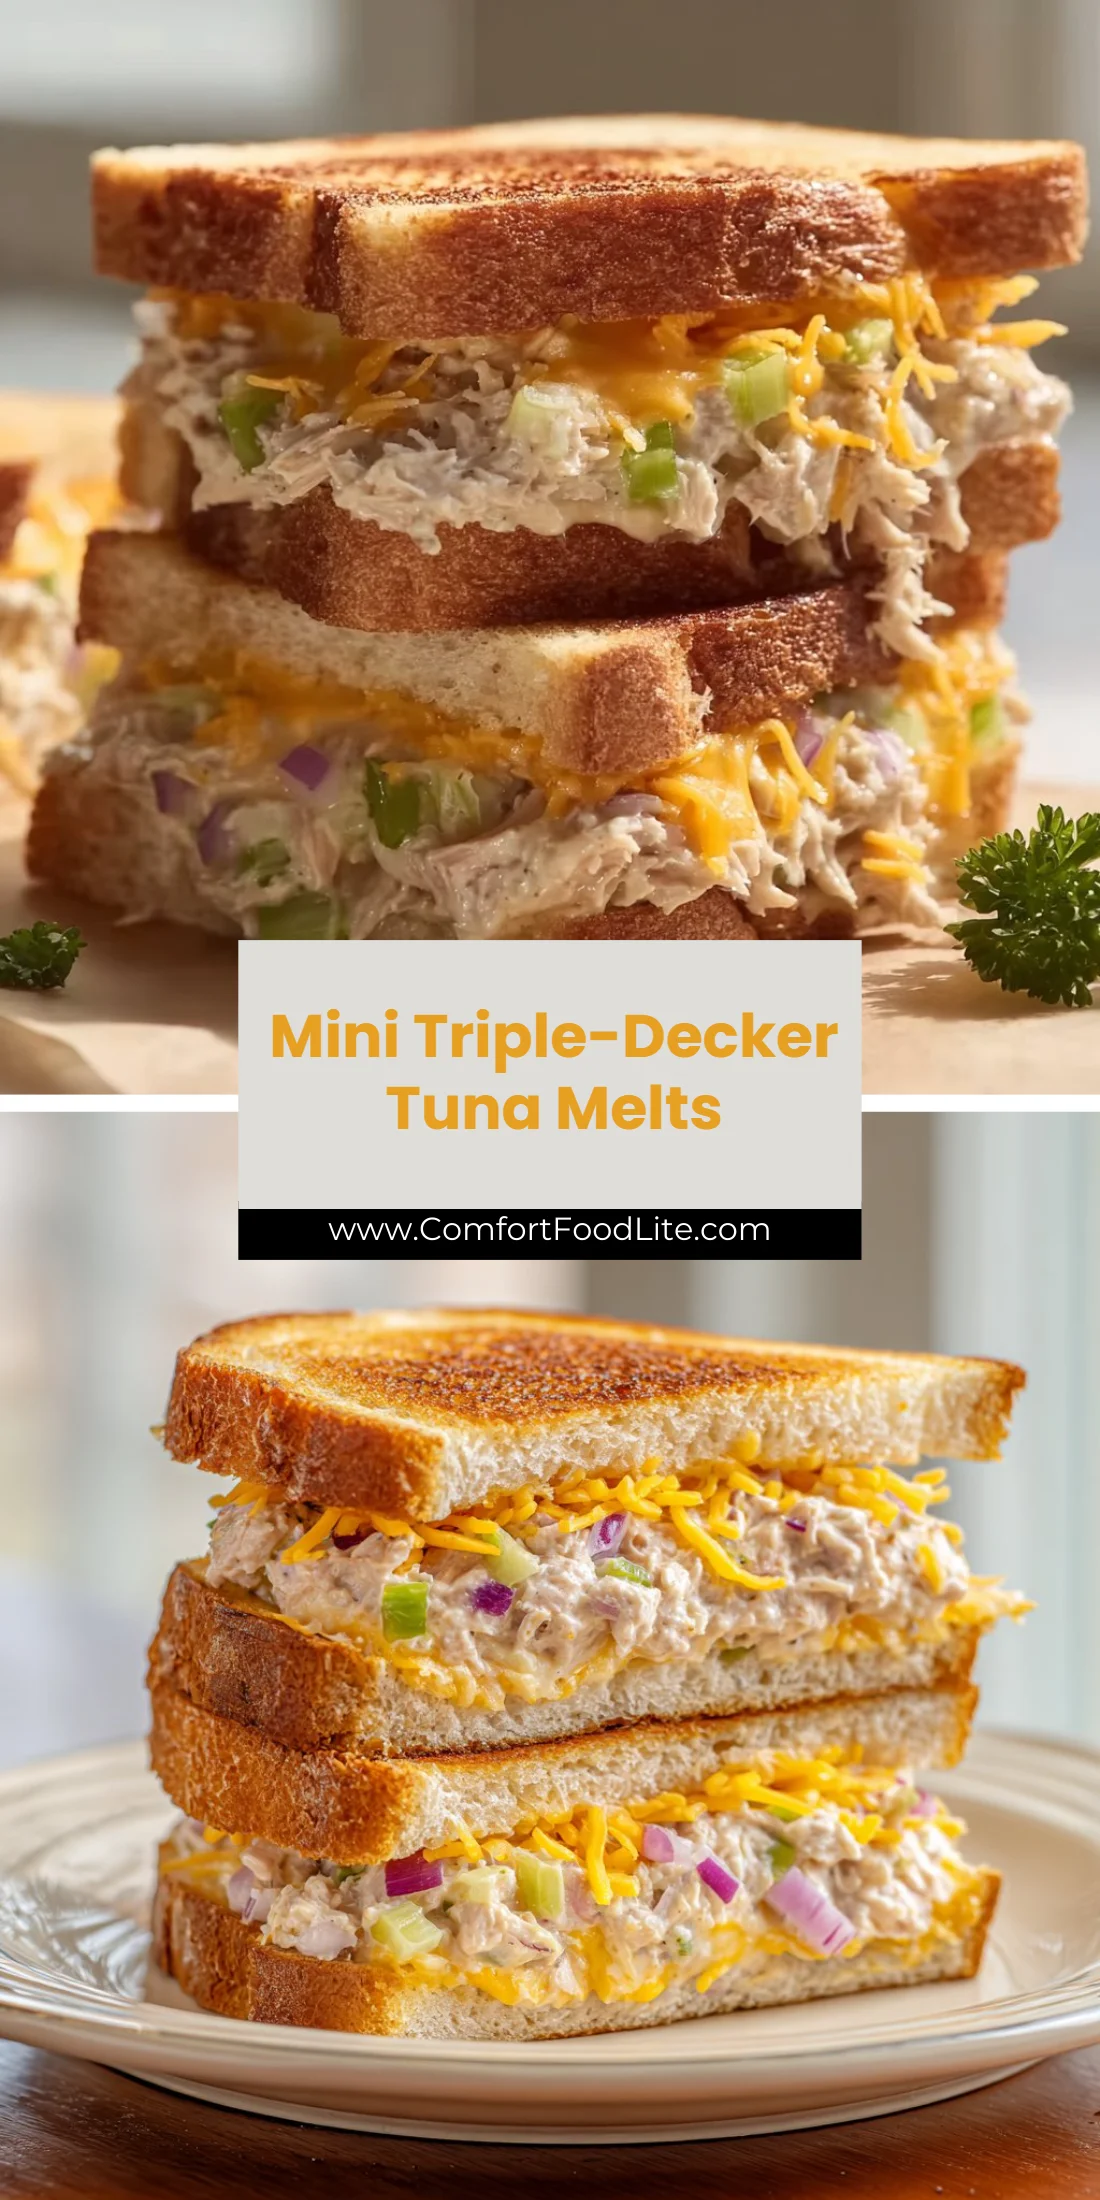
Bright, crispy, and perfectly cheesy, these mini triple-decker tuna melts are the kind of snack that disappears fast at a party or becomes a comforting weeknight dinner in minutes.
They’re compact but layered with flavor, and they make excellent use of pantry staples.
If you like quick tuna recipes, you might also enjoy a creamy twist in this avocado tuna salad for a different sandwich filling.
These mini melts are fast to pull together and small enough to serve as appetizers or a main with a salad.
Why You’ll Love This Mini Triple-Decker Tuna Melts
- Bite-sized triple layers for an irresistible crunch and melt.
- Uses pantry staples you likely already have.
- Quick assembly — ready in under 20 minutes.
- Highly adaptable to dairy-free or low-fat swaps.
- Great for parties, kids, and make-ahead lunches.
- Easy to scale for a crowd.
The taste is a bright balance of briny tuna, creamy mayonnaise, sharp cheddar, and a whisper of crunch from celery and red onion. Texture plays between crunchy toasted bread and gooey melted cheese, making each tiny sandwich satisfy multiple cravings at once.
"These were gone in ten minutes — cheesy, salty, and so addictive. Perfect party food!" — 5-star reader review
Key Ingredients for Mini Triple-Decker Tuna Melts
canned tuna
- Canned tuna is the backbone of these melts; choose solid or chunk light for firmer texture. Look for tuna packed in water for a cleaner flavor or oil if you prefer richer mouthfeel. If you substitute canned salmon, expect a softer texture and stronger flavor that will change the sandwich profile.
mayonnaise
- Mayonnaise binds and adds creaminess that helps the tuna mixture stay moist under the heat of the skillet. Use full-fat mayo for the silkiest melt, or a light mayo for fewer calories; Greek yogurt makes a tangy, tangy substitute but will alter the final texture. If you omit it entirely, the filling can become dry, especially when reheated.
cheddar cheese, shredded
- Sharp cheddar brings melting strength and a pronounced savory note that contrasts the tuna. Buy a block and shred it yourself for better melting and flavor; pre-shredded cheese often includes anti-caking agents that affect melt. Substituting mozzarella yields a milder, stringier melt, while Swiss adds nuttiness and a smoother melt.
bread slices
- Bread is the structural element; choose a thin sandwich loaf or slightly firm white bread to achieve golden browning without collapsing. Sturdier slices like sourdough or country loaf will hold triple layers better. Using very thin or very soft bread can lead to sogginess once filled and grilled.
Full Ingredient List for Mini Triple-Decker Tuna Melts
- Canned tuna
- Mayonnaise
- Celery, chopped
- Red onion, chopped
- Cheddar cheese, shredded
- Bread slices
- Butter
- Salt
- Pepper
Step-by-Step Instructions for Mini Triple-Decker Tuna Melts
Step 1: Mix the tuna filling
In a bowl, combine the canned tuna, mayonnaise, chopped celery, chopped red onion, salt, and pepper until evenly distributed.
Pro Tip: The filling should look creamy with visible bits of celery and onion and smell bright and slightly briny.
Step 2: Preheat your skillet
Place a skillet over medium heat and let it warm until it feels evenly hot to the touch; a drop of water should sizzle slowly when it hits the pan.
Pro Tip: The skillet should give a gentle sizzle—not a roar—so the bread crisps without burning and the cheese melts.
Step 3: Butter the bread
Butter one side of each slice of bread evenly; use softened butter for a consistent spread and avoid globs that will melt too quickly.
Pro Tip: The buttered side should glisten but not leak; when in the pan it will foam slightly and then settle as the bread turns golden.
Step 4: Assemble the sandwiches
Spread the tuna mixture on the unbuttered side of a slice, add shredded cheddar, and top with another slice to create a double layer; repeat if making a triple-decker configuration then cap and press gently.
Pro Tip: The assembled sandwich should feel slightly firm when pressed and show a bit of tuna at the edges; the cheese layer should be visible under the top slice.
Step 5: Cook the sandwiches
Place the sandwiches butter-side down in the skillet and cook until the bottom is golden brown and the cheese begins to melt, then flip and brown the other side.
Pro Tip: Look for an even deep-golden color and smell a toasty, savory aroma; press lightly with a spatula to ensure the cheese has softened through.
Step 6: Cut and serve warm
Remove the sandwiches from the skillet, let them rest briefly, then cut into mini sandwich sizes and serve while the cheese is still gooey.
Pro Tip: The interior should be warm and the cheese stringy when pulled apart; each mini should hold together but yield when bitten.
Expert Tips for Mini Triple-Decker Tuna Melts
- Use room-temperature tuna mix for the most even heating; cold filling can make the cheese take longer to melt.
- Keep skillet heat in the medium range; too hot will char bread before cheese melts, too cool makes the sandwich soggy.
- Grate cheese fresh from the block for better melt and flavor; pre-shredded often contains anti-caking agents.
- If texture is too loose, drain canned tuna thoroughly and press excess liquid from celery with a paper towel.
- For perfectly sealed edges, use a small offset spatula to press the top and bottom slices together before cooking.
- Use an electric griddle or panini press for consistent top-to-bottom heat when making larger batches.
- Common mistake: Overfilling sandwiches — this can cause spillage and make them hard to flip. Keep filling to a modest layer.
- When serving at a party, keep cooked melts on a warm sheet pan in a 200°F (95°C) oven to hold them without drying.
For inspiration on miniature party bites and plating, check a complementary idea in this festive mini hotdogs recipe that uses similar small-plate techniques.
Storage & Freezing for Mini Triple-Decker Tuna Melts
Fridge storage: Store cooled melts in an airtight container for up to 3 days. Place parchment between layers to avoid sticking and keep the container in the main fridge compartment.
Freezer storage: Fully cooked melts can be frozen for up to 1 month; wrap each mini in foil and place in a freezer bag to prevent freezer burn. For best results, flash-freeze on a tray for 30 minutes before bagging.
Thawing: Thaw overnight in the fridge for best texture, or reheat from frozen at low temperature to avoid over-browning.
Reheating: Reheat in a 350°F (175°C) oven for 8–12 minutes or in a skillet over low heat until warmed through; avoid microwaving if you want to retain crispness.
If you often make tuna dishes, consider turning leftovers into a hearty lunch like this high-protein tuna pasta salad to avoid repeated reheating.
Variations & Substitutions for Mini Triple-Decker Tuna Melts
Mediterranean twist
- Swap mayonnaise for Greek yogurt and add chopped kalamata olives and diced roasted red pepper. The result is tangier with briny pops and a lighter mouthfeel.
Spicy Sriracha tuna
- Mix a teaspoon or two of Sriracha into the mayo and add a pinch of smoked paprika. Expect a bright heat and smoky dimension that plays well with sharp cheddar.
Cheesy Swiss & dill
- Replace cheddar with Swiss cheese and stir in fresh dill and a touch of lemon zest. The melts will be nuttier and slightly more aromatic, great with rye or pumpernickel bread.
Open-faced melt
- Use a single slice of bread topped with tuna and cheese and broil briefly instead of pan-frying. This yields a quicker, crisper top and a lighter snack that’s easier to portion.
Frequently Asked Questions About Mini Triple-Decker Tuna Melts
Q: Can I make the tuna filling ahead of time?
A: Yes. Prepare the tuna mixture up to 24 hours in advance and store it covered in the refrigerator. Stir before assembling and taste for salt; flavors often mellow and may need a final adjustment.
Q: What type of tuna is best for texture in these melts?
A: Chunk light or solid white albacore both work well; chunk light offers flakier pieces while albacore gives a firmer, meatier bite. Drain thoroughly to prevent soggy bread and press gently to remove excess liquid.
Q: How do I prevent the bread from getting soggy?
A: Use slightly sturdier bread and butter the outside only. Cook at medium heat so the exterior crisps quickly and the interior warms without overcooking. If using wetter mix-ins like cucumber or tomato, pat them dry first.
Q: Can I make these dairy-free?
A: Yes. Substitute the mayo with dairy-free mayonnaise and use a plant-based melting cheese. Choose a brand known for good meltability to preserve that gooey texture.
Q: What are good side pairings for mini melts?
A: Light sides like a crisp green salad or a lemony coleslaw brighten the meal. For seasonal pairings and cozy bakes to serve alongside, try a sweet note like these cinnamon swirl pumpkin mini loaves as a contrasting treat.
Final Thoughts on Mini Triple-Decker Tuna Melts
These mini triple-decker tuna melts are an easy, crowd-pleasing combination of crunchy, creamy, and cheesy in every bite. If you tried this recipe, please leave a star rating in the recipe card below and pin it to Pinterest for later.

Mini Triple-Decker Tuna Melts
Ingredients
Tuna Mixture
- 1 can Canned tuna Choose solid or chunk light for firmer texture.
- 1/4 cup Mayonnaise Full-fat for creaminess; Greek yogurt can be a substitute.
- 1/4 cup Celery, chopped Adds crunch.
- 1/4 cup Red onion, chopped Provides flavor.
- 1/2 cup Cheddar cheese, shredded Sharp cheddar preferred for flavor.
Sandwich Assembly
- 8 slices Bread slices Use thin sandwich loaf or slightly firm bread.
- 2 tablespoons Butter Softened for spreading.
- to taste Salt For seasoning.
- to taste Pepper For seasoning.
Instructions
Preparation
- Mix the canned tuna, mayonnaise, chopped celery, chopped red onion, salt, and pepper in a bowl until evenly distributed.
- Preheat your skillet over medium heat until hot.
- Butter one side of each slice of bread.
- Spread the tuna mixture on the unbuttered side of a slice, add shredded cheddar, top with another slice, then assemble additional layers if desired.
Cooking
- Place the sandwiches butter-side down in the skillet and cook until the bottom is golden brown and the cheese begins to melt.
- Flip the sandwiches and brown the other side.
Serving
- Remove from the skillet, let them rest for a moment, then cut into mini sandwich sizes and serve warm.