The first time I made this pumpkin dump cake I expected a cobbler, and ended up with something richer, silkier, and impossibly simple to serve to a crowd.
It’s the kind of recipe that looks fancy on a dessert table but takes almost no babysitting.
If you’re short on time but want true fall flavor, this one-pan bake is a winner every single time.
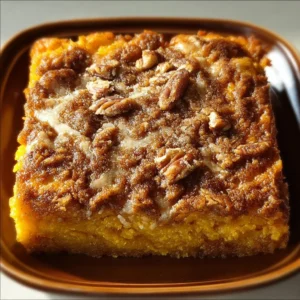
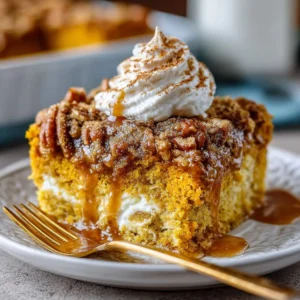
What makes it special is the contrast: custardy pumpkin beneath a buttery, cake-like top that crisps in places and stays tender in others.
You can dress it up with whipped cream, ice cream, or a drizzle of caramel, and most people will assume you spent hours on it.
Why You’ll Love This Recipe
- Ready with pantry staples and one 9×13 pan.
- Crowd-pleasing fall flavors with minimal effort.
- Balanced texture: silky pumpkin custard and a golden, buttery top.
- Extremely forgiving — small measuring variances rarely ruin it.
The texture is the recipe’s calling card. The pumpkin layer bakes into a dense, silky custard similar to pumpkin pie filling. The box cake mix on top, once soaked with melted butter, forms pockets of tender cake and crisp, buttery edges. That contrast between smooth interior and crunchy, caramelized top keeps every bite interesting and prevents the dessert from feeling heavy.
"Five stars — I brought this to book club and everyone asked for the recipe. So easy and so good!" — reader
Key Ingredients
Pumpkin purée
Pumpkin is the base flavor and moisture source for the custard layer. Use 100% pumpkin purée (not pumpkin pie filling) for true pumpkin flavor and to control your spices. Canned pumpkin from a well-known brand gives consistent texture; if you use homemade purée, make sure it’s thick and not watery.
Evaporated milk
Evaporated milk adds body and a lightly caramelized milk flavor that helps the pumpkin set into a custard without the heaviness of cream. It yields a silkier, creamier texture than regular milk and gives reliable results.
Yellow cake mix
The boxed yellow cake mix is the quick-structure component that crisps and browns on top while absorbing butter to make tender pockets of cake. Don’t substitute with self-rising or sugar-free mixes unless you adjust other ingredients, as the chemistry changes the final texture.
Melted butter
Two sticks of butter poured over the dry cake mix is the magic step. The butter soaks the mix and creates an uneven, rustic top that browns beautifully. Use real butter for flavor — margarine and spreads won’t give the same depth.
Full ingredient list:
- 1 (15 oz) can pumpkin purée
- 1 (12 oz) can evaporated milk
- 3 large eggs
- 1 cup sugar
- 1 tsp cinnamon
- ½ tsp nutmeg
- ½ tsp ginger
- ½ tsp salt
- 1 box yellow cake mix
- 1 cup (2 sticks) melted butter
- ½ cup chopped pecans (optional)
Step-by-Step Instructions
Step 1: Preheat and prep
Preheat your oven to 350°F (175°C).
Grease a 9×13-inch baking dish thoroughly with butter or nonstick spray so the cake releases cleanly.
Pro tip: Line the dish with a strip of parchment if you want easier serving squares later.
Visual cue: The oven should be fully preheated so the top begins browning immediately.
Step 2: Whisk the pumpkin custard
In a large bowl whisk together the pumpkin purée, evaporated milk, eggs, sugar, cinnamon, nutmeg, ginger, and salt until smooth and evenly combined.
Aim for a glossy mixture with no streaks of egg or pockets of dry spice.
Pro tip: Use a wire whisk and scrape the sides — this mix is thick and benefits from a few firm stirs.
Visual cue: You’ll know it’s ready when the mixture pours off the whisk in a smooth ribbon.
Step 3: Pour and spread
Pour the pumpkin custard into the prepared 9×13 pan and use a spatula to level the surface gently.
This creates the foundation for the cake mix topping to sit evenly and soak properly.
Pro tip: Don’t over-level; slight ridges are fine and help the cake mix settle into nooks.
Visual cue: The pan will look almost full but still have a smooth, thin top.
Step 4: Add the dry cake mix
Evenly sprinkle the dry yellow cake mix over the pumpkin layer, covering the surface in a thin, uniform layer.
Try to avoid clumping by shaking the box lightly as you sprinkle or sifting the mix through a fine-mesh strainer.
Pro tip: If you don’t have a sifter, use the back of a spoon to break up clumps and spread the mix.
Visual cue: The pumpkin should still peek through in places but the surface will be mostly covered.
Step 5: Drizzle with melted butter and add nuts
Drizzle the melted butter slowly and evenly over the top, trying to coat as much of the dry mix as possible.
If using pecans, sprinkle them over the buttered top for texture and nuttiness.
Pro tip: Warm the butter but don’t let it scald; cool slightly so it pours smoothly and soaks rather than steam.
Visual cue: The cake mix will darken and glisten where the butter has soaked in.
Step 6: Bake until set
Bake for 50–55 minutes, until the top is golden brown and the center is set. A toothpick inserted into the center should come out mostly clean with a few moist crumbs, not wet batter.
Allow the pan to cool slightly on a wire rack before serving.
Pro tip: If the top is browning too fast, loosely tent with foil for the last 10–15 minutes.
Visual cue: The edges will pull away from the pan a little and the center will jiggle very slightly but not run.
Step 7: Serve and garnish
Cool for about 15 minutes, then serve warm with whipped cream or vanilla ice cream.
A drizzle of warm caramel elevates the dessert if you want extra sweetness.
Pro tip: For neat squares, chill the cake for 30 minutes before cutting.
Visual cue: The top should be crisp and the pumpkin beneath should feel custardy when sliced.

Expert Tips for Success
- Control your moisture: Canned pumpkin is ideal because it has consistent moisture. If your homemade purée is watery, drain it through cheesecloth or simmer to thicken before using.
- Use real butter: The flavor and browning power of real butter are essential. Margarine won’t give the same caramelization or mouthfeel.
- Watch the bake time: Ovens vary. Start checking at 45 minutes; the goal is a set custard and a browned top. A slightly under-baked center can set more as it cools.
- Even butter distribution: Pour melted butter slowly and in a grid pattern over the cake mix to encourage even pockets of cake and crispness. Using a spoon to spread butter helps if it pools.
- Tent if needed: If the top is darkening too quickly but the center is undercooked, tent loosely with foil to prevent burning while the center finishes.
- Spice balance: Cinnamon is the anchor spice; taste your batter for aroma (not raw eggs) by sniffing — if you want more warmth add a pinch more nutmeg or ginger.
- Nut alternatives: If using nuts, toast them briefly in a dry pan for a minute to bring out their oils before sprinkling on top. This adds a deeper roasted note.
- Make-ahead strategy: This cake holds well. Bake it a day ahead, cool completely, then warm slices in a low oven or microwave before serving with ice cream.
- Pan choice matters: Metal pans brown faster than glass; if using glass, add a few extra minutes to your bake time at the end.
- Cut clean slices: For the cleanest presentation, chill slightly and use a knife dipped in hot water and wiped between cuts.
Storage & Freezing
Fridge storage: Cool the pumpkin dump cake completely before covering tightly with foil or plastic wrap.
Store in the refrigerator for up to 4 days. Reheat individual slices in the microwave for 20–30 seconds, or the whole pan at 300°F for 10–15 minutes until warm.
Freezer storage: To freeze, cut into individual portions and wrap each square tightly in plastic wrap, then place in a freezer-safe bag or container.
Freeze for up to 3 months. Thaw overnight in the refrigerator and reheat gently in a 325°F oven for 10–15 minutes to regain crispness on top.
Reheating tips: For best texture, reheat in a low oven rather than the microwave to revive the top’s crispness.
If microwaving, add a small pat of butter on top before heating to help mimic the original richness.
Variations & Substitutions
Spiced-up top: Swap the yellow cake mix for a spice cake mix for deeper cinnamon and clove notes. This adds instant warmth without extra effort.
Nut swaps and crunch: Use walnuts or pecans toasted and chopped, or sprinkle crushed gingersnaps on top for a ginger snap crunch. Both change texture and add new flavor layers.
Lower-sugar option: Use a reduced-sugar or light cake mix and reduce the added sugar by 2–3 tablespoons; keep in mind the texture may be slightly less tender.
Dairy-free version: Replace evaporated milk with canned full-fat coconut milk and swap butter for a stick of solid coconut oil for a dairy-free take with a subtle coconut background.
Frequently Asked Questions
Q: Can I use pumpkin pie filling instead of pumpkin purée?
A: Don’t use pumpkin pie filling. It contains added sugar and spices, which will throw off the flavor and sweetness of this cake. Use plain pumpkin purée so you control the spice and sugar levels.
Q: My top is soggy after baking — what happened?
A: Soggy tops happen when the butter doesn’t distribute evenly or the cake mix is too thick in places. Next time, drizzle butter in a grid and use a spoon to coax it into dry areas. Also make sure your oven is properly preheated so the top starts to brown right away.
Q: Can I halve the recipe for a smaller pan?
A: Yes. Use an 8×8 or 9×9 pan and reduce bake time by about 10–15 minutes. Start checking at 35 minutes and look for the same visual cues (golden top, set center).
Q: How do I make this less sweet?
A: Reduce the 1 cup of sugar to ¾ cup or use a yellow cake mix labeled as lower sugar. Remember the baked top will still be sweet from the cake mix and butter, so balance with unsweetened whipped cream.
Q: Is this freezer-friendly after baking?
A: Absolutely. Freeze individual portions wrapped tight, thaw in the fridge, and reheat in the oven for best texture. It’s excellent for make-ahead parties or meal prep.
Final Thoughts
This pumpkin dump cake is the sort of recipe you’ll return to every autumn because it’s fast, comforting, and endlessly adaptable.
If this is your first time making it, savor how simple ingredients become something comforting and crowd-pleasing.
Please leave a star rating in the recipe card below and pin this to Pinterest if you loved it.
Conclusion
If you want to see a similar riff on pumpkin dump cake with step photos, I found a clear walkthrough at Pumpkin Dump Cake • Dance Around the Kitchen.
For another version with different notes and serving ideas, check out this take on the recipe at Easy Pumpkin Dump Cake (The Best Fall Dessert Recipe).
Pumpkin Dump Cake
Ingredients
Pumpkin Custard Layer
- 1 15 oz can pumpkin purée 100% pumpkin purée, not pumpkin pie filling.
- 1 12 oz can evaporated milk Adds creaminess to the custard layer.
- 3 large eggs Bind the custard together.
- 1 cup sugar Sweetens the custard layer.
- 1 tsp cinnamon Main spice for flavor.
- ½ tsp nutmeg Adds warmth and depth.
- ½ tsp ginger Provides a spicy kick.
- ½ tsp salt Enhances all flavors.
Topping Layer
- 1 box yellow cake mix For a quick and easy topping.
- 1 cup melted butter Real butter adds flavor and richness.
- ½ cup chopped pecans Optional for added texture and flavor.
Instructions
Preparation
- Preheat your oven to 350°F (175°C) and grease a 9×13-inch baking dish thoroughly.
- In a large bowl, whisk together the pumpkin purée, evaporated milk, eggs, sugar, cinnamon, nutmeg, ginger, and salt until smooth.
- Pour the pumpkin custard into the prepared 9×13 pan and level the surface gently.
Topping
- Evenly sprinkle the dry yellow cake mix over the pumpkin layer.
- Drizzle melted butter slowly and evenly over the top. Add pecans if using.
Baking
- Bake for 50–55 minutes, until the top is golden brown and the center is set.
- Allow to cool slightly before serving.
Serving
- Serve warm with whipped cream, vanilla ice cream, or a drizzle of caramel.