I first made these red velvet cookies for a holiday cookie swap and they vanished before I could get a second cup of coffee. They’re soft, slightly cakey, and have that classic cocoa-kissed tang you expect from red velvet — but in cookie form. Perfect for celebrations, school lunches, or when you want a festive treat with minimal fuss.
Why you’ll love this dish
These cookies hit a sweet spot: familiar, comforting, and just a little bit showy thanks to their red color. They’re great when you want a crowd-pleasing dessert that looks special without requiring complicated technique.
“Soft, tender, and beautifully red — these were the hit of our cookie swap. Everyone asked for the recipe.” — A satisfied tester
Why try them?
- Kid-approved and party-ready. The color makes them festive for Valentine’s Day, Christmas, or birthday trays.
- Simple pantry staples. Nothing exotic here — mostly flour, sugar, butter, and a touch of cocoa.
- Flexible: easy to frost, dust, or roll in sprinkles for a variety of finishes.
How this recipe comes together
This is a straightforward creaming-method cookie with a few important steps so the texture stays soft and the color stays vivid.
Overview:
- Cream butter and sugar until light.
- Add eggs and vanilla.
- Whisk dry ingredients separately.
- Alternate adding dry ingredients and buttermilk to keep the dough tender.
- Add red food coloring; chill dough for structure and deeper flavor.
- Shape into 1-inch balls and bake briefly for soft centers.
What you’ll need
- 3 cups all-purpose flour
- 1 1/2 cups granulated sugar
- 1 cup unsalted butter, softened (room temperature)
- 2 large eggs
- 2 tablespoons red food coloring (gel recommended for best color without thinning the dough)
- 2 tablespoons unsweetened cocoa powder
- 1/2 cup buttermilk (or substitute: 1/2 cup milk + 1/2 tablespoon lemon juice or 1/2 cup plain yogurt thinned with a little milk)
- 1 teaspoon baking soda
- 1 teaspoon vanilla extract
- 1/2 teaspoon salt
Ingredient notes:
- Gel food coloring gives the brightest red without adding liquid. If using liquid dye, start with less and increase as needed.
- Unsweetened cocoa provides that subtle chocolate note without overpowering the velvet flavor.
- If you don’t have buttermilk, the milk + lemon juice trick approximates acidity and tenderness.
Step-by-step instructions
- Preheat no earlier — start with the mixing so the butter is ready when you need it.
- In a large bowl, cream the softened butter and granulated sugar until the mixture is light and fluffy. Use a stand mixer or hand mixer on medium speed for about 2–3 minutes.
- Beat in the eggs one at a time, scraping the bowl after each addition. Stir in the vanilla extract.
- In a separate bowl, whisk together the flour, cocoa powder, baking soda, and salt until evenly combined.
- Add the dry ingredients to the wet mixture in three additions, alternating with the buttermilk. Begin and end with the dry ingredients. Mix on low speed and stop as soon as the flour disappears — do not overmix.
- Stir in the red food coloring until the dough is an even, vibrant red. Taste a small amount (optional) to check sweetness and balance.
- Cover the dough and chill for at least 30 minutes. Chilling firms the dough for cleaner shaping and improves texture. For best flavor and color depth, chill 1–2 hours or overnight.
- Preheat the oven to 350°F (175°C). Line baking sheets with parchment paper.
- Roll the dough into 1-inch balls and space them about 2 inches apart on the prepared sheets.
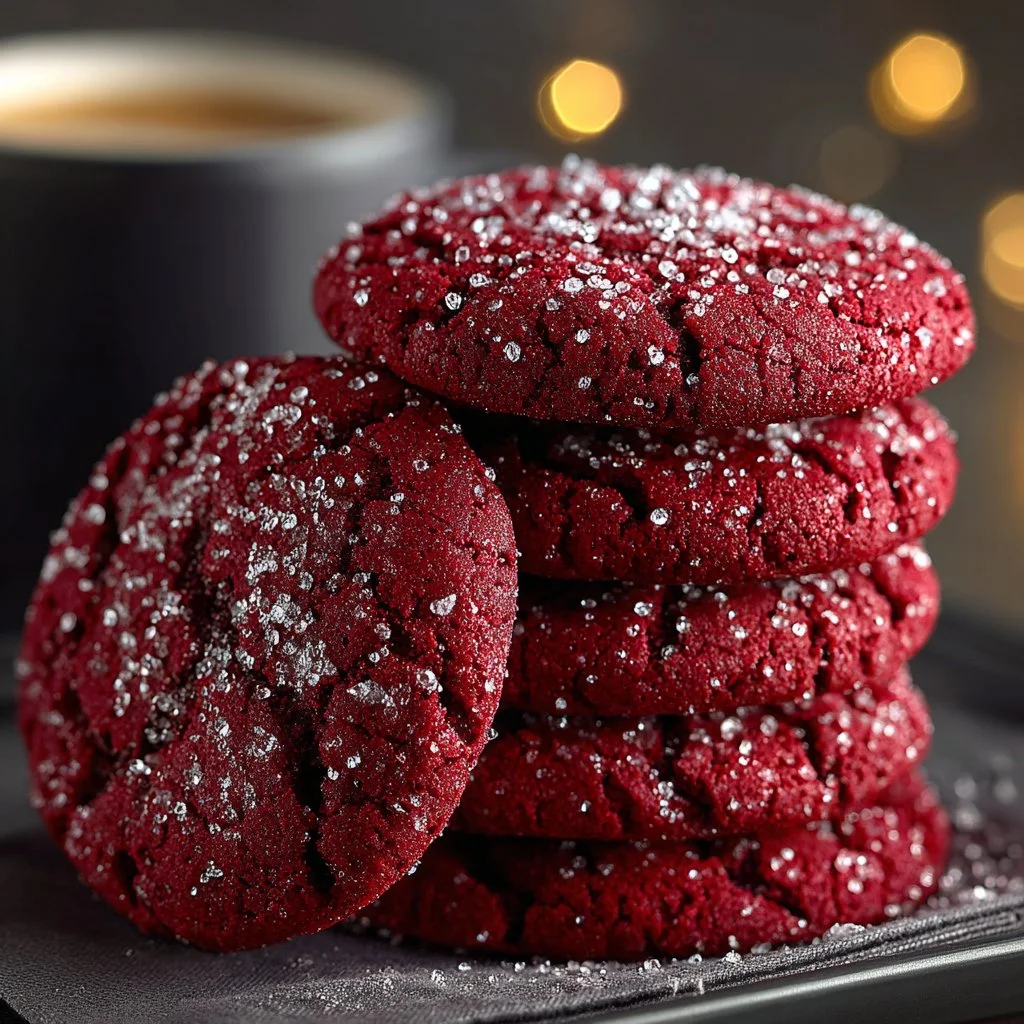
- Bake for 8–10 minutes, or until the edges are set but the centers remain slightly soft. They’ll firm more as they cool.
- Let the cookies cool on the sheet for 3–5 minutes, then transfer to a wire rack to cool completely.
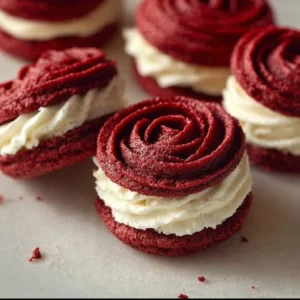
- Decorate as desired with cream cheese frosting, sprinkles, or a light dusting of powdered sugar.
Best ways to enjoy it
- Serve warm with a smear of cream cheese frosting or a small dollop piped on top. The tang of cream cheese pairs perfectly with the cocoa note.
- Pair with cold milk, coffee, or a lightly sweetened hot cocoa for a cozy combo.
- For a dessert plate, stack two cookies with frosting in the middle to make mini sandwich cookies.
- Add festive touches: white chocolate chips, coarse sugar, or sprinkles before baking for texture and color contrast.
How to store & freeze
- Room temperature: Store in an airtight container for up to 3 days. Place a sheet of parchment between layers to prevent sticking.
- Refrigerator: Keep in an airtight container for up to 1 week. Bring to room temperature before serving for best texture.
- Freezer: Freeze baked cookies in a single layer on a tray until firm, then transfer to a freezer bag or container for up to 3 months. Thaw at room temperature; refresh in a 300°F (150°C) oven for 5–7 minutes if you want them warm.
- Dough freezing: Scoop dough balls onto a parchment-lined tray, freeze until solid, then transfer to a bag. Bake from frozen with an extra 1–2 minutes.
Food safety tip: Use fresh eggs and store finished cookies appropriately. If you leave frosting-covered cookies at room temperature, keep them out of direct heat and consume within 24–48 hours if frosting contains dairy.
Pro chef tips
- Don’t skip chilling. Chilling firms the butter and helps the cookies spread less, keeping centers soft.
- Softened butter vs. melted: Use softened (not melted) butter so you can trap air while creaming; that gives the cookie lift and tender crumb.
- Cocoa distribution: Sift cocoa with the flour to avoid streaks and uneven color.
- Adjust color gradually: Gel paste coloring is potent — add more a little at a time until you reach your preferred shade.
- Test one tray first. Oven temperatures vary. Bake one sheet first to confirm timing and texture before finishing all batches.
Creative twists
- Cream cheese-stuffed: Press a small ball of softened cream cheese into the center of each dough ball before baking; freeze briefly so it holds shape.
- White chocolate chip: Fold 3/4 cup white chocolate chips into the dough for sweet, melty pops.
- Gluten-free: Substitute a 1:1 gluten-free baking flour blend; check for added xanthan gum to maintain structure.
- Vegan option: Use vegan butter, an egg replacer (like 2 flax eggs for texture), and a non-dairy buttermilk (plant milk + acid). Baking results will be slightly different but still tasty.
- Sprinkle rim: Before baking, roll dough balls in festive sprinkles or sanding sugar to create a party-ready exterior.
Your questions answered
Q: Can I make the dough ahead of time?
A: Yes. Chill the dough tightly covered for up to 48 hours for slightly better flavor. You can also freeze shaped dough balls for up to 3 months and bake from frozen.
Q: My cookies spread too thin — what happened?
A: Likely the butter was too soft or the dough wasn’t chilled. Use properly softened butter (not greasy) and chill dough 30–60 minutes to reduce spreading.
Q: Can I skip the red food coloring?
A: The flavor will still be red velvet, but without dye the cookies will look like cocoa cookies. You can use a smaller amount of natural beet juice for color, though it may slightly affect moisture and flavor.
Q: How can I make these chewy instead of cakey?
A: Reduce the flour by 2–4 tablespoons, avoid overmixing, and consider baking 1 minute less. Using an extra yolk (remove one white) increases chewiness.
Q: Is it safe to eat the dough?
A: No. This recipe contains raw eggs and uncooked flour. Always bake before consuming.
Conclusion
If you want more red velvet cookie inspiration or variations to test alongside this recipe, check out Jane’s NYC take on the cookie at NYC Red Velvet Cookies! – Jane’s Patisserie. For another well-tested home-baker version and helpful notes, see this Red Velvet Cookies Recipe from Simply Recipes.

Red Velvet Cookies
Ingredients
Dry Ingredients
- 3 cups all-purpose flour
- 2 tablespoons unsweetened cocoa powder Provides a subtle chocolate note.
- 1 teaspoon baking soda
- 1/2 teaspoon salt
Wet Ingredients
- 1 1/2 cups granulated sugar
- 1 cup unsalted butter, softened Should be at room temperature.
- 2 large eggs
- 1 teaspoon vanilla extract
- 1/2 cup buttermilk Can substitute with milk + lemon juice or yogurt thinned with milk.
- 2 tablespoons red food coloring Gel recommended for best color.
Instructions
Preparation
- Preheat the oven to 350°F (175°C) and line baking sheets with parchment paper.
- In a large bowl, cream the softened butter and granulated sugar together until light and fluffy for about 2-3 minutes.
- Beat in the eggs one at a time, scraping the bowl after each addition, then stir in the vanilla extract.
- In a separate bowl, whisk together the all-purpose flour, cocoa powder, baking soda, and salt until combined.
- Add the dry ingredients to the wet mixture in three additions, alternating with the buttermilk. Begin and end with the dry ingredients. Mix on low speed until just combined.
- Stir in the red food coloring until the dough is a vibrant red and evenly mixed.
- Cover the dough and chill for at least 30 minutes for improved texture.
Baking
- Roll the chilled dough into 1-inch balls and place them about 2 inches apart on the prepared baking sheets.
- Bake for 8-10 minutes or until the edges are set but the centers remain slightly soft.
- Let the cookies cool on the baking sheet for 3-5 minutes, then transfer them to a wire rack to cool completely.
Serving
- Decorate as desired with cream cheese frosting, sprinkles, or a dusting of powdered sugar.