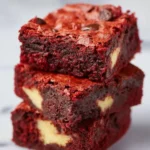
I’ve been making these red velvet brownies for family parties and quiet weeknight dessert cravings for years. They’re a cross between a tender cake and a fudgy brownie, with that show-stopping red color and bursts of chocolate chips in every bite. This version uses buttermilk and baking soda for lift, cocoa for a mild chocolate tang, and a generous tablespoon of red food coloring for the classic look — perfect when you want something festive without fuss.
Why you’ll love this dish
These brownies give you big flavor for little effort. They’re fast to mix, bake in about half an hour, and hold up well for parties, bake sales, or a simple after-dinner treat. The texture sits nicely between cake and brownie — moist, tender, and studded with melty chips. Because they’re made in a 9×13 pan, they’re great for feeding a crowd or slicing into neat squares for gifting.
“I made these for Valentine’s Day and everyone asked for the recipe — soft, vibrant, and so easy!” — a repeat tester
How this recipe comes together
Quick overview: cream butter and sugar, add eggs and vanilla, then buttermilk plus red coloring. Sift dry ingredients separately, fold them into the wet mix until just combined, stir in chocolate chips, and bake in a greased 9×13 pan for 30–35 minutes. The end result is a moist, evenly baked tray of bright red brownies with melty chocolate pockets.
What you’ll need
- 1 cup unsalted butter, softened (sub: equal amount vegetable shortening for dairy-free; expect slight texture change)
- 2 cups sugar (can reduce to 1 3/4 cups if you prefer less sweet)
- 4 large eggs, room temperature (for best rise and even texture)
- 1 teaspoon vanilla extract
- 1 cup buttermilk (sub: 1 cup milk + 1 tbsp lemon juice, let sit 5 minutes)
- 2 1/2 cups all-purpose flour (for gluten-free use a 1:1 GF flour blend)
- 1/2 cup unsweetened cocoa powder (Dutch-process will darken color and reduce acidity)
- 1 teaspoon baking soda (reacts with buttermilk to give lift)
- 1 teaspoon salt
- 1 tablespoon red food coloring (adjust to preference; use gel for less liquid)
- 1 cup chocolate chips (semisweet or dark; white chocolate also works for contrast)
Directions to follow
- Preheat your oven to 350°F (175°C). Grease and flour a 9×13-inch baking pan, or line it with parchment leaving an overhang for easy lifting.
- In a large bowl, cream the softened butter and sugar until light and fluffy, about 2–3 minutes with a hand mixer.
- Add the eggs one at a time, beating briefly after each addition. Stir in the vanilla.
- Mix in the buttermilk and the red food coloring until the batter is a consistent color. Use gel coloring if you want less added liquid.
- In a separate bowl, sift together the flour, cocoa powder, baking soda, and salt.
- Add the dry mixture to the wet in two additions. Mix gently until just combined — don’t overmix. A few streaks of flour are okay.
- Fold in the chocolate chips by hand.
- Pour the batter into the prepared pan. Smooth the top with a spatula so it bakes evenly.
- Bake for 30–35 minutes. Insert a toothpick in the center — it should come out with moist crumbs, not wet batter.
- Cool completely in the pan on a rack before slicing. Chilling briefly makes cleaner slices.

What to serve it with
- Warm with a scoop of vanilla ice cream and a drizzle of chocolate sauce.
- Top with a tangy cream cheese frosting for a classic red velvet finish.
- Dust lightly with powdered sugar and serve with fresh berries for a brighter plate.
- Cut into small squares and arrange on a platter with mini cupcakes for a party dessert table.
Storage and reheating tips
- At room temperature: store brownies in an airtight container for up to 2 days.
- Refrigerator: keep in an airtight container for 5–7 days. Let come to room temperature or warm briefly before serving.
- Freezer: wrap tightly in plastic wrap and foil, or freeze in a sealed container for up to 3 months. Thaw overnight in the fridge or at room temp for a few hours.
- Reheat slices gently in a microwave for 10–15 seconds or warm in a 325°F oven for 5–7 minutes to revive softness.
- Food safety: because these contain eggs, store promptly and don’t leave at room temperature for more than 2 hours.
Pro chef tips
- Room-temperature eggs and butter give a smoother batter and better rise.
- Don’t overmix once the flour is added — overworking develops gluten and makes brownies tough.
- If you want deeper red without adding more food coloring, use a higher-iron cocoa? actually Dutch-process cocoa reduces acidity and can mute the red; stick with natural cocoa for brighter color.
- Use gel food coloring to avoid thinning the batter.
- If the top browns too quickly, tent loosely with foil halfway through baking.
Creative twists
- Cream cheese swirl: dollop softened cream cheese mixed with powdered sugar, swirl with a knife before baking.
- Nutty add-ins: fold in 1/2 cup chopped pecans or walnuts for crunch.
- Cheesecake brownies: press a thin cheesecake layer on top before baking (bake a bit longer).
- Vegan version: substitute vegan butter, use flax “eggs” (4 tbsp ground flax + 12 tbsp water), plant-based milk + 1 tbsp vinegar as buttermilk, and check chips are dairy-free.
- Mini muffin version: bake in lined mini muffin tins at 325°F for 12–15 minutes for bite-sized treats.
Your questions answered
Q: Can I use regular milk instead of buttermilk?
A: Yes — add 1 tablespoon lemon juice or white vinegar to 1 cup milk, let sit 5 minutes. That acidity activates baking soda for proper lift.
Q: How do I know the brownies are done without overbaking?
A: Use the toothpick test. It should come out with moist crumbs, not wet batter. The center will set slightly more as it cools.
Q: Can I reduce the red food coloring?
A: Yes. Red food coloring is cosmetic — reduce to 1–2 teaspoons for a subtler hue. Gel color gives more punch with less liquid.
Q: Will these work with melted butter or oil?
A: Melted butter will produce a slightly fudgier crumb. Oil yields a denser, moister texture. Adjust by cooling melted butter before mixing eggs to avoid cooking them.
Q: Can I frost or freeze them?
A: Frosting is optional — cream cheese frosting is classic. Freeze unfrosted brownies wrapped well for up to 3 months; frost after thawing for best results.
Conclusion
If you want a silky cream cheese finish, try this detailed guide for Red Velvet Brownies with Cream Cheese Frosting (with Video …). For a version that combines cheesecake and brownies, this take on Red Velvet Cheesecake Brownies – Pretty. Simple. Sweet. is a delicious inspiration.
Red Velvet Brownies
Ingredients
Brownie Batter
- 1 cup unsalted butter, softened sub: equal amount vegetable shortening for dairy-free; expect slight texture change
- 2 cups sugar can reduce to 1 3/4 cups if you prefer less sweet
- 4 large eggs, room temperature for best rise and even texture
- 1 teaspoon vanilla extract
- 1 cup buttermilk sub: 1 cup milk + 1 tbsp lemon juice, let sit 5 minutes
- 2 1/2 cups all-purpose flour for gluten-free use a 1:1 GF flour blend
- 1/2 cup unsweetened cocoa powder Dutch-process will darken color and reduce acidity
- 1 teaspoon baking soda reacts with buttermilk to give lift
- 1 teaspoon salt
- 1 tablespoon red food coloring adjust to preference; use gel for less liquid
- 1 cup chocolate chips semisweet or dark; white chocolate also works for contrast
Instructions
Preparation
- Preheat your oven to 350°F (175°C). Grease and flour a 9×13-inch baking pan, or line it with parchment leaving an overhang for easy lifting.
- In a large bowl, cream the softened butter and sugar until light and fluffy, about 2–3 minutes with a hand mixer.
- Add the eggs one at a time, beating briefly after each addition. Stir in the vanilla.
- Mix in the buttermilk and the red food coloring until the batter is a consistent color. Use gel coloring if you want less added liquid.
- In a separate bowl, sift together the flour, cocoa powder, baking soda, and salt.
- Add the dry mixture to the wet in two additions. Mix gently until just combined — don’t overmix. A few streaks of flour are okay.
- Fold in the chocolate chips by hand.
- Pour the batter into the prepared pan. Smooth the top with a spatula so it bakes evenly.
Baking
- Bake for 30–35 minutes. Insert a toothpick in the center — it should come out with moist crumbs, not wet batter.
- Cool completely in the pan on a rack before slicing. Chilling briefly makes cleaner slices.